This post is part of the Design Challenge Series here at Sew Lux Fabric.
See all the previous blogger interviews and tutorials here.
Hello, I'm Lindsay, and I blog at Lindsay Sews and Craft Buds. I'm excited
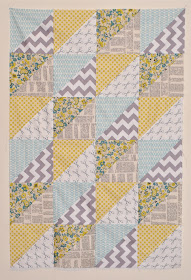
to share with you how to make this Quick Triangles Baby Quilt. Specifically, I'd like to share how you can make half square triangles eight at a time!
I've made half square triangles 1, 2, or 4 at a time, but never 8 at
once. It's pretty amazing, and with the large and speedy quilt blocks,
you can totally make this quilt top in an evening!
Materials:
- 6 fat quarters
- 5/8 yard border fabric
- 1 1/2 yards backing fabric
- 3/8 yard binding fabric
- Crib size (45" x 60") quilt batting
Finished Quilt Size: 38" x 53"
This
is my curated bundle from Sew Lux fabrics, which includes grays, yellow
and aqua fabrics in modern prints by various designers. I wanted to
challenge myself to make an entire quilt (crib size!) from these six fat
quarters, so I went with a familiar quilt block, but made it as large as
possible.
First, break your fat quarters into three sets of two, pairing up prints that coordinate well with each other. I chose to pair each of my gray/white prints with a color.
Open up two of your fat quarters, stack them, and trim to an 18" x 18" square. We are going to use these to make half-square triangles, 8 at a time.
Re-stack your 18" x 18" squares with right sides facing. Use your ruler and a pen to mark a diagonal line from corner to corner on one wrong side. Pin squares together at the corners to hold the fabric in place while you sew.
Stitch a line 1/4" from the edge of one marked line, on both the left and right sides of the line. Repeat with the other marked line.
After you've stitched the four long lines, resist the urge to cut along the marked lines just yet. Instead, use the stitch lines to locate the center of the block. With your ruler and rotary cutter, cut both a vertical line and a horizontal line directly down the center of the fabric.
Take each of your four sections, and now your may cut down the center of your stitches, along the line you marked earlier. You should have 8 half square triangle units.
Open up your half square triangles and press the seams open.
Use a square ruler to trim each block to 8" x 8". Make sure to line up the diagonal line of the ruler with your half square triangle before you cut.
Here are the eight 8" half square triangle blocks from just two fat quarters. Repeat with the other fat quarters, and you should have 24 total blocks.
Arrange your blocks as desired. There are many ways to arrange half square triangle blocks in a quilt. You can make chevrons, diamonds, or just mix them all up. I arranged the blocks in a 4x6 grid and kept them in a set order, with the colors pointing to the upper-left and the grays pointing to the lower-right.
With right sides facing, pin together the blocks in each row and stitch. Press the seams open.
Next, join together the rows with right sides facing, and pin at each seam. Stitch together the rows and press the seams open.
To make the border, cut your border fabric 5" x the width of fabric, for 4 strips total. Starting in one corner, attach a border strip to the top, then trim the excess. Repeat with the bottom. Stitch the ends of these strips to the other to border strips you've cut for the sides, to lengthen them. Press the seams open, then stitch the left and right border strips to the quilt and trim.
Press the seams open. Baste, quilt and bind as desired. After quilting and before binding, I trimmed the borders to 4 1/4" to keep them even all the way around.
This pattern is very beginner-friendly, and I'd recommend it for showing off strong prints. I hope you've enjoyed this tutorial, and if you like this fabric combo, you can purchase a Design Challenge bundle kit at Sew Lux!


How lovely. I think that ruler is interesting too. I'll have to check it out.
ReplyDeleteThanks for a great tutorial.
Great tutorial for a super cute quilt!!
ReplyDeleteThat looks very cute and easy! Great tutorial!
ReplyDeleteThat is a really cute quilt and I love the larger prints and the size!
ReplyDeleteSo pretty! I think the prints and the finished quilt design are perfectly paired.
ReplyDeletethank you, I want to make this, I have a new grand baby, but I have a couple of questions, when you say cut horizontally and then vertically directly down the center of the fabric, where do you mean? the center of each of the 4 sections or the center of the big beginning square??? Are they to be cut corner to corner or edge to edge? thanks.
ReplyDeleteI can see that the cuts are edge to edge on the big 18" square both horizontally and vertically. The next cuts are on the smaller four sections diagonally.
DeleteCongrats on the new grand baby!!