Pages
▼
Monday, January 21, 2013
Sweet Chevrons Pillow Tutorial
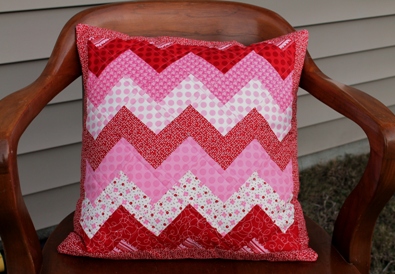
I am so excited to share this happy pillow project using the 2013 Be Mine Bundle. This is the first of two projects I will be making entirely from the bundle of 8 prints. Ready?
For this 18" pillow, you'll need:
- 8 coordinating FQ of red & pink prints (I used the 2013 Be Mine Bundle)
- 1 FQ of muslin or other fabric for backing
Note: Use a 1/4" seam throughout unless noted.
The first thing you need to do is decide what order you'd like your fabrics to be in the Chevron on the pillow. Label your prints as "A" "B" "C" "D" "E" "F" "G" and "H".
Cut two 2" x 18" strips from each of your red and pink FQs.
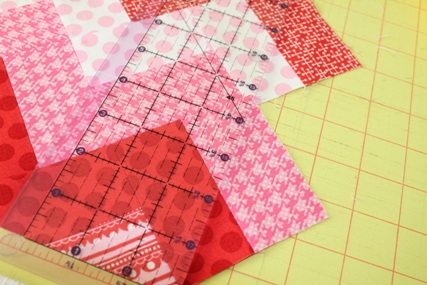
You'll sew the strips together along the long side. Sew strips in sets of two as follows:
AB, BC, CD, DE, EF, FG, GH, and HG.
(Note: for this part, I am using different prints for illustration purposes only. The diagram below should help this make more sense if you are confused. The above photo is meant to illustrate AB and BC strips.)
Measure the width of your strips - mine were 3.5" wide.
Subcut the pieced strips into 3.5" squares. (Note: if your's measured something different, adjust your square size.) You should be able to get 5 squares from each strip set, although we'll only need 4 from each one.
Once you have sewn and subcut all your strips, you will then lay them out in a chevron pattern. You'll need to lay these out on point (diagonal/diamond) to make the pattern. Refer to the diagram below.
Ok, now its time to piece the blocks together. You'll be working in rows.
Sew the blocks together in diagonal rows.
Then sew the rows together, being sure to pin at the intersections. Lots of pins is good to get everything lined up. :-)
Keep sewing until you get all the rows joined.
Press everything really well before moving on. I pressed all my seams open as I went - but that is a personal choice. I sometimes press to the side and sometimes press open - just depends on what I am making. Here I went with pressing everything open to keep the project pretty flat.
Now, you'll trim this down - trim 1/4" away from the points along the sides.
Mine measured about 15.5 inches square after trimming.
From one of the FQs, cut four 2" x 18" strips to make borders.
Add borders - top and bottom and then the sides. (TIP: Keep the border strip on the bottom - this will slide through the machine easier since it will be nice and flat without the seams. I pressed toward the borders.)
Next, press your pieced pillow top well (again), layer with batting, and backing (I used a FQ of muslin). You could just use a layer of flannel and omit the batting and backing/muslin, if you prefer. Baste and quilt as desired.
I quilted diagonal lines along the block seams. And then free motioned some loops in the border (which, you can hardly see because the print is busy). Note - if you are new to free motioning, a busy print and coordinating thread hides any errors! ;-)
Press the quilted top and trim to 18" square.
Next, grab two more of the FQ pieces for the backing. For each piece, fold the selvage over, press, and stitch down.
Then trim them to size 13" from folded selvage edge by 18" wide.
Now, place your pillow front RIGHT SIDE UP on your table, and layer one of the backing rectangles on top so they are RIGHT SIDES TOGETHER. Selvage edge should be in the middle and raw edge along the outside edge of the pillow front.
Then, layer the second backing rectangle on top - the two pieces (selvage ends) will overlap in the middle.
Pin all the way around. Then sew all the way around the square. Used a 3/8" seam for this part.
Remove the pins, turn inside out and press and ENJOY!
The back should look like this ....
I hope you enjoyed this tutorial. I have one more project in the works with the leftovers from this project, so stay tuned! :-)
As always, I'd love to see your version if you make one - please send me a link or comment. If you have any questions about the tutorial, please ask in the comments or send an email.
Happy Sewing! :-)


AHHH I see about the chevrons now! Thanks!! I just adore this RED!!
ReplyDeleteI love this! Thanks for the tutorial!
ReplyDeleteThis is adorable!
ReplyDeleteOh I love it!
ReplyDeleteI love your tutorials they are so clear thank you for taking the time to do them x
ReplyDeleteA gorgeous pillow! and no half square triangles...lol!
ReplyDeletehugz
This is the prettiest pillow! Great Tutorial too. Have bookmarked it to do and a project. Love your bundles too, you ladies put such pretty colours/patterns together! Thank you for the inspiration.
DeleteWill an 18" pillow form fit in this cover fairly well? Or do you end up making a pillow to fit? I love how you did the chevrons, what a neat idea, so used to the half-square triangle method and I appreciate seeing something different!
ReplyDelete~Brandy