Sunday, December 26, 2010

Present Time

Hi everyone!  We hope that you all had a very Merry Christmas with your family and friends.  We got some snow late Christmas evening and today ... about 5 inches or so.  We don't get a lot of snow in these parts, so it has been really fun and beautiful to have a white Christmas!

Linda (aka Mom) took a break from making her Little Quilts (more on those to come this week!) to whip up this really cute wall hanging, which she entitled "Present Time."
 
Here's a closer view of the embroidered panels. Aren't they the cutest?
We hope you are staying warm and are continuing to enjoy the holiday season!  More to come this week!

Tuesday, December 21, 2010

Wishing you a BLISSful holiday season!

Hi everyone!  As Christmas quickly approaches, I am sure you are like me and my mom ... whipping up last minute projects!  I recall last Christmas eve furiously stitching a binding and then taking the fresh quilt from the dryer as we headed out the door to open gifts with family on Christmas morning!  Can any of you relate?!  :-) 

We're hoping that you have a blissful (and relaxing!) holiday season and that you'll maybe be able to sew something up for yourself!  And if you're chasing away any winter blues, try working with some of these lovely Bliss fabrics ... in fact, we're offing 10% off all Bliss fabrics, including Bliss bundles, now through 12/31/10.  Please use the coupon code "blissful" upon checking out at the shop!
 
A special "thank you" to Rachel, a fellow blogger and friend from Flickr for mentioning our site on her blog today.  She does great work and helps us all "do. Good stitches" for others.  :)

Sunday, December 12, 2010

Handmade Holiday Giveaway Winners

Hello!  Hope you've all enjoyed the weekend.  I wanted to stop by and share who won the giveaways from last week.  If its you, please contact us at sewlux {at} gmail {dot} com and we'll get your prize out to you!

Ornament Winners: Laura and cdketchie
Coasters Winner:  Jessica
Scrappy Fabric Cards: Jessica

Congratulations winners!

Stop back by later this week ... we'll be sharing some new little quilts that will be headed to the shop!

Friday, December 10, 2010

Handmade Holiday: Scrappy Cards

Happy Friday folks!  I have one more project to share with you as part of our Handmade Holiday series.  And those of you who know me well, will know that I also love to make cards ... so here's a combo project! 

First ... grab some scraps that you love!  I am using some favorites here ...
Stitch them into a block ... approximately 4" x 5-1/4".  Then pink the edges.  Don't worry if its not perfect ... it will just add to the charm!  :-)
Next, stitch it to a card base (mine is a 4-1/4" x 8-1/2" strip of card stock folded in half so the fold is on top).  Tie a ribbon around the card and tape down a piece of card stock with a sentiment, tucking it slightly under the ribbon. That's all there is to it!
Now, granted I have quite a few stampin' supplies ... so I stamped a sewing machine, a fun sentiment and inked all the edges a bit by dabbing a small scrap of fabric onto an ink pad and then on the edges.  But you could easily print a sentiment or monogram off your computer. 

A set of cards would be a fun gift for a fellow crafter or use Christmas fabric scraps and print a Merry Christmas sentiment for a holiday version!

Leave a comment on this post to win an assortment of four handmade scrappy cards!  Comment must be posted by 11:59 PM tonight ... winners for all of this week's giveaways will be announced tomorrow so be sure to come back and see if its you!  :-)

Thanks for stopping by!

Thursday, December 9, 2010

Handmade Holiday: Gift Pouch

Hi again!  Today, we're sharing a quick and easy tutorial for a gift case/pouch.  Ready to get started?  You'll need a little fabric ... we used Fandango Sarabande Sand, Portico Sand Celadon, and Canto Ole.
I started with two pieces of fabric - 6.5" x 17".  Pin them right sides together and stitch around the edges being sure to leave a small opening on one side to turn it right sides out.
 Once you've turned your little case right sides out, fold one side over to create a pocket and stitch all the way around the rectangle.  This will close the gap you left and create the pocket.  You can see that I can fit an A2 envelope in the pocket easily.
Now, to make the tie to hold it closed, you'll need a strip 2" wide and approximately 40" long.  Fold this in half, pressing as you go.  Then fold the edges to the middle as seen in the photo below. Stitch around the open edges to hold it together.
The next step is to line the center of the tie to the center of the back of your pouch.  Line it up and stitch it down.  I just stitched a small square over the tie.  Be careful not to stitch the pouch closed! :-)
 Now ... fill it up!  Its big enough to hold a set of cards ... some make up brushes ...
 ... or some stamps (here shown in a CD case) ...
There's so many things you could gussy up with a pretty little pouch.  :)  What would YOU put in it?  If you decide to make one, we'd love to see it!  Please link us to your photo in the comments below.

And speaking of comments ... leave one on this post to win this pouch filled with some handmade greeting cards!  Comment must be left on this post by 11:59 on 12/10/10 to be entered to win.

Thanks for stopping by!  See you tomorrow :-)

Wednesday, December 8, 2010

Handmade Holiday: Reversible Coasters

Hello again!  We're back today with a super quick and easy gift - a set of reversible coasters.  And the possibilities are endless with these when it comes to adding your own special touch. 
To start, you'll need two 5" squares of fabric and a 5" square of cotton batting for each coaster.  Then just layer the fabrics right sides together, stack them on the batting square and pin.  Then stitch a 1/4" seam around the edges, leaving an opening for turning.  Turn them right sides out as you would if making a pillow and stitch around the edges to keep the layers in place.  That's it!

You can add more quilting if you like or piece your coasters with strips, make a small version of a favorite block or use some embroidery in the middle. It's totally up to you! 

A tip for this project - a walking foot helps keep the layers in place when sewing them together and then when stitching around the edges to finish the coaster.  I also lengthen my stitch length on my machine when using a walking foot to help the fabric layers move through more smoothly.

In this project, we've used Fandango Sarabande Ole and Portico Sand Celadon.

Leave a comment below if you'd like a chance to win this pair of coasters!  Comment must be on this post and be entered by 11:59 PM on Friday.  Winners will be posted on Saturday!

Thanks for stopping by!  See you tomorrow :-)

Tuesday, December 7, 2010

Handmade Holiday: Can Cover

 Hello again!  We're back with another quick & easy Handmade Holiday gift idea ... we're calling this one the "can cover."  Think of all the things that you can put in a can ... pens, pencils, scissors, rulers, etc. This is the perfect gift for a teacher, fellow crafter ... or yourself!  And I bet you have a few scraps you couldn't bear to get rid of that would be perfect to use and put on display!  Let's get started!

First, you need an empty can.  I used a famous maker's chicken noodle soup can, washed and label removed, of course!  I measured my can and it was 3-7/8" high and 8-1/4" around.  I added a 1/2 inch to each of those measurements for my foundation piece.  (Note: in hindsight, I would add an inch to the height measurement - it'll be easier later!)

Cut out a foundation piece ... I used some some Bella Solid Snow here.
Next, take some scraps and start stitching them down.  Here, I started with a piece of Designer Houndstooth in Gray and then added some strips from other projects.  Lay the next strip right side down overlapping the first strip. Stitch, folder over, press and repeat.
 Keep adding strips until you get the foundation piece covered and then trim it back down to size.
 Next, stitch a scant 1/4 seam to form a tube and make sure it will fit snugly around the can.
Once you've checked this, then you just turn the tube right side out and press under about 1/4" along the top and bottom and stitch in place.  (Note - this is where it would be better to have more wiggle room to press the edges to the inside.  A 1/4" extra along the top and bottom was a little tight!  So add about inch to your original height measurement when cutting your foundation piece.) 

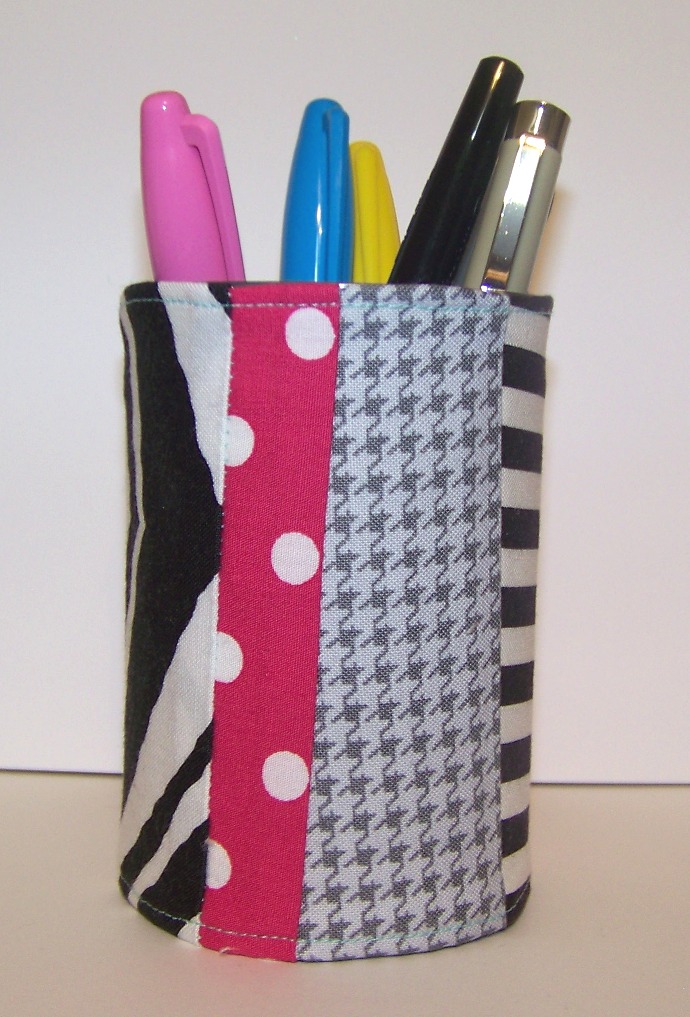
Then put your can in its new "outfit" and admire your work!  :-)
So what do you think?  What would you use a covered can for?  If you decide to make some can covers, we'd love to see them!  Please leave a link to your photo or blog post so we can check it out! 

Back tomorrow with another project!  See you then! :-)

Monday, December 6, 2010

Handmade Holiday: Quilted Ornaments

Happy Monday everyone!  Today we're kicking off our Handmade Holiday week!  We'll be sharing a quick and easy gift idea every day this week AND offering up a few giveaways along the way ... so be sure to comment and check back to see if you've won! :-)

To start off the week, we've got a few examples of quilted ball ornaments.  These ornaments are really easy to make and there are lots of great tutorials and videos available online for the instructions.  These were made by Jessica McQuaig, a customer and seasoned professional at making these beautiful ornaments.

This first ornament is made with Designer Beads in Red and Mist from our Free Spirit Fabrics. I love this color combination for the holidays, a little nontraditional, but very fun and modern!
And Jessica also made a few in several different Fandango fabric combinations.  This one is Sarabande Sand and Canto Ole. 
 The one below is in Sarabande Sand and Sarabande Ole.
 And finally, Sarabande Ole and Portico Sand Celadon.
Aren't they pretty!?  We've got two different Fandango Fat Quarter bundles and a Designer Beads bundle in the Custom Bundles section of the shop ... just add some Styrofoam balls and sequin pins and you'll be on your way!

Leave a comment on this post for a chance to win one of these beautiful Fandango ornaments!  Two winners will be chosen.  Comments must be made by 11:59 pm on Friday, December 10th.  Winners will be announced on Saturday, December 11th.

Tuesday, November 30, 2010

Welcome!

Welcome to the Sew Lux Fabric & Gifts Blog!  We're so excited that you've stopped by to visit.

We will be updating this blog over the course of this week ... making it look pretty as well as sharing info on our Handmade Holiday series which takes off this weekend!  Stop by for project ideas, giveaways and more.

In the meantime, shop our store this week and save 10% off your purchase with the coupon code "holiday" - give yourself the gift of fabric!  :)

See you soon!