Showing posts with label table runner. Show all posts

Tuesday, July 22, 2014

Tutorial : Snowy Stars Table Runner


This tutorial is part of our Christmas in July series of tutorials.

I'm working with this fun bundle from Be Jolly by Deb Strain for Moda.  I actually have two different projects from this bundle to share.  In this tutorial, I am sharing a quick and easy table runner using the Bloc Loc HRT ruler and the blues from our Be Jolly bundle.  (Check out my other tutorial with the red and greens.)


Project Requirements: 

Finished runner measures approximately 11.5 x 31.5.

Cut the Blocks:

From each of three blue fat quarters, cut one 2.5 x 20" strip, cut two 2.25 x 20" strips, and one 3.5" square.  From the 2.5" strip, subcut into four 2.5 x 5" rectangles.  Reserve the two 2.25" strips for binding later.


Cut two of each rectangle in opposite directions as shown. You will need 4 triangles in each direction for each of the three prints.


From the background (red & white dot), two 2.5" x WOF strips.  Subcut into twelve 2.5 x 5" rectangles. 
Then cut two 4.5" x WOF strips.  From these, subcut to get FOUR 4.5" squares, FOUR 4.5" x 7.5" rectangles and TEN 1.5 x 4.5" rectangles.


Make the Star Points: 

Sew each blue triangle to a background triangle right sides together.  Off set the triangles a little bit. Carefully press toward the blue print.  (See more photos of this step in this tutorial here.) 

Trim each HRT using your Bloc Loc.  Be sure to use the correct ruler for each of the two types of triangles.


Place your ruler on top of the pieced unit and slide it toward the seam until it locks on. Be sure that your completed size (2" x 3.5") is included in the trim lines.  Trim the top and side.


Then slide the ruler up along the seam until the trimmed edges are lined up with the lines for the correct size (2" x 3.5").  Trim the left and bottom sides. Repeat to trim all 24 units.


Next, join an "A" HRT unit and a "B" HRT unit together.  Press seams open.  Sew four pairs of each print.

Assemble the Top:


Start by sewing a 1.5 x 4.5" rectangle to two star point units from each of the three fabrics.  Press toward the background sashing strip. These units will be used in Rows 1 and 3 below.


(click to enlarge photo)

Using the diagram above, sew the pieced star points, center squares and background pieces into three rows as shown.  Press toward the background when possible.

Once you've pieced the rows, join them together to complete the top.

Finish the Runner:


Prepare a backing using the 4th fat quarter and strips from the remaining fabric from the 3 prints used in the stars.  Baste and quilt as desired.


 I did some meandering and loops as well as some free hand swirls and snowflakes.  These smaller peieces are a great time to practice your free motion quilting!
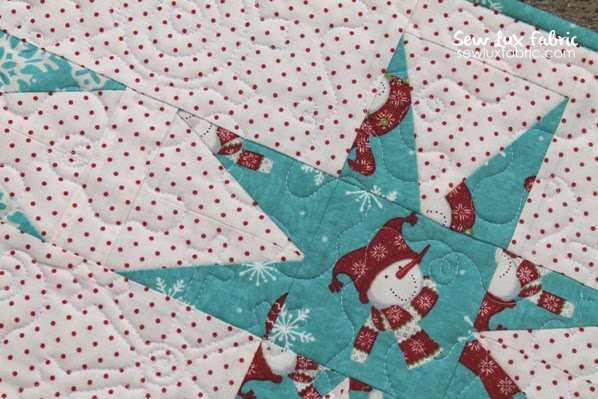

Join the 2.25" strips from the 3 fat quarters to make a scrappy binding.  Attach to the front and finish by hand or machine.  (See more on binding here.)


Enjoy! :-)  If you make one, please share the link!  I'd love to see it!

Happy Sewing! :-)

Monday, September 17, 2012

Design Challenge :: Cross your "T's" Table Runner


Hi there and welcome! I am so very happy that Chrissy asked me to join the Sew Lux Design Challenge Series! I have a fun tutorial for you today that is just perfect for fall and features some gorgeous prints from Denyse Schmidt's newest line, Chicopee

When I first saw this collection, it immediately spoke "back-to-school" for me. I couldn't help but be transported to those crisp end-of-summer days when the excitement of starting a new grade--with a whole new set of things to learn--buzzed in my daily thoughts. So in honor of the new school year, the coming fall season, and all things "reading, writing, and arithmetic" related I am very happy to share my Cross Your "Ts" Table Runner tutorial. :)


Required Materials:
- One September Sew Lux Design Challenge fat quarter bundle (or 6 coordinating fat quarters)
- One (16" x 32") piece of batting (I used 100% cotton batting)
- Neutral thread for piecing
- Coordinating thread for quilting 

Chicopee Bundle
Fabrics shown above in order from left to right:
Chicopee Ladder Dot Black / Chicopee Ziggy Medallion Red / Chicopee Ladder Dot Fushia
Chicopee Paisley Red / Chicopee Simple Plaid Red / Chicopee Cross Square Red


Cutting Instructions:
Make sure to read through the tutorial at least once before starting cutting. For the interior blocks you will need to cut the following from your fat quarters:
Cross Your "T's" Table Runner Tutorial

And for the border and binding tape you will also need to cut the following pieces:

Cross Your "T's" Table Runner

*Make sure when cutting all of the fabric pieces from the Ladder Dot Fushia and Cross Square Red to cut along the short grain of the fat quarter (18" side) rather than along the longer side. This will allow you to have enough fabric width for the required backing pieces.* 

Piecing Instructions:
Taking all of the (1.5" x 3.5") pieces, organize them into groups of three strips based on the diagram below:
Cross Your "T's" Table Runner Tutorial
Then start to chain-piece your strips together to form the 12 (3.5" x 3.5") blocks as shown. Press seams open. 

Cross Your "T's" Table Runner Tutorial

Taking the pieced (3.5" x 3.5") blocks, lay them out using the diagram below as a guide to form the three larger blocks. Then sew these larger blocks together, stitching together the top and bottom blocks first and then the right and left sides, pressing the seams as desired. I prefer to press my seams open, but you may feel more comfortable alternating pressing side-to-side to "nest" the seams. Either is fine. Use pins along the seam lines to make sure everything lines up, regardless of which method you use.

Cross Your "T's" Table Runner Tutorial

Then grab the 6 (2.5" x 6.5") strips and sew these to the top and bottom of each of the three blocks as indicated in the diagram below. Press the seams open. Next grab the 4 (2.5" x 10.5") strips. Starting with the first block on the left; sew one strip to the left side of the block, then one strip each to the right and left sides of the middle block, and finally one strip to the right side of the last block. Press seams open.

Cross Your "T's" Table Runner Tutorial

Then, to finish the interior pieced portion of the table runner, sew the left and right hand pieces to the middle block and press open.

Cross Your "T's" Table Runner Tutorial 

Finally, to create the pieced border around the sides of the joined interior blocks, grab all of the prepared border fabric pieces (from the second cutting diagram) and lay them out as show in the diagram above. Using chain-piecing again, sew these smaller units together to form the pieced strips as shown. Then sew the longer pieced strips to the joined interior blocks, top and bottom sides, and press open. Lastly, sew on the shorter pieced strips to the left and right sides and press open. The pieced table runner top is now finished! Next, the backing.

Preparing the Backing:
Note that the backing should be around 1-2 inches wider on all sides than the pieced top. Taking the Paisley Red fat quarter, trim the edges slightly if needed to square it up. Then cutting across the shorter grain (18"), cut from the non-selvedge end one (7" x 18") piece. It's ok if your piece ends up slightly shorter than 18", especially if you happened to have trimmed off a little more than 18" during the process of squaring up your fat quarter. The important thing to keep in mind is #1 to make sure all of your backing pieces are square and #2 that you have least one inch of extra fabric all around your finished backing. Same goes for the measurements below.

Next, cut one (9" x 18") piece from the remaining Ladder Dot Fushia fabric and one (4" x 18") piece from the remaining Cross Square Red fabric. Then sew together the larger Paisley piece, the (4" x 18") Cross Square piece, the (9" x 18") Ladder Dot piece, and the (7" x 18") Paisley piece in this order, according to the diagram below. Press all seams open.

Cross Your "T's" Table Runner Tutorial

Finishing:
Taking the pieced top, batting, and pieced backing; make a quilt sandwich. You'll want to make sure everything is nice and square before proceeding to baste all of the layers together. Quilt however you wish. I used a fuchsia-colored thread and straight-line quilting in concentric boxes to echo the shape of the blocks and border (see photo below).

Cross Your "T's" Table Runner

Once you have finished quilting, trim the excess batting and backing flush with the quilt top. Then join your plaid binding strips together (I like to sew them on the diagonal) and press in half to create a long piece of quilt binding tape. Sew your binding tape to the finished quilt sandwich, making mitered corners as you go. Once you have sewn all the way around, join your binding ends together. Then fold over the binding tape toward the back of the table runner and press. Either finish sewing your binding on by hand or machine stitch it in place to the back. If you are new to quilting and/or would like step-by-step instructions for how to attach binding tape to a quilt, Chrissy has written an excellent tutorial here.
Cross Your "T's" Table Runner

Cross Your "T's" Table Runner

I hope you enjoy this tutorial as much as I did making it! If you have any questions, feel free to leave me a comment here or send me an e-mail directly. And if you would like to see more of my projects and tutorials, feel free to stop by Echinops & Aster and say "Hi!"

Finally, I just wanted to remind you that all of the beautiful prints I used in this tutorial are now available to purchase at the Sew Lux shop in a special fat quarter bundle and it's on sale now through 9/22/12! Pick one up while they last. :)