Showing posts with label perle. Show all posts

Saturday, September 20, 2014

Perle Club : Tiger Tape Tutorial

Hey there!

This month, all of our Perle Club members received some Tiger Tape and needles along with their shipment of threads.  I'm going to show you a quick how-to for using the Tiger Tape to help guide your hand quilting.

Basically ... if you're a pro at hand quilting, you probably won't need Tiger Tape.  But for those of us who are new or it isn't our best skill yet (ahem ... like me), its a great tool to help you practice sewing consistent stitches.

Start with something small to practice ... I have a little Mini Dwell block.  I spray basted mine really well, but a hoop is also really helpful and I would definitely use on a bigger project.


 Place a strip of the Tape along the line where you want to sew.


Thread some perle embroidery floss on your needle.


Knot the end of your thread and come up from the back. (If you are starting in the middle of your quilt, knot the end of your thread and pull the knot through the backing to bury the knot in the batting.)

Coming up from the back, sew straight down at the next line.


Then come back up at the next line.


And repeat.  As you get more comfortable, you can load a few stitches on your needle.


Once you finish your line, you can usually reuse the tape once or twice more and continue stitching in the same manner.


Of course, there are some great hand quilting tutorials online in several places. Here's a helpful video and post on the Craftsy website.

Happy Sewing!  :-)


Monday, June 2, 2014

Perle Club : Member Perks

Happy Monday!

Have you signed up for our Perle Club yet?  We start shipments in this 6-month series in July and I am thrilled to share a little about the first of two exclusive project club members will receive.


Jennie and Clara at Clover & Violet design such cute embroidery projects and have offered to share the pattern for this cutie pin cushion with our club members!

Photo used with permission from Clover & Violet.

So cute right?!  You can read a little more about the original pin cushion here.  Club members will receive a special packet of fabric with their third shipment as well as the pattern for this project.

What are you waiting for?  Check out the club details and reserve your spot today!

Happy Sewing! :-)

Sunday, July 7, 2013

Tutorial : Hand Quilted Journal Cover

Hi everyone!

I was recently asked to participate in a hand made series over at Clover & Violet, so I put together a tutorial for hand quilting a sketch book cover.


You can read more about the hand quilting process here at Clover & Violet.

To make the cover, I modified the Swatch Book Cover Pattern from Michelle Patterns to fit the size of a standard composition book cover.  Since I followed her directions for construction, I don't want to share them here as a "tutorial" but will give you the measurements and modifications I made to create my book cover.

Modifications to Michelle Patterns Swatch Book Cover Pattern

  • I chose to omit the flap closure for this particular project. 
  • I used a 1/4" seam to baste the lining and flap pockets together. 
  • I used a 1/2" seam when I attached the front to the lining/pockets and left a 3" opening along the bottom instead of one of the sides.
  • I used a 1/8" seam to topstitch around the entire piece to finish. 
  • I used interfacing on the Crossweave (top and pockets) as well as on the lining, but didn't clip the corners before fusing (although I would next time to avoid some bulk).  Since I had quilted my top panel to flannel, I omitted the additional layer of sew-in interfacing called for in the pattern.
  • Measurements:  Top and lining measurements are 11.5" x 16.75" presew.  Pockets were cut 10" x 11.5" (fold along long edge for a 5" x 11.5" folded flaps). 
The pattern is well-written and easy to follow and includes instructions and pattern pieces for two sizes of Moleskin Cahier notebooks.  


To learn more about how I quilted the Moda Crossweave with Perle cotton check out my tutorial at Clover & Violet


For this project, I used Moda Crossweave in Natural, a Honey Honey by Kate Spain print for the lining, and Perle in Medium Sea Green and Light Violet.

If you're interested, my sample is available for sale here

Thanks for stopping by today!

Happy Sewing!  :-) 

Thursday, August 2, 2012

Modernista Homemade Project

Hey y'all!  So far it has been an exciting week around here ...

Monday morning I finished and mailed off my Modernista Homemade swap package and then got ready for some my of my girlfriends to come over that evening ... while tidying up, I noticed a small lizard in the dining room.  Freak out moment.  Especially since my husband wouldn't be home before my friends came over.  Bigger freak out moment.  My husband's advice to "make a game of it" when everyone got there was not acceptable!  LOL  I tried to swoosh him outside, but he skittered under the couch.  I solved the problem by walking outside and asking the neighborhood elementary boys who were playing basketball next door who wanted to earn $20.  Four of them came running at me.  I explained the lizard needed to go, there should be no blood or guts on the carpet, and that the TV better not get knocked over.  A very entertaining 20 minutes later, the lizard was rescued and returned to the outdoors.

More exciting, though, was getting to see Chicago The Musical last night!  Wow!  What an incredible show.  Christie Brinkley was supposed to star, but was sick so they flew in the lead from NYC.  I am sure Christie is good, but I think we got the better deal on that one.  :-)  If you get a chance to see it, you should.

Anyway, I know y'all probably come here for fabric-based stuff, so here's some quilty stuff for you ...

My Modernista Homemade swap partner has a sewing area in the corner of her bedroom.  She likes big florals and birds and wanted a red and cream theme with accents of gray and blue and she asked for either a machine cover or a sewing organizer.  Needless to say, I felt a little goofy posting my fabric choices in the Flickr pool because (A) I was sure it would give it away and (B) well, most people wouldn't immediately associate "modern" with them.  So several "pretty, but not for me" type of comments later I had a few doubts.


I decided to use my Etchings charm pack and make it happen anyway. I bought some ruler twill tape on Etsy and added it on.

I like balance in my projects and decided to do a big center panel instead of an off-center one in the pattern that I was using.  I'm also still pretty new at the embroidery thing, so that also helped make my decision. :-)


I really love the perle quilting on this.  I am no longer scared of hand quilting since the Tiger Tape really made it pretty much fool-proof!  I found some shell buttons at the big box store and added them after I quilted the line down the sides.  This wasn't a problem, since the machine cover is completely lined when you are done.


I almost skipped the piping, but I think it adds a nice touch ... and I learned some things along the way that I will do differently the next time I use piping but overall I was pleased with it.


Overall, I really love it.  She should get it today and I am hoping she does too.  I might have been checking the tracking and the Flickr group anxiously to see if she's gotten it yet and what she thinks.

I also made a pin cushion and trash bucket caddy thing using this tutorial from Elizabeth Hartman - its called the "Weighted Pincushion Organizer." And its really easy to make.


I used some scraps from the cover project and I think it turned out pretty well.  The little bucket is removable as well.  I just thought a matching set would be nice.  :-)


I added a few other things and sent off this package. :-)

I haven't gotten anything from my secret swapper yet, but will update here when I do.

Happy Sewing!  :-)

Monday, July 30, 2012

Design Challenge :: Bedside Trio


Hi everyone!  I'm really excited to be sharing these projects as part of the Sew Lux Design Challenge.  When Chrissy first asked me if I'd be interested in making something, I immediately thought it must include Vintage Modern and embroidery.  A short time later, I was out shopping and looking for more canvas baskets for the kid's dressers, only to find the ones I liked were no longer available.  It seemed like the perfect opportunity to make my own.

I then thought that a smaller, nesting basket would be nice, but enough smaller that it doubles as a divider instead of just a smaller basket.  I chose a couple favorite Vintage Modern prints, added a few others I loved, picked out some coordinating threads, and made a fun bedside set.

Supplies:
For the large basket, from each printed fat quarter, cut 2 - 3 1/2" x 18" strips.  Cut the strips into 10 - 3 1/2" squares from each fabric.  From the porcelain fat quarter cut 2 - 7" x 18" strips.  From each strip cut one 6 1/2" x 9 1/2" rectangle {bottom of large basket} and 4 - 3 1/2" squares.

Note: the outside of the baskets are sewing with 1/4" seam allowance, for the inside to fit and not be bunched up {like my large basket!}, sew the bottom seams and the side construction seams with a 3/8" seam allowance.

Large Basket

From the 3 1/2" squares piece 4 - 5 squares x 2 squares pieces for the basket - two for the body and two for the lining {note, I used three porcelain pieces on the basket body, none on the lining}.


Use the two outside panels and one porcelain 6 1/2" x 9 1/2" rectangle and sew together to form an "I" shape:


Then, place the outside of basket on batting and trim batting to fit {if using fusbile batting, follow manufacturer's directions and fuse in place}, then quilt as desired {I quilted in the ditch of all the seams and then quilted a large "X" across all the print square.


Embroider the squares as shown.  If you're new to embroidery, you can find my Embroidery 101 tutorials here.


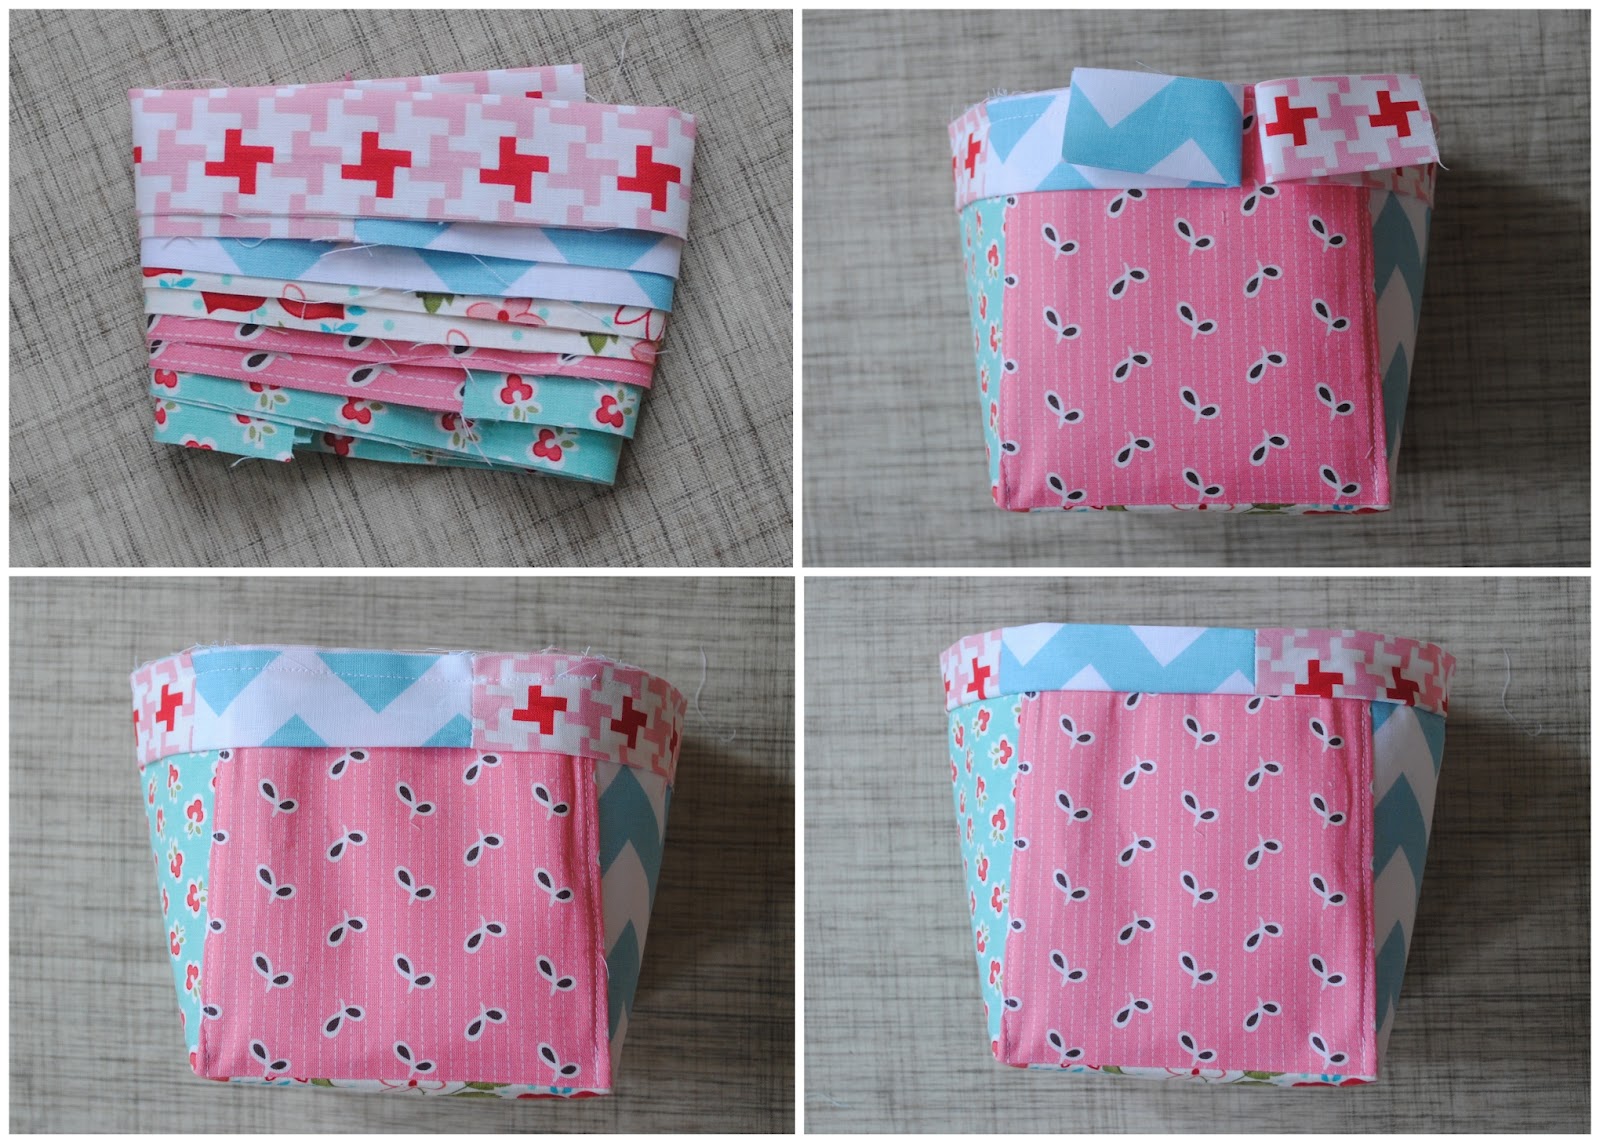
Sew the short patchwork side seams, press open {I also top stitched my side seams to keep the fabrics in place}.  Please note: if using Fusible Thermolam - only press the fabric or use a press cloth, it will melt if touched with the iron, I know this from experience!  Turn your basket right side out and press all the corners.

Make the lining using the same method but, instead of batting, use the heavy interfacing.  I omitted the quilting on my lining.  Place the lining inside the basket and top stitch 1/8" from the raw edge.  Set aside.

Small Basket
 

To make the small basket, cut one 5 " x 18" strip from each printed fat quarter, from each strip cut 2 - 5" squares.  Assemble the basket in the same manner as the large basket, using heavy interfacing for both the outside and the lining.  Use a 1/4" seam allowance for the outer basket, and 3/8" for the inner.  Place the inner basket inside the outer, wrong sides together, and top stitch them together.

Bind the Baskets

Then, from each printed fat quarter, cut one 2 1/2" x 18" strip, cut one extra 2 1/2" strip {for added interest, I also cut one of the remaining 5" wide pieces into two 2 1/2" strips and sewed one of them to my binding strip}.  Sew the strips together to make one long length of scrappy binding.  Fold the binding in half, wrong sides together, and press.


Place binding, fold down, around the outside edge of basket.  Stitch 1/4" from raw edge, leaving 4" of unstitched binding.  Join seam and finish stitching the binding around the basket.  Fold over raw edge.


Machine stitch binding in place {I like to use pins when machine stitching to make sure the bindings are nice and even}, and you're finished!  Bind the larger basket the same way, using the scrappy binding.

Embroidered Mini Quilt

And, since every dresser or nightstand needs a mini quilt, I used the 16 of remaining 3 1/2" squares to do a matching embroidery quilt.  After piecing the squares in the same manner as the large basket, I fused a square of batting to the back and then stitched my embroideries in the same manner as the large basket.


I used the remaining 5" pieces to do a scrappy backing, and the two leftover 3 1/2" squares to make corner pockets, so I can hang it on the wall if I chose!


Thanks so much for having me today, and I hope you enjoy making this as much as I have, it would make a perfect baby gift too {hint, hint!}.  And the fat quarter bundles and perle cotton samplers are on a special sale until August 4th, so get one while they're available.  Enjoy!

Tuesday, April 10, 2012

Back to Reality

Well, Spring Break is definitely over and I can tell you that both teachers and students are counting the days until Summer!  LOL  I hope you had a wonderful Easter weekend and enjoyed some time with family and friends.  I took this picture outside of church and thought I'd share these pretty flowers with you. Look at those pretty pink hydrangeas!

Mom gave me a hydrangea plant along with my Easter basket and I can't wait to plant it.  I love hydrangeas, especially the blue ones, and have been asking the mister to plant me one for a couple of years.  So, thanks Mom for helping me get my wish!  ;-)

I also wanted to share that there is new Perle in the shop!  The Garden Steps thread kits are back in stock and we've added 10 more colors available by-the-ball!

Terrain is also on sale this week ... a few prints are at the end of their bolt!

Happy Sewing! :-)