Showing posts with label Pinwheel Stitch Along. Show all posts

Monday, April 4, 2011

Pinwheel Stitch Along Week 4

Hiya!  This is Week 4 of the Pinwheel Stitch Along and my plan was to just invite you to share a link to your pinwheel project.  Not done yet?  No worries, just link us up when you get done or share your current progress with us here or on our Flickr group page.

So far, I've gotten to finish my Bliss FQ version.  Here she is blowin' in the wind today ...

Also, I have the top for my charm version in Countdown to Christmas.  I am waiting until the yardage comes in to finish it.

I think if I turn it the other way and line it, it may make a really cute apron! :) What do you think?  (I know that my mister needs to work on his photography skills! haha)

Can't wait to see what you've made!

Monday, March 28, 2011

Pinwheel Stitch Along Week 3 - Quilt & Bind

Here we are at another Monday ... this is Week 3 of our Pinwheel Stitch Along and I'm going to give you some tips for quilting and binding your project. Ready?

First, once you've finished piecing the top, you'll want to press it well before sandwiching your quilt together.  If you are doing the fat quarter version (started with 8" squares) or the charm version, you won't need to piece the back of your quilt.  Just layer the backing (wrong side up), batting, and then quilt top (right side up) and baste using your favorite method. If you are doing the layer cake version (10" squares), you'll either need a 1-1/2 yard backing or you can piece it.  I am still working on my layer cake version, but here's an illustration for you. (Click on the photo to enlarge it.)

I prefer to baste my quilt with safety pins.  (I do want to try spray basting at some point, but haven't gotten any spray adhesive yet. Any suggestions?) I knew that I wanted to quilt down the seams, so I chose to pin along the diagonal seams so I wouldn't have to stop quilting to move pins. :) Here's a closer view of my basting.


Here's my quilt all basted up ... I took it outside for better lighting.  I definitely don't recommend basting on your concrete porch! :-)


Ok, so let's get to quilting. I am giving directions for straight-line quilting in a grid-like style, using the seams as my guide.  I like this style for these pinwheel quilts and straight-line quilting gives a nice drape to the quilt.  You could free motion or stitch along the diagonals or whatever you like. When straight-line quilting, I HIGHLY recommend a walking foot.  They are fairly expensive, but I think it makes a BIG difference.


Also, I like to LENGTHEN my stitch length.  I think this helps a lot!  Another tip ... start with a full bobbin so you don't have to stop in the middle to change that out!


Now, just use the seams as your guide.  I line up the edge of my foot with the seam and follow it down the length of the quilt. Work you way down the right side of each seam, moving across the quilt from right to left.  Then flip the quilt around and repeat the process to come back down the other side of each seam.  Then start on the horizontal seams.  Same process ... keep on stitchin'. I like to roll the edge of my quilt to help move it along through my machine as I get more quilt to the right side of my needle.


Look at that!  It turned out so nice!  Go ahead and press your quilt (after you remove pins, of course).


Square up your quilt. Careful to keep your slices nice and straight along the sides. (Tip: Sometimes if part of your quilt is hanging off the table, the edge of your quilt isn't truly straight laying on the table since the weight of the piece hanging off is pulling on it a bit.  So make adjustments as needed BEFORE you slice.)


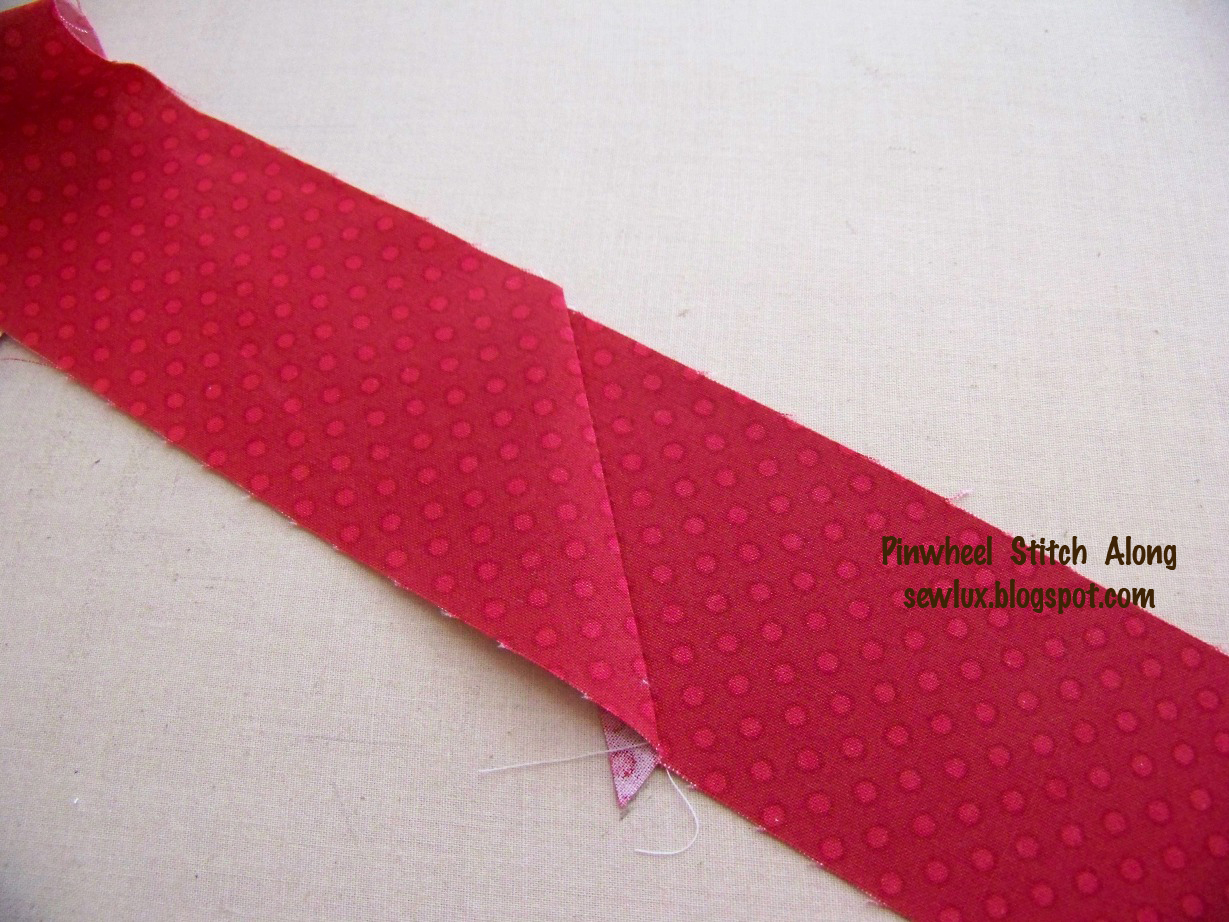
Let's get some binding ready!  I am using a double-fold, straight-grain binding (as opposed to a bias binding) because I'm not planning to bind any curves.  Making binding is pretty easy ... start by cutting strips.  I like to cut my binding strips 2.5" inches wide.  Some folks like 2.25", for me its a little tight.  But do what you like. :)  Measure all 4 sides and add several inches to figure out how many WOF (width of fabric - usually about 42/44") strips you need to cut.  For the FQ version, I cut 4 strips. To join the strips, you'll need to lay them perpendicular to each other and stitch along the diagonal.


Press your seams in the binding. Continue joining all the strips together to get one continuous piece.


Fold your binding in half and press it.  Here's my binding (rolled just for this post! :-)


Start about 12 inches from the bottom of one side and lay your binding down on the edge of your quilt.  You may pin if you like, I don't pin for this.  Use your foot to maintain a 1/4" seam allowance, leaving several inches of binding unstitched behind your starting point.  (Again, I prefer to use a walking foot and a lengthened stitch for this.)

As you approach the corner, slow it down and stop and backstitch 1/4" from the edge.


Fold your binding up and then back down to lay in line with the edge of the next side of the quilt.  You'll have a little triangle-shaped fold in the middle like shown here.


Stitch from the edge of this side, backstitching at the top.  And keep working your way around the quilt.


When you get close to where you started, trim off some of the excess and fold your binding in and tuck the starting end into the fold. (My photo probably shows it better than I'm saying!)  Stitch across the seam and backstitch again to secure it.


Now, press your binding open. Looks good, right?!


Some folks like to machine stitch their binding to finish it.  I prefer to hand stitch it to the back.  Partly because I think it makes me feel like its more "hand-made" and also because I just prefer the look of a nice hand-stitched binding.  I use a basic slip stitch and I wanted to show how I do my corners.  (No new or earth-shattering technique, just pictures for you if you're new.)

As I work my way toward the corner, I stitch up into the corner before folding over the top side.
I will put my needle through the actual corner and then I'll be able to stitch down the diagonal and then continue on down the next side.


Here it is pinned so you can see a little better how it will look.

So, have a seat on the couch and stitch away y'all! I will share my layer cake version and my finished binding later this week.

As always, if you have a question or need more clarification on a step, please leave a comment and I will be happy to help out!

Happy Sewing! :)

Sunday, March 27, 2011

Pure Bliss ...

Hiya! Hope you are all having a lovely weekend.  Wanted to stop in real quick to share my Bliss pinwheel quilt all basted and ready to finish.  :-)  The quilting went fast and I am hoping to work on some handstitching on my binding tonight if I get some lesson plans done quick enough.

I've got tomorrow's post with quilting and binding instructions ready to go ... see you then!

Happy Sewing! :-)

Saturday, March 26, 2011

Pinwheel Progress


Finished piecing the Bliss (FQ version) Pinwheel Quilt.  Got it all sandwiched up and ready to quilt tomorrow.

Hope you had a wonderful day! :-)

Monday, March 21, 2011

Pinwheel Stitch Along: Week 2 - Stitch Your Blocks

Happy Monday!  Here we are at Week 2 of the Pinwheel Stitch Along.  This week, we'll work on stitching our pinwheel blocks together.  Ready?  In this tutorial, you'll see pictures from all the different sizes I am working on ... charms (Countdown to Christmas), fat quarters (Bliss) and layer cake squares (Fandango).  I don't plan to mix them all in one quilt! :-)


*Please note ... I updated the materials yesterday.  You need a total of 24 squares in whatever size you are using.

Last week, I asked you to cut some fabric and separate them into light and dark. Here's the charm pack prints I pulled from Countdown to Christmas.  (Note ... I know y'all asked for Flurry ... but when I went to use it, I realized that we actually had been shipped "Ready, Set, Snow" and NOT Flurry!  So, I will save that fabric line for another project.) Here's the charm pack prints ...  I have 3 sets of 4 light and 4 dark.

Ok ... next, let's pull two squares (one "light" and one "dark") and pin them right sides together (RST).

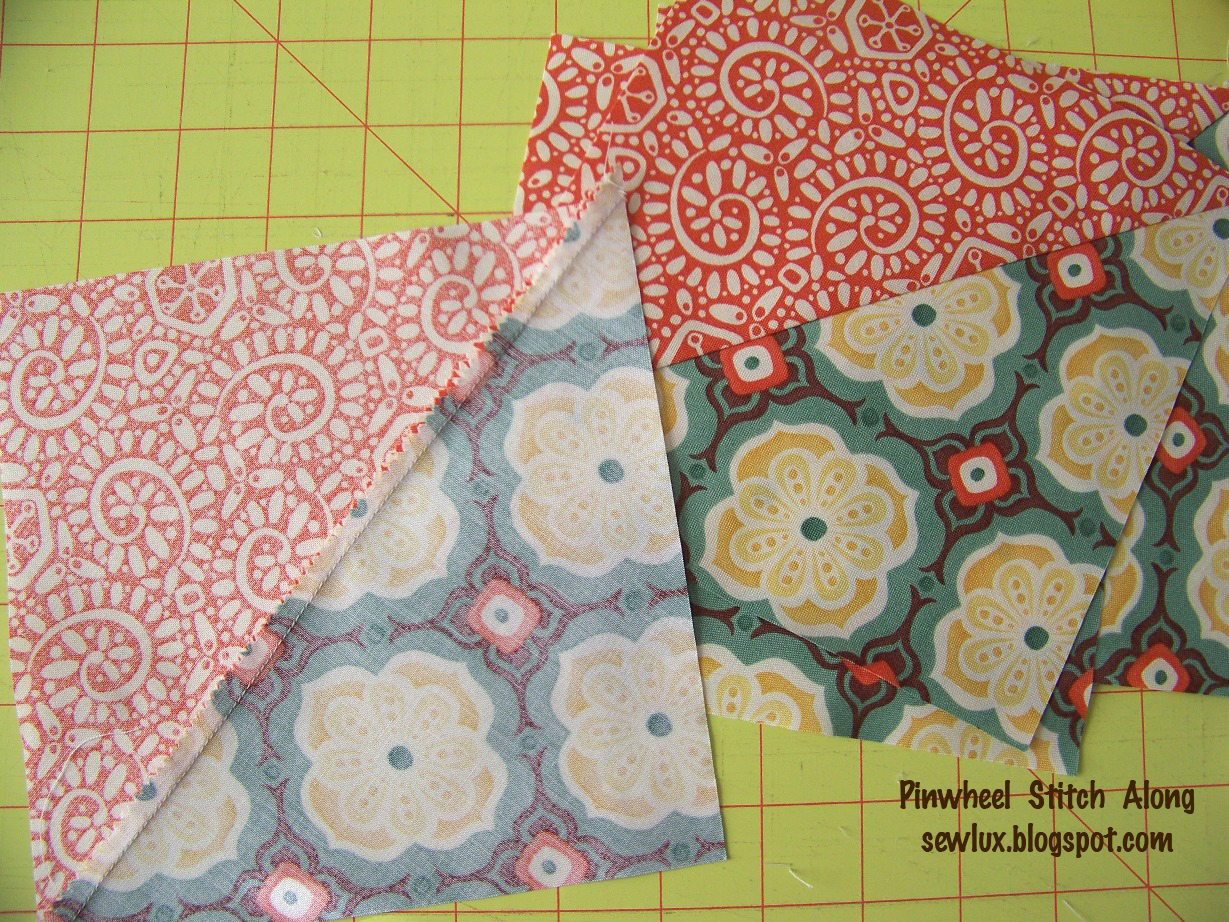
Now, stitch around all four sides using a 1/4" inseam. Press and lay it on your cutting mat.

Slice along both diagonals to create four triangles. 

Press all half-square triangles (HST) toward one fabric (the darker one).

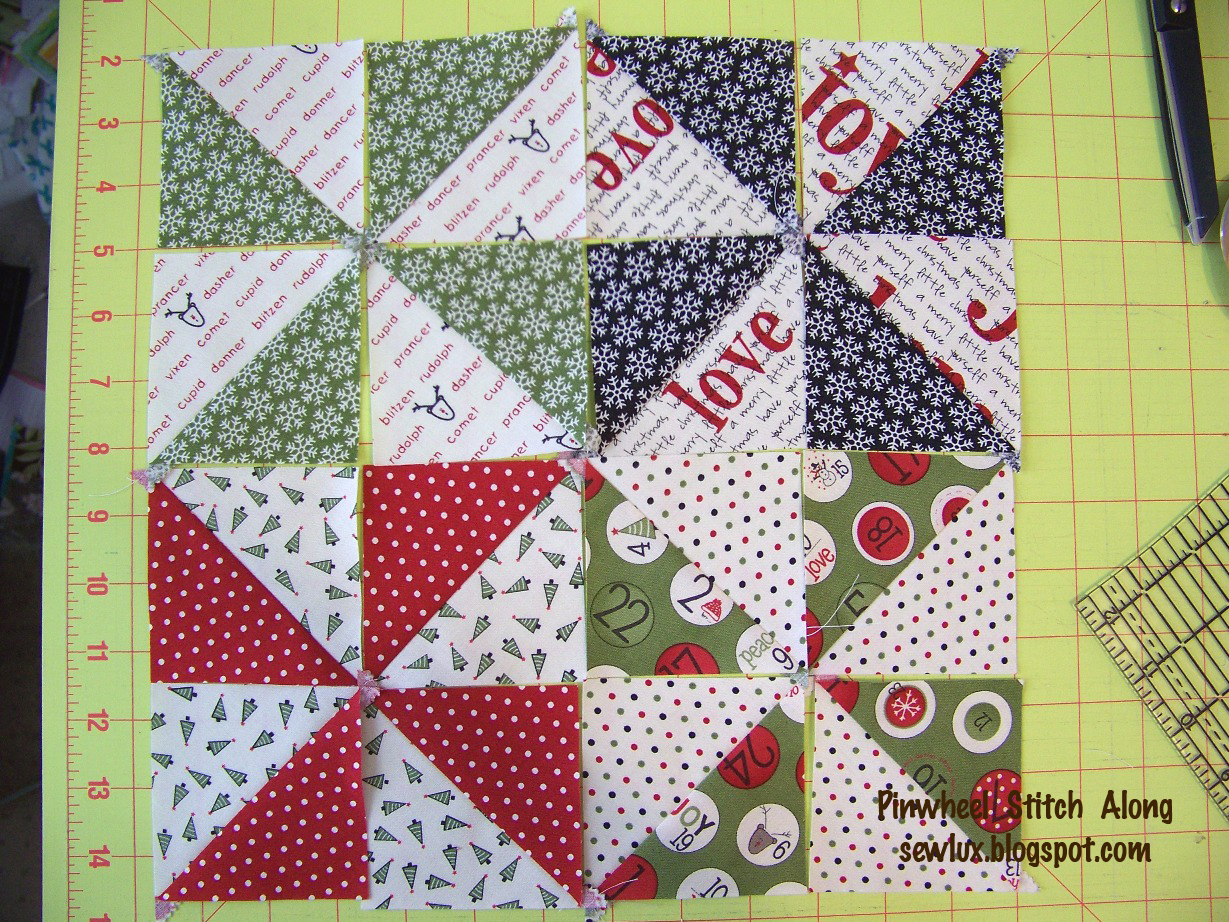
Now, lay them out to create your pinwheel.

Note ... Make sure all your pinwheels are spinning the same way (dominant print in same position in all blocks).  Here's a photo where ONE of them (black print) is going the wrong way ...

And here's the same picture with the "wrong way" pinwheel fixed.  Better right?  So spin them whichever way you want, but make sure they are all spinning the same way. :-)

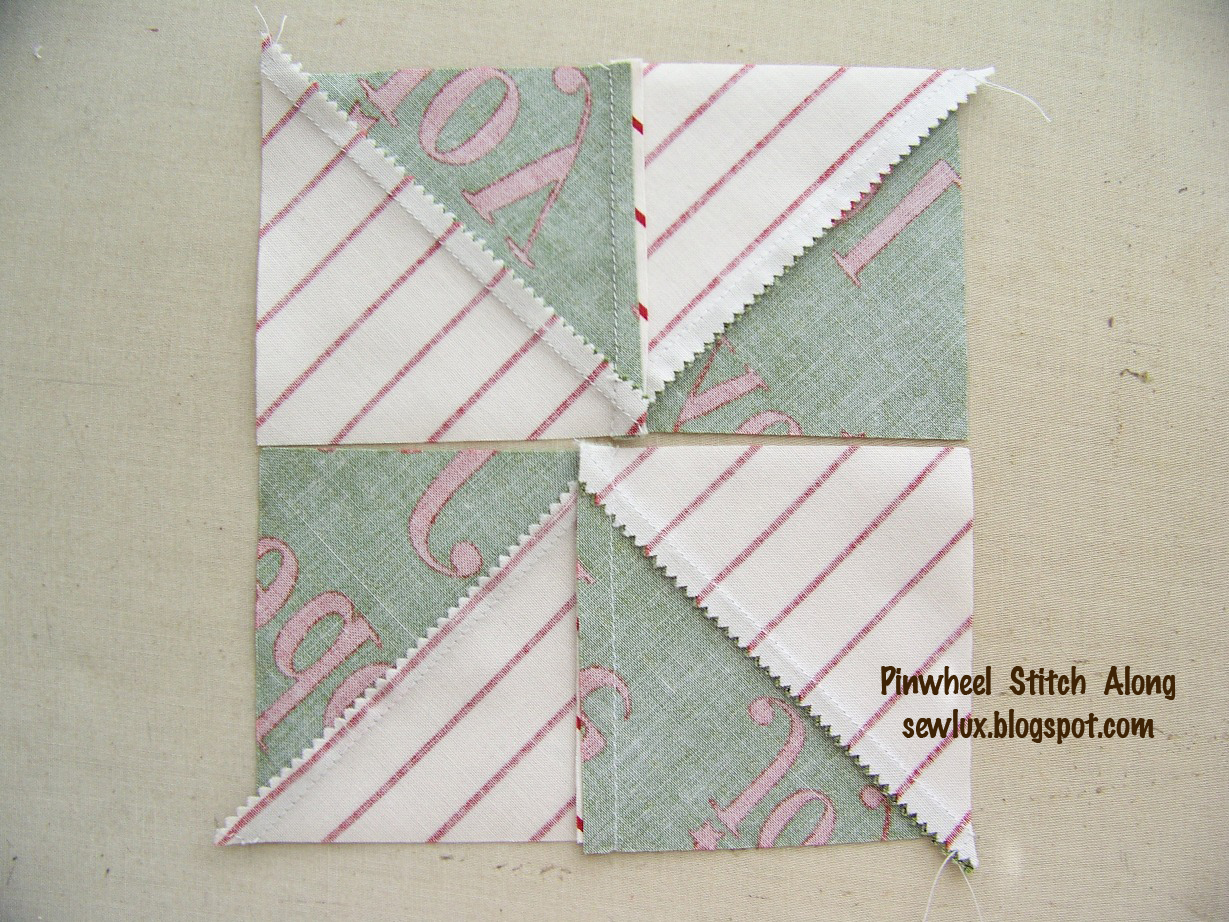
Ok ... so now let's start sewing the pinwheel blocks together.  Pin and press in the same direction.  Here I've pressed all sets of 2 blocks to the left (keeping the "V" seam down/pointing toward me when pressing). This will help your seams nest nicely together.

Now that you have two pairs together, pin and stitch the pairs to create a 2x2 block. Careful to line up the seams on the corners. :-)
You may want to press the seam joining the two pairs open as shown below ... it will help the center of the block lay a little flatter.

Finished layer cake block ...

Once you have your 2x2 block, repeat the process to finish the other 11 blocks. :) Finished blocks should be approx 6" for charms, 10" for FQ, and 13" for layer cakes.

This is a fast and easy way to create those versatile half square triangles.  There are many other ways, but this seems to require less math (which we learned I'm apparently not that great at! haha! :-)  If you'd like to watch a video tutorial, there is a great one here.

Once you have all 12 blocks, lay them out and arrange them as you'd like them in your quilt.

Then start sewing all your blocks together. I work in rows and then attach the rows together. Pins are your friend in this process ... so take a few extra seconds to match the seams, pin them and pin in between.

You'll end up with a pretty quilt top. :-)

I hope all this makes sense!  If you have any questions, please leave a comment and I will do my best to help you out. :)  Can't wait to see your progress!  Feel free to share a link in the comments or in our Flickr group.

Later this week, I will share my Fandango layer cake top and the Bliss fat quarter top.

Happy Sewing! :-)

Sunday, March 20, 2011

Pinwheel Stitch Along - Update

Good morning!  I'll start you off with a story this morning ...

In my "day job," I am a high school teacher and occasionally when I pass handouts down a row, I accidentally short them a sheet so the last kid pipes up and asks for another. I usually answer them with a joke, "so you're saying it's a good thing I'm not a math teacher, right?" and they (usually) laugh with me. :-)

Well, this morning I realized that I am definitely NOT a math teacher!  I made an ERROR in my initial directions and I hope it doesn't mess you up too much ... as you should still have enough fabric. But ... when I told you the number of squares you'd need, I was thinking about the number of blocks we'd have (12 total), NOT that each block comes from two squares.  So ... you'll actually need the following:
  • Charm Pack Version: 24 5" squares
  • FQ Version: 24 8" squares (4 from each of 6 prints)
  • Layer Cake Version: 24 10" squares
I sincerely apologize for this mistake and will be ultra paranoid about the rest of my directions for you (which stitching starts tomorrow!).  I hope that you'll still be able to squeeze out enough of what you'll need for the stitch along and that you'll still join me tomorrow.

Have a lovely day!  And I'll see you tomorrow (I hope)! :-)

Wednesday, March 16, 2011

Pinwheel Stitch Along Fabric Selections

Happy Wednesday!  The weekend is getting closer and closer!  And so is the pretty weather we're supposed to have. :)

Today, I am stopping in to share the fabrics I will be using for the Pinwheel Stitch Along.  Are you ready?!

First up, for the fat quarter version, I am planning to go a little red and aqua on y'all and use these prints from Bliss. We're selling out of the aqua prints pretty quick.  If you're lucky, you can catch the last of the tulip here.

I think this is going to be really lovely.  I am leaning toward using the red designer beads print for the binding.

For the layer cake version, I will be using the Fandango layer cake I've been hoarding for quite. some. time. :) I plan on using this print for the backing with two rows of layer cakes pieced in and this one for the binding.  Here are the prints I pulled from the layer cake that I will use on the quilt top - I chose 3 squares from 4 of the main colors.

And, later this week I will let you know the consensus on the "would you rather" question of Countdown to Christmas or Flurry!  :-)

Share your fabric choices with us in the Flickr group. :-)

Happy Sewing!

Tuesday, March 15, 2011

Let's Play a Game of ...

Hello, hello!  I am getting my fabrics together for the Pinwheel Stitch Along ... I had a plan for the charm pack version, but then we got some samples in!  So, let's play a game of "would you rather ..."

Would you rather me use Countdown to Christmas by Sweetwater or ....

Flurry by Kate Spain ...

for the charm pack version of the stitch along?  Let me know which you'd rather see!  :)  I will share my selections for the 2 other versions tomorrow!

Happy Sewing!

Monday, March 14, 2011

Need a Pinwheel Quilt Kit?

Hi again ... I am excited some of you are thinking about stitching along with us!  If you are interested in buying a kit for the FQ version of the Pinwheel quilt, I have set up a listing in our Sew Lux Etsy shop for easy one-click shopping.

Hope you are having a lovely day! :-)

Pinwheel Stitch Along: Week One

Here we are at week one of our Pinwheel Stitch Along.  This week, your goal is to get your fabrics ready to go so we can start stitching our blocks next week.  In order to help you use some of those precuts we've all been hoarding, I will be giving you instructions for three different sizes of this quilt.  Keep in mind, you can make it bigger or smaller by adding additional blocks. :-)
Edited 3/20/11
Charm Pack Pinwheel Quilt:
  • Top: 12 24 charm squares
  • Backing: 3/4 yard or 30 charms if you want to piece the back
  • Binding: 1/4 yard
  • Final Dimensions: Approx. 17" x 22"
Fat Quarters Pinwheel Quilt:
  • Top: 6 fat quarters - cut two four 8" squares from each print (12 24 total squares)
  • Backing: 1 yard
  • Binding: 1/3 to 1/2 yard
  • Note: if you are using FQ, you can cut 10" squares to make this a little bigger (see layer cake version)
  • Final Dimensions: Approx. 29" x 38"
Layer Cake Pinwheel Quilt:
  • Top: 12 24 layer cake squares
  • Backing: 1 yard + 10 layer cake squares (pieced back) or 1-1/2 yards for a non-pieced backing
  • Binding: 1/2 yard
  • Final Dimensions: Approx. 38" x 50"
When choosing your fabrics, you want to select half that read as a "light" print and half that read as a "dark" print so that your pinwheels will be more noticeable when you put the quilt together.  Basically, you don't want the two prints in the pair to blend together too much.  See the pinwheel quilt photo below as a reference.  Note - your layer cake and charm pack versions will be a little scrappier than the FQ version since you will have 12 24 prints instead of 6.

This week, you'll need to collect your fabrics, cut them if needed (FQ version), and then separate your fabrics into 6 12 pairs - each pair of prints should contrast each other - one "light" and one "dark" print. That's it!  Later on this week, I will show you the fabrics I will be using and then next Monday, I will show you a quick method for making the half-square triangles and how to put your pinwheel blocks together. Make sure you have some pins ready ... that is key to successful piecing!

We'd love to see that fabrics you'll be using ... share them in our Flickr group pool.

Happy Sewing! :-)

Sunday, March 13, 2011

Winner and Pinwheel Stitch Along Update

Hello again!

Let's get straight to the good stuff .... we randomly drew a winner from our "Suggestions Anyone" post this morning ... congratulations to Tracy!  Tracy, please email us at sewlux (at) gmail (dot) com with your address so we can send out your prize.  We've got a set of 2 fat eighths from Bliss and a cute cupcake needle holder. :-)

Thank you to everyone who posted a suggestion and your thoughts on the coming soon fabrics ... we really appreciate your input and look forward to building our inventory around what you want most.

We heard you loud and clear about needing some ways to use all those beautiful precuts, especially charm squares! I have several projects/tutorials using those planned for the blog over the next couple of weeks, so I hope you'll stay tuned.

I am also going to be sharing directions and dimensions for three different sizes of the pinwheel stitch along quilt ... so whether you've got some fat quarters, a layer cake, or some cute charm squares, you can stitch along with us.  I will have all those details up and ready for you tomorrow morning so you can start making selections and prepare to get to stitchin' in week two.  This is definitely a quick and easy project, so I hope you'll join in the fun with us.

In the meantime, here's a sneak peek at my original version of the quilt we'll be making ... I had these Dillweed by SEI for Robert Kaufman sitting on the shelf for wayyyyy too long. So glad I put them to good use!

See y'all tomorrow!

Saturday, March 12, 2011

Ready ... Set ... Stitch!

Hi!  We've enjoyed reading your comments about our "coming soon" products and about the things you'd like to see from us at Sew Lux.  Remember that today is the last day to share your comments and be entered into a drawing for a little prize. Tomorrow, we'll post a winner here on the blog. :-)

Today, I am excited to share our first stitch along project.  Many of you have said you need some smaller projects ... and I know how that is!  They take less time and fewer materials and let's face it ... it's nice to finish up a project quick.  (I don't know about you, but I have a lot of WIPs, UFOs, and stacks of fabrics that have been looking at me from the shelf for quite some time!  :-)

So are you ready?!  For this first stitch along, we're going to make a small pinwheel quilt.  It's a beginner-friendly quilt and it would be great for a new little person or to hang on the wall.  If you are new to quilting, this will be a great project.  If you're a seasoned veteran, we'll this will be an easy breezy project! :-) So, I want you to check out your stash and get some supplies ready!

Here's what you'll need to get started ...
  • Six fat quarters (OR a layer cake or large scraps - you'll need 15 or 16 - 10" squares) for the quilt top
  • One yard for the backing
  • Half a yard for the binding
EDITED TO ADD:  I know many of you are probably hoarding some charm packs ... I will also share directions for using a charm pack for this  project.  The dimensions will be a little different and your quilt slightly more scrappy than if you use 6 FQ, but we'll make this an equal opportunity stitch/quilt along!  So, whether you have a stack of FQ, a charm pack or layer cake, come on over and join us!  :-)  
    Here's the time line for our stitch along ....
    • Week 1 (Mon. 3/14): Choose and Prepare Your Fabrics
    • Week 2 (Mon 3/21):  Piece Your Quilt Top
    • Week 3 (Mon 3/28): Quilt and Finish Your Masterpiece :-)
    • Week 4 (Mon 4/4): Show and Tell 
      Are you ready?!  Post a comment on this post and let us know that you'll be along for the ride!  If you have a blog, we'd love for you to include a link as well.  We've also got a Flickr group, so feel free to share with us there if you'd like. :-)