Happy Wednesday!
It's hard to believe there's little more than a week left in October! The holidays will be here before we know it! That seems just crazy.
If you need some fun and easy projects for your handmade gifts list, check out the Holiday Hustle QAL. We have 7 great new kits in non-holiday prints as well as four holiday versions of this easy lap quilt. And ... they're on sale now through Sunday! Everything you need for the top and binding of a lap quilt for less than $30! Check them all out here.
Happy Sewing! :-)
Showing posts with label Holiday Hustle. Show all posts
Wednesday, October 23, 2013
Thursday, August 15, 2013
Holiday Hustle QAL : Link Up
We hope you've enjoyed the Holiday Hustle QAL!
If you've finished your quilt, link it up below.
Links posted by 11:59 PM on August 31, 2013, will be entered in a random drawing for a $40 gift certificate to our shop!
For the drawing, a "finish" will count as a quilt that has been quilted and has the binding sewn down at least on the front. :-)
Thanks for stitching along with us! :-)
If you've finished your quilt, link it up below.
Links posted by 11:59 PM on August 31, 2013, will be entered in a random drawing for a $40 gift certificate to our shop!
For the drawing, a "finish" will count as a quilt that has been quilted and has the binding sewn down at least on the front. :-)
Thanks for stitching along with us! :-)
Holiday Hustle QAL: Quilting & Binding
It's time to finish up our Holiday Hustle quilts! If you are sewing along, I hope you've found this quilt fast and fun (and easy!) to put together. Today, I will be sharing how to quilt and bind your quilt. When you get your quilt finished, link it up in the linky post and share! Link up by 8/31/13 to be entered for a chance to win $40 to spend in our shop! Aren't you excited to have a great lap quilt done months before Christmas?! :-)
Step 1: Prepare the Binding
Last week, in the borders and sashing instruction, I shared that you'd cut SIX 2.5" x WOF strips for your binding. If you haven't cut those yet, grab a half yard and slice it up!
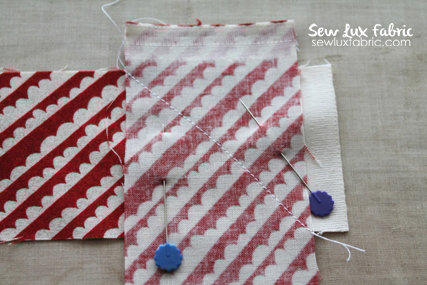
You are going to join all six strips together, end-to-end. Line them up as shown and stitch along the diagonal. Be sure to leave the selvages out of the way - we'll be trimming those off. (Note: if your fabric is directional, like this one, make sure they will line up right before sewing!)
Trim the ends off leaving a 1/4 inch seam allowance from the sewn line.
Press open. And repeat until all 6 strips are joined in one long continuous piece.
Fold the binding in half lengthwise and press. Roll it up really pretty (or don't) and set it aside for later. :-)
P.S. You can totally make the binding later, but I lose steam if I don't do it first! :-)
Step 2: Prepare the Backing
You need 3.5 yards of fabric for the backing. You'll cut the yardage in half for TWO 63" x WOF pieces.
Join the pieces along the selvage edge. (Note: If your fabrics are directional like my snowmen, make sure you sew them so both sides will face the right direction.)
You'll sew about 1/4" INSIDE the selvage - we'll trim those off. :-)
Step 3: Sandwich your Quilt Top
Find a good spot where you can lay out the whole quilt top.
I like to start with just the batting and top. Working from one end, carefully smooth the quilt top over the batting. Be careful not to smooth left to right too hard or you'll distort your quilt. I try to do the smoothing in a vertical motion. Roll the batting and quilt top up as you smooth it out. The photo below shows me starting this process.
Next, lay your backing out on the floor and tape down using painter's tape. (Note: I have trimmed the width of my backing a little (about 10 inches wider than my quilt top) prior to this step.)
Carefully unroll your top/batting onto the backing. Smooth it as you go so its nice and flat. (TIP: If your backing is directional, like my snowmen, make sure the top of your quilt it as the top of your backing.)
Pin it up! I used a safety pin in every charm square plus some in all the borders and in the sashing. A good rule of thumb would be to make sure your pins aren't more than a handprint apart.
Step 4: Quilt it!
Quilt as desired. You can straight stitch or free motion. I did an all-over free motion stipple on this one - which is usually how I quilt most of my projects.
I do have a pretty small machine. So on bigger projects, I roll up one side and start in the middle. If I can get down the middle section, I can then turn the quilt and work the sides a little easier. I also bring my machine down to the kitchen table and set up in the bottom right corner of the table so that the rest of the table can support the weight of the quilt.
When I free motion, I generally drop the feed dogs and lengthen my stitch as well. I used Aurifil 50 wt in white and I loved the way it kind of melted into the fabric since it is fairly fine thread.
Step 5: Attach the Binding
After you are done quilting, press the borders. And then trim them down. I trimmed them 6" from the seam between the inner and outer border to square up my quilt.
TIP: When I do this, I like to trim on a larger table like my kitchen table and use the table to support the quilt top. If your quilt is hanging off the edge of a table, it might distort your borders as you cut them due to the weight pulling on the quilt.
Using a walking foot and a lengthened stitch, attach the binding to the front.
I am assuming you have a basic knowledge of adding binding. If you're totally new, I have more info here in this tutorial post. (This post by Rita at Red Pepper Quilts is also really good and shows directions for binding completely by machine.)
TIP: I like to put my binding in a little bucket next to my machine as I attach it so it doesn't end up everywhere! :) I think I got this bucket at the $1 bin at Target.
Almost done! Take the quilt over to your ironing board and press the binding open.
And attach the binding to the back as you wish - by hand or by machine. In this case, the quilt is for my mom and I know she prefers the look of hand binding, so that is what I will be working on this week. :-)
Here are a few more shots of my quilt for you ...
Closer detail of the quilting ...
The cutie snowmen on the back ...
Happy Sewing! :-)
Thursday, August 8, 2013
Holiday Hustle QAL : Sashing & Borders
Happy Thursday!
It's time for another installment in the Holiday Hustle QAL. Last week, I shared directions for piecing the blocks using just one charm pack. Today, we'll add sashing and borders. Ready?
Step 1: Gather your yardage and start cutting.
You'll need 1 yard for the outer border, 3/4 yard of solid for sashing, 1/2 yard for the inner border, and 1/2 yard for the binding. If you ordered a kit from us, you've got everything you need!
From the solid, cut NINE 2.5" x WOF strips.
Set aside six strips and from the remaining 3 strips, cut NINE 2.5" x 10" strips.
Next, cut FOUR 3" x WOF strips for the inner border.
Then, cut FIVE 6.5" x WOF strips for the outer border.
And while we're cutting, let's go ahead and cut the binding strips for next week. You need SIX 2.5" x WOF strips. (Note: I use 2.5" strips, some folks like to use a 2.25" strip - do what you like!)
Step 2: Sash the block sets
Last week, we made blocks and sorted them into three sets - column A, column B, and column C. We need to sash between each block in each column.
You'll add a 2.5" x 10" strip between A-1 & A-2, between A-2 & A-3 and between A-3 & A-4. Repeating the process for column B and column C. Press toward blocks (away from sashing). You are NOT adding sashing strips above block 1 or below block 4 in each set.
As you are pinning and sewing sashing, make sure to line up the middle seams in each block to keep your columns straight. (This will also help with trimming later.)
Step 3: Trim the column strips
After pressing your blocks and sashing, you will have three longer pieced strips.
Use a ruler to trim the long edges of the pieced strips. You'll trim 4-3/4" away from the center seam in the blocks.
Step 4: Sash the strips together
Ok, next you'll grab the remaining solid WOF sashing strips and start sewing everything together.
Add a WOF strip on both sides of column B. Stitching the length of both sides. Press toward blocks.
And a WOF strip on the LEFT side of column A and on the RIGHT side of column C. Stitch the length of both columns. Press toward blocks.
Then, you'll join the the columns together and then add a WOF strip along the top and bottom of the joined columns. Press toward blocks. (Refer to diagram.)
Step 5: Add the borders
Add an inner border (3" x WOF) strip on the LONG sides first. Then add the top and bottom. (This is so we don't have to piece your inner border strips.) Press toward border.
Then, add an outer border (6.5" x WOF) strip on the TOP and BOTTOM first. If your border fabric is directional, make sure you add them all on in the same way. :-)
For the sides, we'll need to piece these borders to make them long enough.
Cut one of the WOF strips in half.
Sew one half to each of the two remaining WOF strips. Trim off the selvage. And if your prints are directional, make sure you sew them so the pattern is right side up on both pieces.
Then stitch the side border strips onto the quilt top. Press toward the border. (Refer to diagram.)
Step 6: Admire your work!
We'll meet back next week for quilting and binding! :-)
It's time for another installment in the Holiday Hustle QAL. Last week, I shared directions for piecing the blocks using just one charm pack. Today, we'll add sashing and borders. Ready?
Step 1: Gather your yardage and start cutting.
You'll need 1 yard for the outer border, 3/4 yard of solid for sashing, 1/2 yard for the inner border, and 1/2 yard for the binding. If you ordered a kit from us, you've got everything you need!
From the solid, cut NINE 2.5" x WOF strips.
Set aside six strips and from the remaining 3 strips, cut NINE 2.5" x 10" strips.
Next, cut FOUR 3" x WOF strips for the inner border.
Then, cut FIVE 6.5" x WOF strips for the outer border.
And while we're cutting, let's go ahead and cut the binding strips for next week. You need SIX 2.5" x WOF strips. (Note: I use 2.5" strips, some folks like to use a 2.25" strip - do what you like!)
Step 2: Sash the block sets
Last week, we made blocks and sorted them into three sets - column A, column B, and column C. We need to sash between each block in each column.
You'll add a 2.5" x 10" strip between A-1 & A-2, between A-2 & A-3 and between A-3 & A-4. Repeating the process for column B and column C. Press toward blocks (away from sashing). You are NOT adding sashing strips above block 1 or below block 4 in each set.
As you are pinning and sewing sashing, make sure to line up the middle seams in each block to keep your columns straight. (This will also help with trimming later.)
Step 3: Trim the column strips
After pressing your blocks and sashing, you will have three longer pieced strips.
Use a ruler to trim the long edges of the pieced strips. You'll trim 4-3/4" away from the center seam in the blocks.
Step 4: Sash the strips together
Ok, next you'll grab the remaining solid WOF sashing strips and start sewing everything together.
Add a WOF strip on both sides of column B. Stitching the length of both sides. Press toward blocks.
And a WOF strip on the LEFT side of column A and on the RIGHT side of column C. Stitch the length of both columns. Press toward blocks.
Then, you'll join the the columns together and then add a WOF strip along the top and bottom of the joined columns. Press toward blocks. (Refer to diagram.)
Step 5: Add the borders
Add an inner border (3" x WOF) strip on the LONG sides first. Then add the top and bottom. (This is so we don't have to piece your inner border strips.) Press toward border.
Then, add an outer border (6.5" x WOF) strip on the TOP and BOTTOM first. If your border fabric is directional, make sure you add them all on in the same way. :-)
For the sides, we'll need to piece these borders to make them long enough.
Cut one of the WOF strips in half.
Sew one half to each of the two remaining WOF strips. Trim off the selvage. And if your prints are directional, make sure you sew them so the pattern is right side up on both pieces.
Then stitch the side border strips onto the quilt top. Press toward the border. (Refer to diagram.)
Step 6: Admire your work!
We'll meet back next week for quilting and binding! :-)
Thursday, August 1, 2013
Holiday Hustle QAL : Piecing the Blocks
It's August 1st and that means its time to get this quilt under way! I pieced the blocks in about an hour and I probably could have hustled to get it done faster. Ready?
If you missed the first post detailing the fabric required for this quilt, check it out here. For today, all you need is a charm pack and your machine. That's it!
Step 1: Grab a charm pack!
I am using an Aspen Frost kit for my quilt. We'll use all 42 5-inch squares.
Step 2: Sort your charms by color.
It's likely that your charm pack is already sorted by color. So this is easy ... just lay them out so you can see them all.
Step 3: Sort your charms into three sets of 14.
To do this, you'll want to work by color. Sort of like dealing playing cards. Start with one color and divide into three stacks. Repeat with each color so that you won't have all the reds on one side and the greens on the other.
Step 4: Arrange each set group of 14 into smaller sections.
From each group of 14, you will need two sets of 2, one set of 4 and one set of 6. You can see that I just shift-sorted them on my ironing board. (This quilt is all about the hustle and I didn't feel like laying them out downstairs and then hauling them back up to sew! But if you prefer to lay them all out on the floor or a design wall, go for it!)
Note that I am trying to mix up the colors and prints some across the whole quilt top.
This diagram might help you plan your placement.
TIP: Once you have your placement figured out, its a great idea to snap a photo with your phone or camera. If you get confused while sewing later, you can then just check the photo to make sure you are sewing the right prints in the right order.
Steps 5 & 6: Sew and label your blocks
Cut some scraps of paper and label as A-1, A-2, A-3, A-4, B-1, B-2, B-3, B-4, C-1, C-2, C-3, and C-4. Lay them with each corresponding group (refer to diagram above). This way you'll be able to get them all in the right place later! I just pinned my labels to the top left corner of each block set as I was sewing them together.
Start sewing your blocks together using a 1/4" seam. Be careful of any directional prints that they all go in the same direction. (You don't want Frosty or some trees upside down later!)
For sets of 2 squares, press in either direction.
For the 4 patch, you'll sew two pairs and then join the two rows. Before joining, press rows in opposite directions so you can nest your seams.
Just butt the seams together, pin the intersection, and then sew.
Look how nice that turned out! You can press the completed 4 patch in either direction.
For the 2x3 block, repeat the process. Make 3 rows of pairs. Press in opposite directions, nest the seams, and sew the rows together.
Since we're hustling through this quilt, I chain pieced a lot of my blocks and then also double pinned my 2x6 to save a trip back to the ironing board. (Refer to photo above.)
Step 7: Check your layout and admire your work!
Now that you've sewn all your blocks together, take them where you can lay them out. Using the diagram shown earlier in this post, lay them out in columns (A, B, & C) and make sure you like the arrangement.
Shuffle them around a little if you feel like you need to balance colors or prints. Or just leave and love it!
That's all you need to do for this week! Next week, we'll add sashing and borders. The week after that we'll quilt and bind. A few Christmas kits are still available - so join the fun why don't you?!
If you have any questions, please leave a comment or email me at sewlux (at) gmail (dot) com.
Happy Sewing! :-)
If you missed the first post detailing the fabric required for this quilt, check it out here. For today, all you need is a charm pack and your machine. That's it!
Step 1: Grab a charm pack!
I am using an Aspen Frost kit for my quilt. We'll use all 42 5-inch squares.
Step 2: Sort your charms by color.
It's likely that your charm pack is already sorted by color. So this is easy ... just lay them out so you can see them all.
Step 3: Sort your charms into three sets of 14.
To do this, you'll want to work by color. Sort of like dealing playing cards. Start with one color and divide into three stacks. Repeat with each color so that you won't have all the reds on one side and the greens on the other.
Step 4: Arrange each set group of 14 into smaller sections.
From each group of 14, you will need two sets of 2, one set of 4 and one set of 6. You can see that I just shift-sorted them on my ironing board. (This quilt is all about the hustle and I didn't feel like laying them out downstairs and then hauling them back up to sew! But if you prefer to lay them all out on the floor or a design wall, go for it!)
Note that I am trying to mix up the colors and prints some across the whole quilt top.
This diagram might help you plan your placement.
TIP: Once you have your placement figured out, its a great idea to snap a photo with your phone or camera. If you get confused while sewing later, you can then just check the photo to make sure you are sewing the right prints in the right order.
Steps 5 & 6: Sew and label your blocks
Cut some scraps of paper and label as A-1, A-2, A-3, A-4, B-1, B-2, B-3, B-4, C-1, C-2, C-3, and C-4. Lay them with each corresponding group (refer to diagram above). This way you'll be able to get them all in the right place later! I just pinned my labels to the top left corner of each block set as I was sewing them together.
Start sewing your blocks together using a 1/4" seam. Be careful of any directional prints that they all go in the same direction. (You don't want Frosty or some trees upside down later!)
For sets of 2 squares, press in either direction.
For the 4 patch, you'll sew two pairs and then join the two rows. Before joining, press rows in opposite directions so you can nest your seams.
Just butt the seams together, pin the intersection, and then sew.
Look how nice that turned out! You can press the completed 4 patch in either direction.
For the 2x3 block, repeat the process. Make 3 rows of pairs. Press in opposite directions, nest the seams, and sew the rows together.
Since we're hustling through this quilt, I chain pieced a lot of my blocks and then also double pinned my 2x6 to save a trip back to the ironing board. (Refer to photo above.)
Step 7: Check your layout and admire your work!
Now that you've sewn all your blocks together, take them where you can lay them out. Using the diagram shown earlier in this post, lay them out in columns (A, B, & C) and make sure you like the arrangement.
Shuffle them around a little if you feel like you need to balance colors or prints. Or just leave and love it!
That's all you need to do for this week! Next week, we'll add sashing and borders. The week after that we'll quilt and bind. A few Christmas kits are still available - so join the fun why don't you?!
If you have any questions, please leave a comment or email me at sewlux (at) gmail (dot) com.
Happy Sewing! :-)
Subscribe to:
Posts (Atom)