Showing posts with label holiday. Show all posts

Tuesday, September 10, 2013

Tutorial : Boo Crew Mini Quilt

Hey y'all!  I am really excited to share a fast, fun, & festive mini quilt tutorial with you today.

This little mini is about 14 x 17 inches and is perfect for the wall or a table topper.  The best part is you can whip it up really quickly with minimal supplies.  Ready!?

Supplies Needed: 
1 Mini Charm Pack (42 2.5" x 2.5" precut squares)
1 Quarter Yard (9 x WOF) black print (borders & binding)
1 FQ cream print (backing)

Pick up a kit here - available while supplies last.

Step 1: Sort Your Charms
Sort your charm squares by color.


Step 2: Make the Pumpkin
Select 9 of the orange squares and sew into a 9-patch.  (Start by stitching together three rows of three squares and then joining the rows.)


Step 3: Sew the Pumpkin Corners
From the cream fat quarter, cut one 2.5" square from a corner.  (This can be a rough cut - it doesn't have to be exactly 2.5", but close is good. :-)

Cut the cream square and one green square in half diagonally.


Then sew one triangle onto each corner as shown in the photo.  Just eyeball them!  Make sure that once sewn and flipped, the cream or green print will cover the entire corner.  Sew cream on the top corners and green on the bottom corners.


Trim the extra orange off each corner and press the triangles open.  Then trim your block to 6.5" x 6.5".


Step 4: Plan the Rest of the Layout
Lay your pumpkin block down and then arrange green, purple, and low volume printed squares in the arrangement as shown.  (Low volume at the top, purple in the middle, and green on the bottom.)


Step 5: Piece the Background
Starting with the sides, piece one cream, one purple, and one green together.  Make two sets. Attach these 3-block pieces to the left and right sides of the pumpkin block. 


Then piece the top and bottom rows together into two 5-block strips. And sew to the top and bottom of the pumpkin block.


Then select one more purple print and four black prints for each side.  (Hold one black square for the stem in the next step.)  Sew the strips together and attach to the left and right sides. 


Step 6: Add the Stem
Adhere a small piece of fusible interfacing to the back of a black square.  


Cut a stem shape from the square. (I just cut a wonky square.) Then use a zig zag or blanket stitch to applique the stem to the pumpkin.  (TIP: I like to shorten my zig zag stitch length and tighten the width between stitches on my machine settings when doing machine applique.  I have talked about this here.) 


Step 7: Add the Borders
Next, cut the 9" x WOF black fabric into four strips.  TWO strips 1-3/4" wide and TWO strips 2.5" wide x WOF. (Note: in photo below, these strips are folded up. They are 44" in length.) 


Add a 1-3/4" strip to the top and bottom of the quilt.


Then add a 1-3/4" strip to each side. 


Step 8: Finish the Mini Quilt
Start by layering your top, batting, and backing (the cream FQ).  Pin or baste as desired. 


Quilt as desired.  This is a great time to try out different free motion designs! :-) 


After quilting, press, and trim excess batting and backing from your quilt. 

Join the two 2.5" x WOF black strips together to create the binding.  Press in half lengthwise.  Attach binding to the front and finish on the back by hand or machine.  (Again, more details on binding can be found in this tutorial here.)


Enjoy your new mini quilt!

If you make one of these, I'd love to see it - please link it up in the comments. :)  If you have any questions please comment or send me an email.

Happy Sewing! :-)

Thursday, July 11, 2013

Christmas in July Sewing Challenge : Aspen Frost Projects

Hey y'all!  I wanted to stop in and share the great projects that have been shared in the Christmas in July Sewing Challenge hosted by Christen at Love by Hand.


Christen contacted me several weeks ago about sponsoring the challenge and so we put together three FQ bundles (Aspen Frost, Winter's Lane, and In From the Cold) for the challenge. For each collection, two different bloggers will share a fun tutorial for the challenge. This week, Aspen Frost was up.


Christen made this awesome Present Placemat.  Check out the details and her tutorial here.


And Sarah at Stitching and Bacon made these cute Tree Trivets.  Her quick and easy paper piecing project tutorial can be found here.

I think both projects turned out so cute!  And its even more fun that I know both Christen and Sarah in real life.  We had a blast sewing together at Sew South and we'll even be sewing together next weekend with some other fellow Sew Southers!  :-)

You can also get involved with the challenge by entering your own project!  Read all the details here.

All the bundles for this series are available now and are 10% off through 7/14/13.  Stay tuned ... Winter's Lane challenge projects are up next!  :-)

Happy Sewing!  :-)

Saturday, December 29, 2012

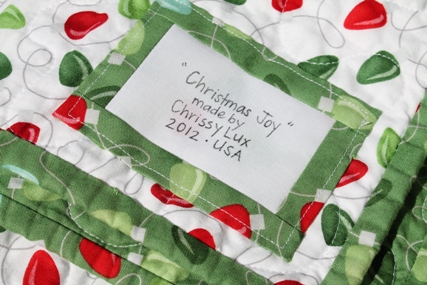
Christmas Joy Quilt

Well ... we've dug our way out of the wrapping paper, bags, and assorted bows and tissue.  I still haven't taken down the trees and decorations yet, but maybe tomorrow.

I did finish my quilt the day after Christmas and here it is ...


It seems really small when my giant, 6'4"husband holds it up.  But it is a decent size lap quilt. :-)


I decided to call it "Christmas Joy" instead of what I will be calling the pattern ("Holiday Hustle") when I get around to doing a tutorial for this one.  :-)


This quilt was easy ... and uses one charm pack, some Bella white solid for sashing, and Joy yardage for the border, binding, and backing.


I just did some free motion stippling on this one and it washed up and crinkled nicely.  :-)

I am happy to report it was very well received and even warranted a "best gift ever" comment.  Love it when that happens.  :-)

Happy Sewing!  :-)

Tuesday, December 18, 2012

Scrappy Gift Tag Tutorial

So getting sick the week before Christmas is a crafter's nightmare for sure.  Yep ... I came down with the crud on Saturday and haven't done much since.  I think I am finally back on the upswing but we'll see how the rest of the day goes.  

I did play around the weekend before last with a little scrappy gift tag idea.  Here's a quick tutorial for you ... 


Ok, so a card stock rectangle and a strip of green cut with pinking shears (solid works great since we'll see both sides).  My strip is about 1/2 inch or so wide. 


Fold and press the strip into a tree shape.


Lay the tree on the card stock and stitch it down.  (Tip: Use an old need when sewing on paper.)


I used a corner rounder and a oval punch to finish up my tag. 


Then cut out some little circles from another scrap to make ornaments.  I used some cherries - the circles are so small it won't matter that its not Christmas-y.


Place the ornaments where you want them and then just do a quick straight stitch back and forth over each ornament to tack them down. I did rough up the edges of the tree with my fingernail to fray the fabric a little and give some more texture to it.


Then write a message on the bottom, add some ribbon to tie on the package and you are all set!


Hope you enjoyed this quick little tutorial.  :-) 

Happy Sewing! :-) 

Thursday, November 8, 2012

Coffee Filter Crafting

Hey there y'all!

I know most of you probably visit for fabric-related projects, but I couldn't resist this fun and easy (and cheap) craft project I made the other day ....


Its a coffee filter wreath!  Seriously, natural coffee filters, a metal wreath, and a hot glue gun.


I followed this tutorial here after at least three of my coworkers at school made one. (Scroll down to find the white coffee filter wreath tutorial.)


I used a wire floral wreath ... a 6 inch one to test it out. I didn't fluff mine up either as I kind of prefer it more fanned out around the wreath.

What do you think?  Have you ever made one of these?  I  love it.

Hope you are having a wonderful week!

Happy Sewing! :-)

Tuesday, July 24, 2012

Tutorial: Textured Tree with Ruffles

Happy hellos to you all!  We're celebrating Christmas in July this week and today is the first of two tree tutorials ... this one is a textured tree with ruffles!  Both of the trees I'll be showing you this week will become wall art ... I will show you more about that on Thursday.  Let's get started!

Grab a sheet of computer paper and mark off an 8 x 10 rectangle (or whatever size frame you might like this to fit into.  And then rough out a sketch like I've done here.

Then, measure the two background pieces.  Just a ballpark ... we'll trim this down a little so if its a little big its ok.  :-)

Piece your background with two prints.  I am using a tonal floral from Etchings as my "wallpaper" and Bella Weathered Teak as my "ground."

Next, you'll trace the tree, trunk, and the tree skirt onto some fusible interfacing. Fuse your pieces to the wrong side of your chosen fabrics.

Trim the pieces and Fray Check the edges and allow them to dry.

Then, grab a pair of pinking sheers (or if you have a pinking rotary cutter that works too!) and cut some strips of green prints.  I am using two different prints from my stash.  My strips are about 1.5" wide ... no such thing as perfect here ... just cut some strips!  :-)

Grab your tree and a strip.  Stitch along the center of the strip and smush some ruffles under the foot as you stitch.  I like to use a clear foot and keep the needle in the down position and every few stitches, lift the presser foot and smush some more fabric underneath the foot to make some fun and casual ruffles.

When you're done it will look something like this.

Now, for the next row, flip the first ruffle up and hold it in place with a pin.  Position the next strip so there will be a little bit of overlap, but not too much and repeat the process.

Looking cute, right?!

Keep going ... alternating green prints and moving the top row out of the way as you stitch.  Be sure you are backstitching at the beginning and end of the ruffle.

Here's how to add more fabric on the fly if your strip is too short.  Grab another piece.

Fold both ends under about 1/4" and tuck the new one under the first one and keep on going.  Notice the overlap in the photo below.  (Hope this makes sense!)

Keep on going until your tree is covered.  (I ended up trimming the bottom of my tree shape a little since it was longer, but not long enough for another strip.)

Trim your tree from the back with your pinking sheers. Perfect isn't important on this ... just give it a haircut!

Now, lay all your pieces on your background and arrange as you'd like.  Use some Stitch Witchery to tack all the pieces down.  (Note: in this photo, I've placed the Stitch Witchery on top to show you placement, but it will go under the pieces and stick the tree, trunk, and skirt to the background.)

Stitch the pieces down with a zig zag stitch (I shorten the stitch length and the stitch width when I do this for a tighter stitch) using a coordinating thread starting with the trunk.  Move the tree and skirt back a little to stitch the trunk.

Then stitch the skirt down.

And finally the tree.  Because of the ruffles, I couldn't go all the way around, so I just held the ruffles back and stitched in between them.

I did get all the way around the bottom corners and along the bottom in one stitching session.

Here's my tree .... I haven't decided whether or not I want to add buttons ... so here's a picture auditioning a few ... maybe all the same color?  Or a different shape or buttons with shanks tucked between ruffles?  Beads?  Or just plain?

Decisions, decisions.  :-)

On Thursday, come back for another textured tree tutorial and I will show you how to turn these into wall art or a fun framed gift.

If you have any questions about the tutorial, please feel free to ask.  If you make a ruffled tree, I'd love to see it - link it up in the comments. :-)

Happy Sewing!  :-)