Showing posts with label weekend sewing. Show all posts

Sunday, April 10, 2016

Weekend Sewing : Lollies & Behind the Scenes

Hey there! 

So I finally found my way back to my sewing machine this weekend.  To be fair, I did sew like crazy last weekend, but it was all pre-market sewing with my friend Lee from May Chappell.  Secret sewing can't be shared .... so I will have to settle with sharing this new project.  

I saw an antique quilt on Instagram quite some time ago and I loved the block.  It was actually a signature quilt using the space in the middle (cross) for embroidered signatures.  So sweet!  I've been thinking about making a quilt ever since I first saw it and I finally chose my fabrics! 


Jen Kingwell nailed it with her new Lollies collection.  There are five prints in the collection, but each has eight stripes of different fun dottie prints... which means you get FOURTY prints in our bundle! 

Each stripe is about 5.5" wide, so you can get a 2.5" and a 3" strip of each one ... perfect for a 10" Hearth & Home block! 


The "Hearth & Home" Block is a classic block.  The cutting directions and assembly diagram can be found here. (Note:  I used 3" squares to make the HST blocks and then trimmed them to 2.5" with a Bloc Loc ruler instead of using 2-7/8" squares.  I find I get more accurate points this way.)

I am using eight prints from Jen's Behind the Scenes collection for the backgrounds AND I cut out all 30 of my blocks ... so I better get to chain stitching! :-)

Happy Sewing! :-)

Sunday, July 13, 2014

Sewing Stuff Together

I've become an Insta-sewer as opposed to a blogger.  I'm sorry about that - Instagram is just so easy! 

Anyway, I wanted to share a recent finish with you all ... the Sew Together Bag by Sew Demented!


This is actually my 2nd attempt at this bag and I already have two more in the works with plans for another two.  They are addicting and you have so many options with fabric placement to make them different.


Admittedly, there are some steps to this bag that scare some folks... zippers mainly.  I would classify this as appropriate for a confident beginner.  With that said, there aren't a lot of step-by-step pictures so you do have to read carefully.


Since I was making this second one for my friend, Sarah at Stitching and Bacon, I took it up a notch and pieced the outside in a mini sparkle punch pattern.  I totally love it. 


She is into cat fabric ... so I fussy cut the tabs just for her.


For the inside, I used some metallic birds, some cats, and some of a favorite text print and Carolyn Friedlander Botanics fabrics. 


I really love it.  Did I mention that?  

My next one uses Bliss by Bonnie & Camille ... I offered to make our Moda Rep a bag and she handed me like 10 fat quarters of Bliss ... and then said I could keep the scraps.  (I think I got the better end of that deal!)  I'll share that later this week... 

See you tomorrow with a brand new holiday mini tutorial!  

Happy Sewing!  :-) 

Monday, May 12, 2014

Weekender Sew Along : Making the Exterior


Hey there!  I've been really busy stitching up this bag over the weekend and I am nearly done!  :-)  I'm looking forward to finishing it up and sharing the results next week.  But first let's chat about how I've gotten the exterior of this bag together.


First, once you have your pockets all pieced, its time to quilt them.  I cut out the pocket pieces in the drill canvas and layered them with batting (trimmed approximately 1/2" smaller than the canvas) and then the pieced pocket front.  I used the iron to crease the centers on all four sides of each pocket top and the canvas piece so that I could line up my pockets straight.  I basted with 505 spray, but you can use pins.


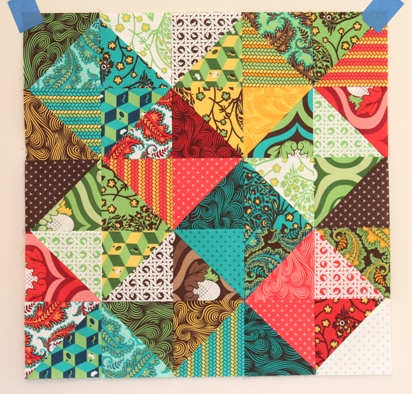
Then go ahead and quilt up your pockets as desired.  :-)  I did a lot of outlining of the main shapes for mine.


I made my pockets a little big on purpose so that I could trim them to the proper size later.  After quilting, I like to use the template as my trimming guide even though I have the canvas piece.  Sometimes with the quilting, you may have a little shifting so it is good to check.


Get all your pockets quilted and trimmed so we can add the piping.

For the piping on the pockets, you don't need it to be bias strips.  So cut 2" strips and fold them in half lengthwise.  Put some cording in the middle and stitch it closed - not too close to the cording.  We want to stitch progressively closer to the cording with each step.  Then, use a ruler to line up the edge of the cording with a straight line on your mat.  Then shift the ruler down 1/2 inch and trim any excess fabric. 


Baste the piping onto the top, right side of your pocket. I used a zipper foot with my needle 3 positions to the left of center.


Then add the pocket lining right sides together on top of the piping and pocket piece. Sew as close to the piping as possible.  I moved my needle over so it was 5 positions to the left of center (as far as it would go on my machine).


Fold back the lining so wrong sides are together and press.  Sew about 1/4" below the piping to secure everything in place, then sew around the edges of the sides and bottom to secure the pocket lining to the front.  Trim away excess fabric. (Note - I didn't cut pocket linings with templates - I just used squares/rectangles and them trimmed them later.) 


Repeat to add piping to the pockets.  (The pattern only calls for piping on the main pockets, but I like them on all four pockets.)

Next up, straps!  I made my straps in the same width as the pattern, but added about 6 inches to the length. I wanted them a little longer to swing it over my should with ease!

I used 2 layers of SF-101 on my straps.  Then I folded them in half lengthwise and then used a ruler to draw a line 1/2" above and below the center fold.  This line serves as a guide for how far to fold down the sides. Fold the edges in to meet the lines and press back in half.  Before sewing down both sides of the straps as well as the center, I added a 7/8" wide piece of fusible fleece inside the strap to make it a little sturdier.


For the main panels, I just straight-line quilted them with the Mochi Linen, batting and drill/canvas just like I did with the pockets. I did not use any interfacing on the main panels.

For the bag bottom piece, I did use a layer of SF-101 and then batting and drill/canvas.  I quilted this piece in a diamond pattern.  Fun fact:  The Bernina walking foot and the Mochi Linen Dot are a perfect match!  I just followed the dots with the sides of my foot to quilt this piece.


How are your bag parts coming along?  I am hoping to sneak in some sewing time this week before we head to market!  Share a link to your progress or tag me on Instagram.  And if you have questions, please ask!

Happy Sewing! :-)

Monday, April 14, 2014

Weekend Sewing

Hey folks!  Hope you had a great Monday!

Recently, I've been working through some stuff and it was strongly suggested that I slow down and take some time for my self.  So, in an effort to complete my homework assignment, I took Saturday and sewed ALL day!  I got quite a lot accomplished ...


I made a another little Sunshine Mini Mug Rug.  These are super easy and charm & scrap friendly.  (See the tutorial here.)


Finally bound my Lazy Sunday quilt in Scrumptious!  The bias stripes are perfect for bindings.  :-) I still need to photograph the finished quilt.


Then I got this striped binding on my St Louis 16 patch ... another quilt I need to photograph!  (Which I just realized I made the top for this in August ... oops!)

Then I moved on to making pouches!  Kate Spain sent me a mini charm pack of her upcoming line called Horizon.  It's really pretty!  I especially love the aquas and the blues in this line.


This aqua pouch turned out cute.  I used some teal perle thread from the Clover Sunshine sampler.


Then I made a blue one.  (More thread from the sampler and, of course, my new favorite neutral - Mochi Dots in Putty!)


That was so much fun I started prepping to make more ... including some with the awesome new Dottie prints.  (Charms, mini charms & yardage of Dottie just came in!)


By request, I am working on a tutorial for this little pouch - so be on the lookout for that soon!

That's all for now!

Happy Sewing!  :-)

Sunday, February 2, 2014

Lazy Sunday QAL : Piecing

It's Sunday and that means its time for another Lazy Sunday QAL update. :)

I've managed to get all of my blocks cut and made this week.  I must say that this is the perfect project when things are a little crazy because its such easy sewing!  There are no fussy pieces, templates or points to match, so you can start and stop as you need to.

And with chain piecing, you can easily get these blocks knocked out in about 20 minutes a day over the course of the week.   If you've been following me on Instagram, you've probably seen me working on these a little at a time over several days.  I didn't even use pins. Easy peasy.  Truly!


Actually the sewing is so laid back, I even managed to rotate my blocks the wrong way!  Fortunately, I don't think it will make a huge difference in the overall design.


I'm excited to throw these on the design wall this week and stitch them all together.

Just like last week, I've pulled a winner from Instagram.  This week, the winner is cdketchie!  She's well ahead of me and was posting a layout this weekend.


Congrats, cdketchie!  We'll be in touch so you can choose your next May Chappell pattern.  :-)

If you haven't started yet, grab a layer cake and join the fun!  You can even make it with fat quarters and you can certainly catch up quick!  :-)

Don't forget to tag your progress this week on Instagram with #lazysundayqal and #isewwithsewlux.

I will see you next week with my finished quilt top!

Happy Sewing!  :-)


Monday, December 23, 2013

Crazy Christmas Sewing ...

The past week has been a complete whirlwind in my sewing room!  And with Christmas a little more than 24 hours away I am happy to say I am nearly done with my projects ... we'll see how much I can get done tomorrow.  :-)

Wanna see my week in review?

Two pillows - super easy - charm square friendly.  :-)  (The one on the right is made with just two prints - these Potluck prints from American Jane are awesome - I got this whole pillow from from just two quarter yard cuts.)

Some super cute snack mats for our friends' kiddos.  Love the Potluck Building Blocks print for these.  One yard gives you several of each letter in the alphabet!  A must stash in my opinion.  :-) These were totally scrap friendly and are 8 x 10.


I also whipped up a crazy Christmas sweatshirt for our tacky sweater Friday last week.  I started with my ruffled tree tutorial and then added embellishments before sewing it to my sweatshirt. I did take pictures as I went and will post a tutorial as a reference for later.


Then two more pillows to match the original Holiday Hustle quilt from last year.  I hear they look really great on the couch with their quilt companion.  :-)


I've also finished hand sewing the binding on my Aspen Frost Holiday Hustle AND pieced and quilted four quilts within the last week!  More about all those quilts soon.  For now ... Dude ... I'm tired!

Follow me on Instagram (@sewlux) to see if I get it all done!  :-)

Happy Sewing!  :-)

p.s. I will also work on getting a winner drawn for the HSJ BOM Link Up as well!

Sunday, April 14, 2013

Weekend Sewing : Nest HSTs

Hope you all had a great weekend!  I spent ALL day Saturday sewing and got so much done.  What a great feeling!  Among all the blocks and things I finished and started, I also worked on this ...


We are having a post-Sew South swap.  I stalked my secret partner a little and decided that it was finally time to do something with these Tula Pink Nest HSTs that I've been hoarding since like 2010.  Seriously no joke ....2010.  So, I took them out of the WIP bag and got to arranging.


I can't decided if I should make a pillow or a wallhanging.  Either way its going to be 20" square and I am super proud of my seams on this .... a little patience for trimming and pinning goes a long way.


It also helps when you have a fun pincushion ring.  Pinning is soooo much more fun.  This pin was made by my girl Susannah Kate of Art Nest (etsy when she has them available) that I met at Sew South. As you can imagine - she is super fun!

More on what else I made later!

Happy Sewing!  :-)

Sunday, October 28, 2012

Weekend Sewing

Been doing a little sewing this weekend ... not too much since we traveled to a wedding out of town yesterday.  I have several friends expecting little ones soon, so I am on a mad dash to finish up some little quilts.


Fortunately, Jennie's Car Seat Quilt pattern is pretty quick to make.  Started a Bungle Jungle version ....


Finished the top today and then got all the pieces cut to a Vintage Modern version as well.  Hope to baste tomorrow.

What did you work on this weekend?

Happy Sewing!  :-)

Monday, July 2, 2012

Catching Up & Weekend Sewing

Hey friends!  How about that awesome tutorial Amy did for her Design Challenge?  I have several friends who've recently announced that they are expecting and I am eagerly awaiting to hear whether or not I will be able to use some pink on one of those bobby pillow covers!  :-)  


Did you get any weekend sewing done?  I did get some work done on my Scrap Attack Strings this weekend.  (More on that later this week.)  And, I am a little embarrassed to say that I totally forgot to post a linky for that in June.  So, I will be posting the new linky on Friday and be giving out two prizes this month to make up for that.  Sorry y'all!


I also got started a special pillow project with some super cute Get Together prints that I need to mail off tomorrow.  I had this "pleat party pillow" idea rolling around in my head for a week or two and am happy to report that it is coming out just as planned.  (I can't say that this always happens! :-)  I will show you the completed project in a few days.  Would any of y'all be interested in a tutorial for this one?

Speaking of tutorials, I will be posting over on Rhonda's blog with a quick and easy tutorial on Wednesday.  Just need to finish editing some photos for that.  And on the topic of photos, my mister loaned out our DLSR to a family member for their vacation (gasp!) and man what a difference in my pictures this week!  Can't wait to get that back!  LOL

Anyway, enough rambling for tonight ... hope you all had a wonderful Monday!

Happy Sewing!  :-)