Showing posts with label Valentines Day. Show all posts

Wednesday, February 3, 2016

Tutorial : Heart Mini Trio

Valentine's Day is quickly approaching and it is so nice to have a little something to show your favorite people you care.  This Heart Mini Trio comes together quick and easy thanks to Moda's precut mini charms!


You'll Need (kits while they last): 
  • 1 Mini Charm Pack (or thirty-five (35) 2.5" squares)
  • 1/4 yard binding
  • 1/4 yard backing
  • 10 x 20 cotton batting 
  • 3" x 4" cardstock 
  • 4" x 8" WonderUnder

Step One: 
Sort your fabric into four groups.  Using the First Crush Fabric by Sweetwater, I sorted as follows:
  • Eight red squares for the hearts 
  • Three sets of nine squares for the mini backgrounds 
Step Two: 
Next, sew together three nine-patches with your background squares.  Press the seams of each row in opposite directions so they will nest when you join them.


Then, sew the red squares together in a rectangle (two rows of four).  Press seams open. 

Step Three:  
Fold the 3" x 4" piece of cardstock in half (1.5" x 4") and use paper scissors to cut the shape of a heart.


Trace the cardstock heart onto paper side of the WonderUnder.  Cut out the hearts leaving a little room around your lines.  Then, following the manufacturer's directions, fuse the WonderUnder to the wrong side of your pieced hearts rectangle.


Cut out all three hearts.  And carefully peel the paper off.  Fuse to the nine patch units. 

Step Four: 
Using a coordinating thread, applique one heart to each of the three nine patch units.  (I used a zig zag stitch.  But you can use a blanket stitch or another decorative stitch.)


Step Five: 
Layer the nine patch, batting and backing.  Baste and quilt as desired.  Repeat to make three mini quilts. I chose to outline quilt the hearts and then stitch 1/4" along the sides of each seam to make a grid of quilting in the background. 

Step Six: 
Cut three 2.25" x WOF strips from the binding fabric (one strip for each mini).  Press in half lenthwise to created the binding strips.  Attach binding and finish by hand or machine as desired.  

If you do this by assembly line, you can make all three super quick!  You could also join them together to create a small runner or pillow.  

Hope you enjoyed this sweet little tutorial.  Kits for this are available in our shop while they last! 

Happy Sewing! :-) 


Sunday, January 26, 2014

Tutorial : Hugs & Kisses Mini Quilt

Hello!  I am so thrilled to share my latest mini quilt tutorial with you.  I was so excited as this was coming together - I think it turned out super cute! 


Materials Needed: 
1 Mini Charm Pack 
1 FQ low volume print for background
1 FQ print for backing
1 1/4 yard (9' X WOF) for binding
Batting - approx 18 x 24 inches
Basic sewing supplies (machine, thread, rotary cutter, ruler, etc)


Sort the Mini Charms: 
Select and stack the following: 
- X Block: 8 reds
- O Block: 8 pinks + 1 white/low volume
- Charm Border: remaining squares + one 2.5" square from background fabric

Cut the Following: 
From the Background Fabric (light grey & white print):
- ONE 2.5" x 21/22" strip - subcut into FOUR 2" squares and FIVE 2.5" squares
- TWO 1.5" x 21/22" strips (for border #1)
- FOUR 2" x 21/22" strips (for border #2)
* Be sure you are cutting strips so that you can getting the longest strips possible (perpendicular to the selvage edge, not parallel to the selvage edge) - this should yield a 21" or 22" long strip depending on the cut of your fat quarter.

From the Binding Fabric: 
- TWO 2.5" x WOF strips

Use a 1/4" seam throughout unless noted.

Make the "O" block. 
Grab your selected 8 pinks + 1 low volume/white square.  Arrange into a 9-patch.  Keep in mind some prints are directional. 
Sew the squares together in a 9-patch.  To do this, sew three rows of three squares.  Press each row in opposite directions and then sew the rows together. 


Place the FOUR 2" squares of background fabric on the 9-patch right sides together as shown - one in each corner.  Sew along the diagonal from corner to corner as shown in the photo.


Next, trim the outer corners off, leaving a 1/4 inch allowance from the seam.  Press background triangles open away from the center of the block.


Make the "X" block. 
Grab your selected 8 red squares.  Sew them into FOUR 2-patches, keeping directional prints as shown (they should be 1 column of 2 blocks as opposed to 1 row of 2 blocks).  IMPORTANT:  Use a SCANT seam when sewing these units.  A scant seam means to sew just shy of a 1/4" seam.  Press seams open. 

Grab the FOUR 2.5" background squares and cut them in half diagonally.


Position the triangles on each unit so that the point matches up to the center seam.  This is very important when we go to trim these blocks later!


Sew 1/4" seam along each side to secure one half of the 2.5" square on both sides of the red 2-patch units.


Press the triangles out and then trim your block to 3.5" square.

IMPORTANT:  These blocks are a tight squeeze.  You'll notice that the two red corners are lopped off.  By using the scant seam to make the red unit and pressing open, you should still have enough room to secure these blocks in your 1/4 seams when we join the four 3.5" squares.  
Under normal circumstances, I would not suggest you sew with short seam allowances.  However, since this is a mini and not likely to be heavily used like a kiddo quilt requiring lots of laundering, I feel its ok.  With that said, use your ruler to see where the 1/4" seam allowances would cross in the corner to be sure your trimming will still allow you some seam allowance.
You may wish to make a test block with scraps - I did!  :-)  If you do, use scraps - we will use every square in the mini charm pack for this project.


Repeat the trimming process until you have four 3.5" squares. Arrange them as shown.  And sew them together in a 4-patch unit.


Assemble the Mini:
Sew the X block and the O block together.  Careful of directional prints! 


Next, use the 1.5" background strips to add borders.  Sew the top and bottom first and then use the excess part of the background strip to add the border on to the sides. 


Arrange the remaining mini charm squares (plus the one extra 2.5" background square) around the mini's center.  You will need 7 each for the top and bottom, 4 each for the right and left sides and then 1 for each of the four corners. (I used the two matching grey chevrons and background print squares for my corners.)


Sew the top and bottom row squares together - two strips of seven squares.  Press each in one direction (doesn't matter which way).  And attach to the top and bottom of the mini center.  Press towards the background border. 

Then sew the sides strips together (four + two corners) for two strips of six squares. Press strips in one direction, but press the seam at the corner block TOWARD the corner square.  (This way they will nest with the top and bottom borders when you attach the sides.)  

Sew the side strips on and press away from the center.


Add the final border be sewing the 2" background strips to the top and bottom first.  And then to the sides.
Press away from the center.


Finish the Mini
Press the top well and layer the quilt top and batting on the backing.  (This is a tight squeeze on the FQ, but can be done.  Add a strip of remaining background fabric if you'd like a little more wiggle room.) 


Quilt as desired.  I used some small stipples, infinities, hearts, and some straight line quilting.  This is a great time to play around with free motion quilting designs.


Sew the two 2.5" binding strips together at the short ends to make one continuous piece. Attach to the front and finish by hand or machine on the back.
(More details on binding can be found in this tutorial here.)


You can see my quilting a little better in this photo: 


Enjoy your super sweet mini! :-)  Finished size is approximately 15.5" x 21.5". 


I hope you enjoyed this tutorial!  If you have any questions, please leave a comment or email me.  Also, link up your project if you make one - I'd love to see it. :-)

Happy Sewing!  :-)

Monday, January 21, 2013

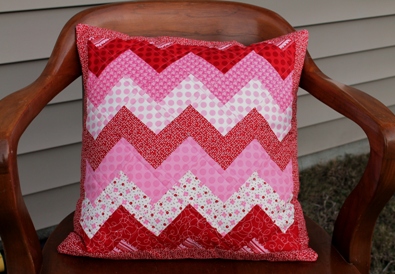
Sweet Chevrons Pillow Tutorial


I am so excited to share this happy pillow project using the 2013 Be Mine Bundle.  This is the first of two projects I will be making entirely from the bundle of 8 prints.  Ready?


For this 18" pillow, you'll need: 
- 8 coordinating FQ of red & pink prints (I used the 2013 Be Mine Bundle)
- 1 FQ of muslin or other fabric for backing

Note: Use a 1/4" seam throughout unless noted.

The first thing you need to do is decide what order you'd like your fabrics to be in the Chevron on the pillow.  Label your prints as "A" "B" "C" "D" "E" "F" "G" and "H".

Cut two 2" x 18" strips from each of your red and pink FQs.

You'll sew the strips together along the long side.  Sew strips in sets of two as follows:
AB, BC, CD, DE, EF, FG, GH, and HG.


(Note: for this part, I am using different prints for illustration purposes only. The diagram below should help this make more sense if you are confused.  The above photo is meant to illustrate AB and BC strips.) 


Measure the width of your strips - mine were 3.5" wide.


Subcut the pieced strips into 3.5" squares.  (Note: if your's measured something different, adjust your square size.)  You should be able to get 5 squares from each strip set, although we'll only need 4 from each one.


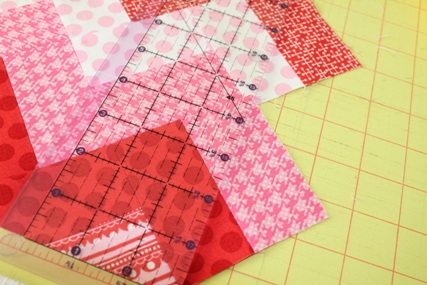
Once you have sewn and subcut all your strips, you will then lay them out in a chevron pattern.  You'll need to lay these out on point (diagonal/diamond) to make the pattern.  Refer to the diagram below.


Ok, now its time to piece the blocks together.  You'll be working in rows.

Sew the blocks together in diagonal rows.


Then sew the rows together, being sure to pin at the intersections.  Lots of pins is good to get everything lined up. :-)

Keep sewing until you get all the rows joined.

Press everything really well before moving on.  I pressed all my seams open as I went - but that is a personal choice.  I sometimes press to the side and sometimes press open - just depends on what I am making.  Here I went with pressing everything open to keep the project pretty flat.


Now, you'll trim this down - trim 1/4" away from the points along the sides.


Mine measured about 15.5 inches square after trimming.


From one of the FQs, cut four 2" x 18" strips to make borders.


Add borders - top and bottom and then the sides.  (TIP:  Keep the border strip on the bottom - this will slide through the machine easier since it will be nice and flat without the seams.  I pressed toward the borders.)

Next, press your pieced pillow top well (again), layer with batting, and backing (I used a FQ of muslin).  You could just use a layer of flannel and omit the batting and backing/muslin, if you prefer.  Baste and quilt as desired.


I quilted diagonal lines along the block seams.  And then free motioned some loops in the border (which, you can hardly see because the print is busy).  Note - if you are new to free motioning, a busy print and coordinating thread hides any errors!  ;-)

Press the quilted top and trim to 18" square.

Next, grab two more of the FQ pieces for the backing.  For each piece, fold the selvage over, press, and stitch down.


Then trim them to size 13" from folded selvage edge by 18" wide.


Now, place your pillow front RIGHT SIDE UP on your table, and layer one of the backing rectangles on top so they are RIGHT SIDES TOGETHER.  Selvage edge should be in the middle and raw edge along the outside edge of the pillow front.


Then, layer the second backing rectangle on top - the two pieces (selvage ends) will overlap in the middle.
Pin all the way around.  Then sew all the way around the square.  Used a 3/8" seam for this part.

Remove the pins, turn inside out and press and ENJOY!


The back should look like this ....


I hope you enjoyed this tutorial.  I have one more project in the works with the leftovers from this project, so stay tuned! :-)

As always, I'd love to see your version if you make one - please send me a link or comment.  If you have any questions about the tutorial, please ask in the comments or send an email.

Happy Sewing!  :-)

Saturday, January 5, 2013

Zig Zagging Along

Hey y'all!  I've been having a little fun with the 2013 Be Mine Bundle this weekend.  :-)

I am in the middle of the first of several projects I hope to get out of this bundle ... first up a little chevron pillow. What do you think so far?


I just love these sugary sweet, dotty prints.  :)  We still have some bundles available here.

Happy Sewing! :-)