

Showing posts with label Tutorial. Show all posts
Showing posts with label Tutorial. Show all posts
Thursday, September 22, 2016

Wednesday, February 3, 2016
Tutorial : Heart Mini Trio
Valentine's Day is quickly approaching and it is so nice to have a little something to show your favorite people you care. This Heart Mini Trio comes together quick and easy thanks to Moda's precut mini charms!

You'll Need (kits while they last):
Step One:
Sort your fabric into four groups. Using the First Crush Fabric by Sweetwater, I sorted as follows:

Step Four:

You'll Need (kits while they last):
- 1 Mini Charm Pack (or thirty-five (35) 2.5" squares)
- 1/4 yard binding
- 1/4 yard backing
- 10 x 20 cotton batting
- 3" x 4" cardstock
- 4" x 8" WonderUnder
Step One:
Sort your fabric into four groups. Using the First Crush Fabric by Sweetwater, I sorted as follows:
- Eight red squares for the hearts
- Three sets of nine squares for the mini backgrounds
Step Two:
Next, sew together three nine-patches with your background squares. Press the seams of each row in opposite directions so they will nest when you join them.


Then, sew the red squares together in a rectangle (two rows of four). Press seams open.
Step Three:
Fold the 3" x 4" piece of cardstock in half (1.5" x 4") and use paper scissors to cut the shape of a heart.


Trace the cardstock heart onto paper side of the WonderUnder. Cut out the hearts leaving a little room around your lines. Then, following the manufacturer's directions, fuse the WonderUnder to the wrong side of your pieced hearts rectangle.

Cut out all three hearts. And carefully peel the paper off. Fuse to the nine patch units.
Step Four:
Using a coordinating thread, applique one heart to each of the three nine patch units. (I used a zig zag stitch. But you can use a blanket stitch or another decorative stitch.)


Step Five:
Layer the nine patch, batting and backing. Baste and quilt as desired. Repeat to make three mini quilts. I chose to outline quilt the hearts and then stitch 1/4" along the sides of each seam to make a grid of quilting in the background.
Step Six:
Cut three 2.25" x WOF strips from the binding fabric (one strip for each mini). Press in half lenthwise to created the binding strips. Attach binding and finish by hand or machine as desired.
If you do this by assembly line, you can make all three super quick! You could also join them together to create a small runner or pillow.
Hope you enjoyed this sweet little tutorial. Kits for this are available in our shop while they last!
Happy Sewing! :-)
Friday, January 29, 2016
Project 48 Quilt
Happy Friday!
This week is my week on the Project 48 Quilt block series. Have you heard of Project 48 Quilt? It's a block of the week sampler that is hosted by Linden & Crystal. Over the course of the year, there will be 48 different quilt blocks shared by Linden, Crystal, and 24 bloggers (including your's truly).
January's theme is the nine-patch. The is a simple block to make, but of course, there are lots of variations when you play around with the size of the center patch versus the surrounding areas or when you piece some of the patches.

I love polka dots, so this was the block I came up with. I definitely want to make a scrappy version of this block soon. I am calling it the "Meet Me in the Middle" block. You can certainly change this up with two colors or event a total of eight prints for the circle.
You can still sign up for Project 48 Quilt FREE through the end of January. After that, its a nominal fee. Learn more here.
Happy sewing! :-)
Wednesday, November 18, 2015
Thimble Blossoms Sampler Week 7 - Nantucket
Hi there!
I am finally back with the last block installment in this sampler project. This week, we are using the Nantucket pattern. I've heard a few of you on Instagram share that this block is a little intimidating. And while it certainly does look difficult, you can totally do it! I photographed a few steps to share some tips with you all.

Before I go into the tips, I will say that this block is a little on the tedious side as you really need to pin carefully in each step. I would consider myself a confident piecer, so I didn't draw the lines as Camille suggests in the pattern. So, if this is a little scary, I would suggest you definitely do that AND maybe make a test 1/4 of a block to get more comfortable with this block.
First ... you are going to need some pins! The finer the better.

I used pins in all the intersections as I pieced the strips and completed strip sets together. Put the pin through each unit at 1/4" and this will help line everything up nicely. (Remove pins as you sew!)
Side note: be really gentle when pinning ... you don't want to pull or tug the fabric a lot since there is a lot of bias going on here!

Continue pinning as you join the larger pieced triangle units into the quarter blocks. I used pins at every intersection as well as in the background triangles.

The pattern suggests that you may need to trim these quarter units. I chose to do so here. You can use the diagonal lines your mat if you have them to assist you, if needed. I didn't need to trim much ... especially in my 2nd and 3rd blocks where I was much more careful in handling and pressing my units.

Continue pinning when you join the quarter units together.

You'll make two halves of the block. And I pressed the seams between the quarter units in opposite directions so they would nest when I joined the two halves.

The next thing I want to share has to do with pressing ... and I mean "press" as opposed to "iron." All the block pieces have bias edges, which means that they will stretch. So you want to be very careful about pressing these blocks - in ALL stages of construction. Sometimes I "iron" and really force fabric where I need it to go. Here we want to press... so up and down (vertically) with the iron as opposed to doing more heavy-handed sliding of the iron on the seams, if that makes sense. I also chose not to use steam here to try and minimize stretching & distortion.
Another tip related to pressing is to finger press seams before you press them with the iron. I usually "set the seam" quickly with an iron and then gently press the seam open with my fingers before getting the iron involved. This just helps to make sure I don't work the fabric too hard with my iron.
(My good friend Lee at May Chappell calls this "married seams" in her glossary of important terms.)

Overall, I am happy with how these blocks turned out. They are not completely perfect, especially this first one that I made ....

You can see where I ended up trimming a little too much - which was possible because I had ironed a little more than I had pressed. :/

I will lose some points on the outer edge of my block. BUT ... in general, I think they turned out pretty good and this quilt is for me. Not for a show. But for me to enjoy and once it is quilted I don't think it will be super noticeable unless you really look. So I decided to live with it. :-)

I can't really decide which I like best. But I love the floral backgrounds. I specifically chose these for this block in the kit because the seams would be less noticeable in the background.

Well, there you have them! Good luck! If you need help, just tag me on IG @sewlux and use #TBScrappySamplerQAL.
I will be back in a couple of days to share the layout process. We'll start in the middle and work our way out, so hang tight on that step!
Happy Sewing!
I am finally back with the last block installment in this sampler project. This week, we are using the Nantucket pattern. I've heard a few of you on Instagram share that this block is a little intimidating. And while it certainly does look difficult, you can totally do it! I photographed a few steps to share some tips with you all.

Before I go into the tips, I will say that this block is a little on the tedious side as you really need to pin carefully in each step. I would consider myself a confident piecer, so I didn't draw the lines as Camille suggests in the pattern. So, if this is a little scary, I would suggest you definitely do that AND maybe make a test 1/4 of a block to get more comfortable with this block.
First ... you are going to need some pins! The finer the better.

I used pins in all the intersections as I pieced the strips and completed strip sets together. Put the pin through each unit at 1/4" and this will help line everything up nicely. (Remove pins as you sew!)
Side note: be really gentle when pinning ... you don't want to pull or tug the fabric a lot since there is a lot of bias going on here!
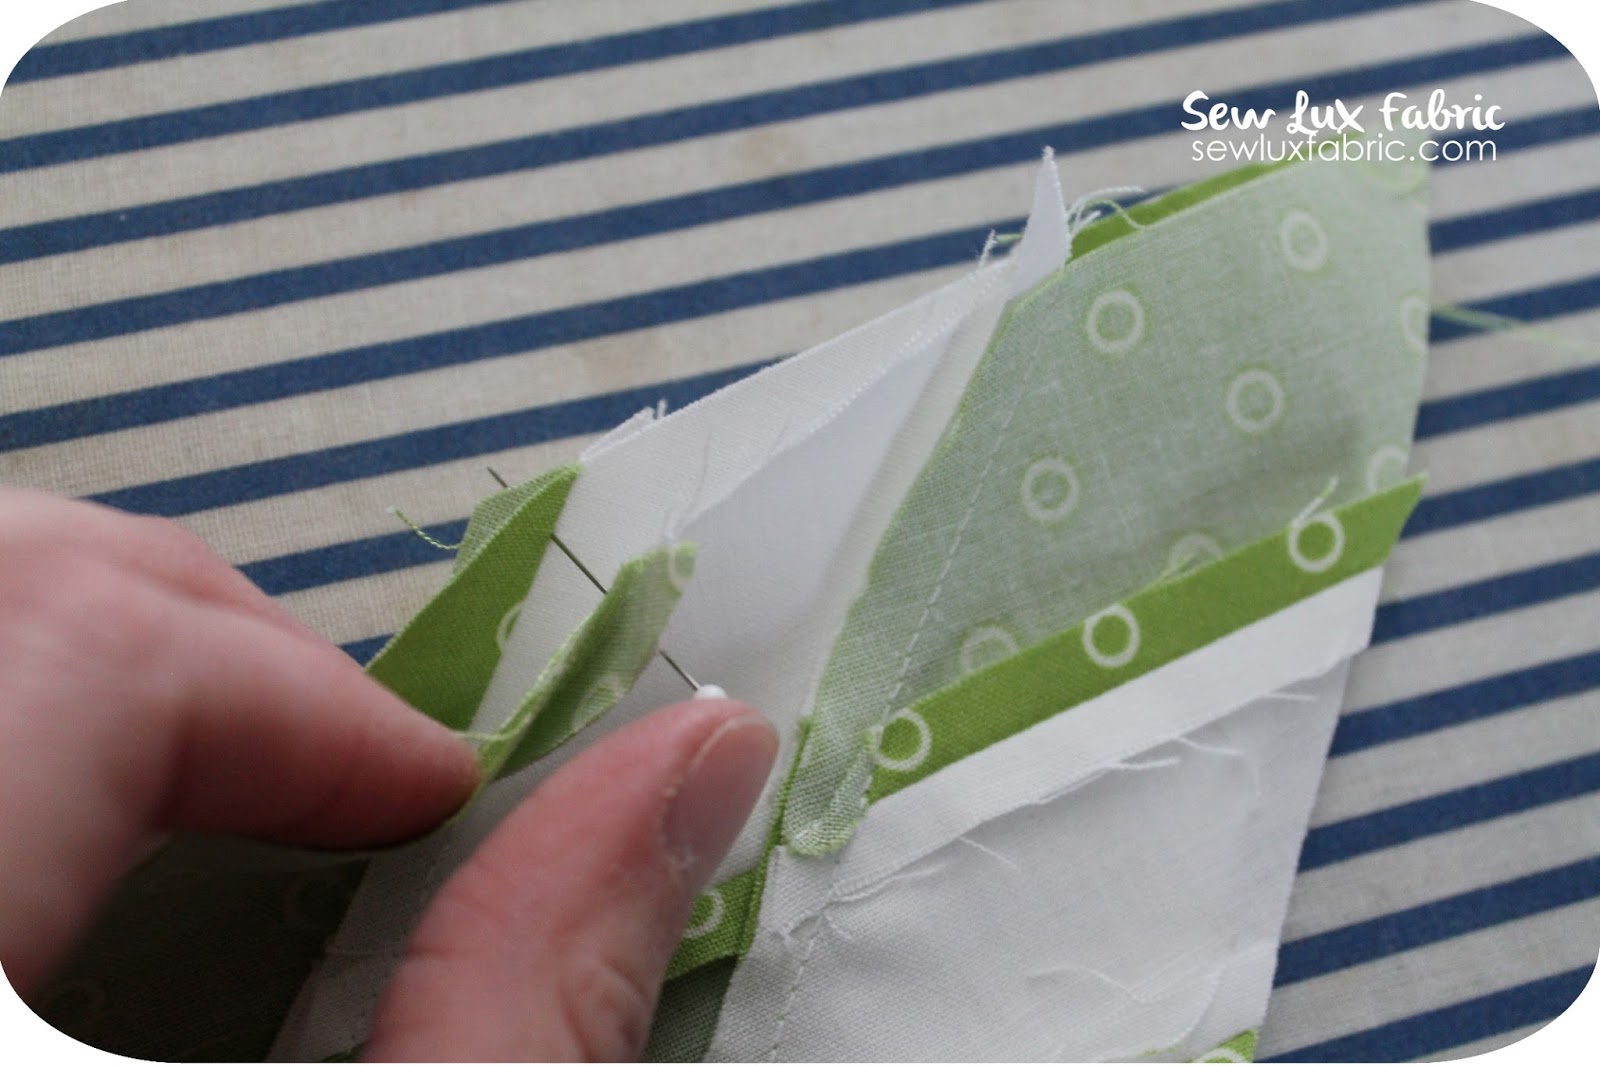
Continue pinning as you join the larger pieced triangle units into the quarter blocks. I used pins at every intersection as well as in the background triangles.

The pattern suggests that you may need to trim these quarter units. I chose to do so here. You can use the diagonal lines your mat if you have them to assist you, if needed. I didn't need to trim much ... especially in my 2nd and 3rd blocks where I was much more careful in handling and pressing my units.

Continue pinning when you join the quarter units together.

You'll make two halves of the block. And I pressed the seams between the quarter units in opposite directions so they would nest when I joined the two halves.

The next thing I want to share has to do with pressing ... and I mean "press" as opposed to "iron." All the block pieces have bias edges, which means that they will stretch. So you want to be very careful about pressing these blocks - in ALL stages of construction. Sometimes I "iron" and really force fabric where I need it to go. Here we want to press... so up and down (vertically) with the iron as opposed to doing more heavy-handed sliding of the iron on the seams, if that makes sense. I also chose not to use steam here to try and minimize stretching & distortion.
Another tip related to pressing is to finger press seams before you press them with the iron. I usually "set the seam" quickly with an iron and then gently press the seam open with my fingers before getting the iron involved. This just helps to make sure I don't work the fabric too hard with my iron.
(My good friend Lee at May Chappell calls this "married seams" in her glossary of important terms.)

Overall, I am happy with how these blocks turned out. They are not completely perfect, especially this first one that I made ....

You can see where I ended up trimming a little too much - which was possible because I had ironed a little more than I had pressed. :/

I will lose some points on the outer edge of my block. BUT ... in general, I think they turned out pretty good and this quilt is for me. Not for a show. But for me to enjoy and once it is quilted I don't think it will be super noticeable unless you really look. So I decided to live with it. :-)

I can't really decide which I like best. But I love the floral backgrounds. I specifically chose these for this block in the kit because the seams would be less noticeable in the background.

Well, there you have them! Good luck! If you need help, just tag me on IG @sewlux and use #TBScrappySamplerQAL.
I will be back in a couple of days to share the layout process. We'll start in the middle and work our way out, so hang tight on that step!
Happy Sewing!
Sunday, October 11, 2015
Thimble Blossoms Sampler Week 4 - 9 Patches
Welcome back! I hope you are having fun sewing along on this QAL ... How did you did with your house blocks last week?
This week, we are making the last of the blocks we will need from the Summerville pattern by Camille at Thimble Blossoms.


One thing I wanted to make sure to point out in the pattern is that you need to trim the 9 patch before adding the corner pieces to complete the block. The pattern calls for this (I may have missed it with my first block!) and you will have a hard time getting your finished block the correct size without cutting off points if you don't. For me, it was about a 1/8" off each side.

You will need 8 blocks total. I haven't sewn mine together yet since I may switch up the layout a little on the top row of the quilt (more about that later).
I hope you are having fun sewing along. Share a link or tag me on Instagram (@sewlux) and use #TBScrappySamplerQAL so I can see your little neighborhood!
Have a great weekend and I will see you next Friday with the Flower Patch block. :)
Happy Sewing! :-)
This week, we are making the last of the blocks we will need from the Summerville pattern by Camille at Thimble Blossoms.

These little 9 patch blocks are point come together quickly. You can see that I elected to use low volumes in the outer corners and replaced the middle background square with another print for some variety. Feel free to make these however you want!
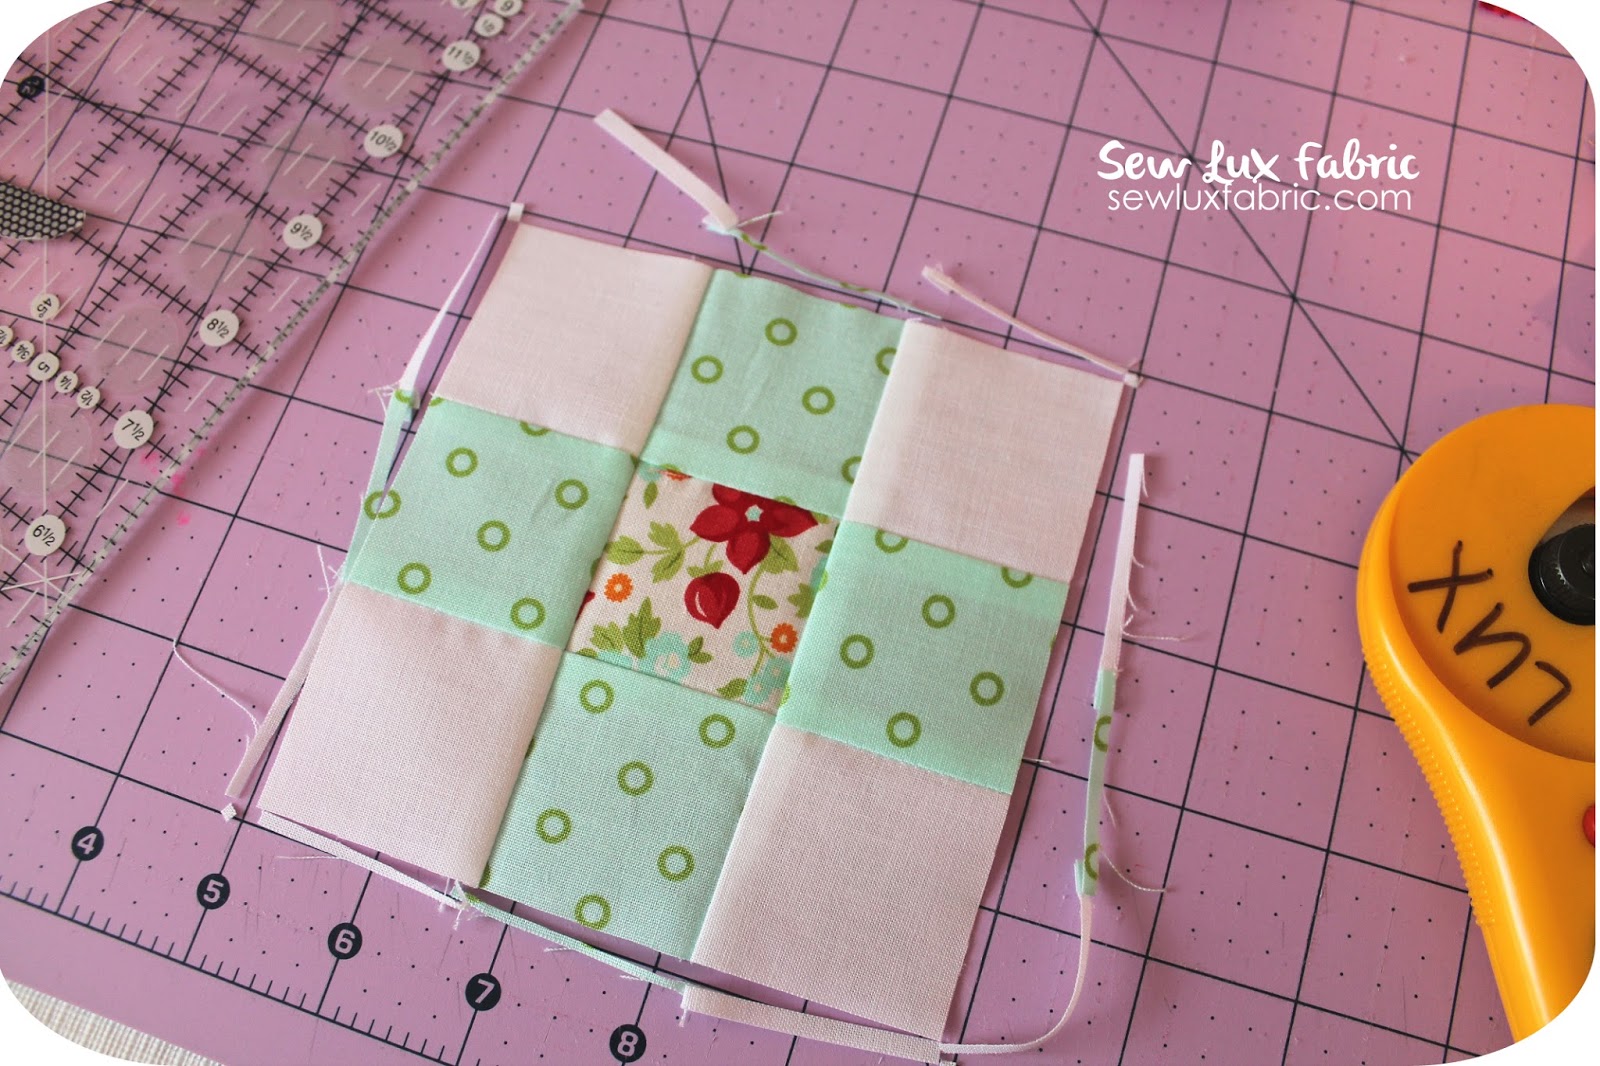

You will need 8 blocks total. I haven't sewn mine together yet since I may switch up the layout a little on the top row of the quilt (more about that later).
I hope you are having fun sewing along. Share a link or tag me on Instagram (@sewlux) and use #TBScrappySamplerQAL so I can see your little neighborhood!
Have a great weekend and I will see you next Friday with the Flower Patch block. :)
Happy Sewing! :-)
Thursday, August 6, 2015
Smitten Quilt Along : Small Block Six
Hey everyone! How are your Smitten quilts coming along? We are coming to a close on the quilt along ... I know I have a few blocks to catch up on! But this month's little block is certainly pretty quick and easy even though it looks like it might not be. No Y-Seams! :-)

For more details on the Smitten Quilt Along, visit this post here for dates and supplies, etc. If you haven't purchased templates, go ahead and make your's using the pattern and template plastic or other material of your choice. (Be sure to add the seam allowance if making your own templates.)
This month is our last tutorial and its Small Block Six ...

Cut out your fabrics and then mark your pieces. (I actually chose not to mark this time for two reasons: (1) there are no y-seams and the clipped corners help me line things up and (2) I am pretty comfortable sewing these now!) Then lay out your block in a pleasing arrangement. Here, I am just using two main prints and alternating them with a "background."

First, we need to make the pieced triangles. We'll sew edge-to-edge to join them... one triangle to the diamond at a time. I also backstitched at the beginning and ends as I chain pieced them.

Then the second triangle to the diamond. I pressed toward the triangles in both steps.

Next, sew two sets of triangles together. You can sew edge-to-edge since there are no Y-seams in this one! (yay!)


Again, we'll sew edge-to-edge since we won't have to join the two halves with y-seams.
You'll have two halves like this. If you are using two alternating prints, they'll be opposite of each other like shown.

Pin the two halves together and sew your last seam. (I put a pin through the intersections to help line things up nicely. See block four here ... its just like last month!)
Viola! Really easy block! :-) You need seven of these cuties.

I am still working on completing all my blocks and will need join my small hexagons into bigger ones as well as make the half blocks necessary. I'll share more of those soon!
I hope these photos were helpful to you... I can't wait to make a few more myself and to see your's too! Don't forget to use #smittenquilt and #smittenquiltqal on Instagram. :-)
If you have questions, leave a comment, email me or tag me on IG!
Happy Sewing! :)


Cut out your fabrics and then mark your pieces. (I actually chose not to mark this time for two reasons: (1) there are no y-seams and the clipped corners help me line things up and (2) I am pretty comfortable sewing these now!) Then lay out your block in a pleasing arrangement. Here, I am just using two main prints and alternating them with a "background."

First, we need to make the pieced triangles. We'll sew edge-to-edge to join them... one triangle to the diamond at a time. I also backstitched at the beginning and ends as I chain pieced them.

Then the second triangle to the diamond. I pressed toward the triangles in both steps.

Next, sew two sets of triangles together. You can sew edge-to-edge since there are no Y-seams in this one! (yay!)

Press and then get ready to add the third triangle to each pair.

Again, we'll sew edge-to-edge since we won't have to join the two halves with y-seams.
You'll have two halves like this. If you are using two alternating prints, they'll be opposite of each other like shown.

Pin the two halves together and sew your last seam. (I put a pin through the intersections to help line things up nicely. See block four here ... its just like last month!)
Viola! Really easy block! :-) You need seven of these cuties.

I hope these photos were helpful to you... I can't wait to make a few more myself and to see your's too! Don't forget to use #smittenquilt and #smittenquiltqal on Instagram. :-)
If you have questions, leave a comment, email me or tag me on IG!
Happy Sewing! :)
Sunday, July 19, 2015
Smitten Quilt Along : Small Blocks Four and Five
Hey everyone! How are your Smitten quilts coming along? I am sorry I was running late this month getting this posted. I got distracted with my Thimble Blossoms Scrappy sampler. In all honestly, these two little blocks took no time at all and were really easy once I finally sat down to make them!

For more details on the Smitten Quilt Along, visit this post here for dates and supplies, etc. If you haven't purchased templates, go ahead and make your's using the pattern and template plastic or other material of your choice. (Be sure to add the seam allowance if making your own templates.)
We will start with Small Block Four ...

Cut out your fabrics and then mark your pieces. Mark the wrong side of your fabric pieces with dots where the 1/4" seams would meet. (The acrylic templates have holes, making this super easy!) Alternatively, you could use your ruler and pen to draw lines along the seam allowances to mark your start and stop points.

Lay out your block in a pleasing arrangement. Here, I am just using two prints and alternating them.

Next, sew two sets of triangles together. You can sew edge-to-edge since there are no Y-seams in this one! (yay!)

Press and then get ready to add the third triangle to each pair.

Again, we'll sew edge-to-edge since we won't have to join the two halves with y-seams.

You'll have two halves like this. If you are using two alternating prints, they'll be opposite of each other like shown.

Pin the two halves together. I put a pin through the intersections to help line things up nicely.

Viola! Really easy block! :-) You need four of these cuties.

Next up ... Small Block Five.

Cut out your fabrics and then mark your pieces. Mark the wrong side of your fabric pieces with dots where the 1/4" seams would meet. (The acrylic templates have holes, making this super easy!) Alternatively, you could use your ruler and pen to draw lines along the seam allowances to mark your start and stop points.
I elected to fussy cut all three diamonds from the same fabric for this particular block. But you could do three prints in the same colorway or whatever you like!

Next, sew two diamonds together. You'll sew from the outer edge (left) to the dots in the center of the block (right). Be sure to backstitch at the dots.

Your diamonds should look like the photo below. Next, you'll attach the third diamond by sewing from the center dots all the way to the outside edges.

When sewing on the second side, be sure you you move the opposing diamond out of the way so it doesn't get caught in your stitching.

All done! Quick and easy! I pressed all the seams in one direction going around the block (clockwise).

You'll need eight of these pretties!
I am hoping to get caught up in the next few weeks with all my blocks so far. Don't forget to use #smittenquilt and #smittenquiltqal on Instagram. :-)
If you have questions, leave a comment, email me or tag me on IG!
Happy Sewing! :)


Cut out your fabrics and then mark your pieces. Mark the wrong side of your fabric pieces with dots where the 1/4" seams would meet. (The acrylic templates have holes, making this super easy!) Alternatively, you could use your ruler and pen to draw lines along the seam allowances to mark your start and stop points.

Lay out your block in a pleasing arrangement. Here, I am just using two prints and alternating them.

Next, sew two sets of triangles together. You can sew edge-to-edge since there are no Y-seams in this one! (yay!)


Again, we'll sew edge-to-edge since we won't have to join the two halves with y-seams.

You'll have two halves like this. If you are using two alternating prints, they'll be opposite of each other like shown.

Pin the two halves together. I put a pin through the intersections to help line things up nicely.

Viola! Really easy block! :-) You need four of these cuties.

Next up ... Small Block Five.

Cut out your fabrics and then mark your pieces. Mark the wrong side of your fabric pieces with dots where the 1/4" seams would meet. (The acrylic templates have holes, making this super easy!) Alternatively, you could use your ruler and pen to draw lines along the seam allowances to mark your start and stop points.
I elected to fussy cut all three diamonds from the same fabric for this particular block. But you could do three prints in the same colorway or whatever you like!

Next, sew two diamonds together. You'll sew from the outer edge (left) to the dots in the center of the block (right). Be sure to backstitch at the dots.

Your diamonds should look like the photo below. Next, you'll attach the third diamond by sewing from the center dots all the way to the outside edges.

When sewing on the second side, be sure you you move the opposing diamond out of the way so it doesn't get caught in your stitching.

All done! Quick and easy! I pressed all the seams in one direction going around the block (clockwise).

You'll need eight of these pretties!
I am hoping to get caught up in the next few weeks with all my blocks so far. Don't forget to use #smittenquilt and #smittenquiltqal on Instagram. :-)
If you have questions, leave a comment, email me or tag me on IG!
Happy Sewing! :)
Sunday, June 7, 2015
Moda Bake Shop - Sunset Ridge Quilt
Hey there!
Just wanted to pop in and share a fun quilt I made for the Moda Bake Shop last week.

Stop by and see the quilt and tutorial here.
This is SO fast and easy! We'll have kits available soon. :-)
Happy Sewing!
Just wanted to pop in and share a fun quilt I made for the Moda Bake Shop last week.

Stop by and see the quilt and tutorial here.
This is SO fast and easy! We'll have kits available soon. :-)
Happy Sewing!
Saturday, June 6, 2015
Smitten Quilt Along : Large Block Five and Small Block One
Hey everyone! How are your Smitten quilts coming along? I've really enjoyed seeing all your blocks on Instagram. :-)
What's awesome about this month's blocks is that there are NO y-seams! Yippee!

For more details on the Smitten Quilt Along, visit this post here for dates and supplies, etc. If you haven't purchased templates, go ahead and make your's using the pattern and template plastic or other material of your choice. (Be sure to add the seam allowance if making your own templates.)

Cut out your fabrics and then mark your pieces. Mark the wrong side of your fabric pieces with dots where the 1/4" seams would meet. (The acrylic templates have holes, making this super easy!) Alternatively, you could use your ruler and pen to draw lines along the seam allowances to mark your start and stop points.
Since this block is mostly triangle-based, we can piece the whole thing with NO y-seams. You'll use your dots for reference, but you can sew through them to the edges and chain piece. :-)
Sew a triangle to two opposite sides of the the center hexagon. And sew a triangle to four of the diamonds as shown. Press toward triangles.

Then sew two of the pairs to the center unit. Press away from center.
And add the remaining two diamonds to two other pairs making two units of three pieces. Press toward diamond.

Next, the 3-piece units to the sides. I used pins and pinned through the dots to keep things lined up well.

Press away from the center. This is a complete Small Block One. It's also the same as the center of Large Block Five. :-)

We'll add the border to make the Large Block Five in the same way as we just did for the center/small block one.
Sew a triangle to two opposite sides of the the center hexagon. And sew a triangle to four of the diamonds as shown. Press toward triangles.
Sew two of the pairs to the center unit. Press away from center.
Then add the remaining two diamonds to two other pairs making two units of three pieces. Press toward diamond.

Next, add the three-piece units like you did for the center. Use pins through your dots to keep everything lined up well while sewing.

And that's it! :-) Now cut and make a few more...

Here is my first Small Block One.

Easy, right?! I really love playing with all the different fabric combinations for these. :)

I hope these photos were helpful to you... I am looking forward to making a few more myself and to see your's too! Don't forget to use #smittenquilt and #smittenquiltqal on Instagram. :-)
If you have questions, leave a comment, email me or tag me on IG!
Happy Sewing! :)
Subscribe to:
Posts (Atom)