Showing posts with label mini quilt. Show all posts

Thursday, June 23, 2016

Weekender Bag Sew Along : Week Two (Pocket Piecing)


Hey there friends!  I promise I've done some sewing since my last post ... maybe not as much as I had hoped, but I was on vacation.  :-) 

I usually sew on a Bernina 710, but took my smaller 210 to the Outer Banks with me and enjoyed sewing with the ocean and sand dunes, and the occasional wild pony, in the background.  Relaxing and a fun week away.  


If you follow me on Instagram (@sewlux), you've seen these photos, but I wanted to walk you through a little more of my pocket piecing process.

You may have also seen that Sew & Sew by Chloe's Closet arrived right before I left for the beach and I changed my mind about my fabric choices...  I mean, they are just so pretty!


I knew I wanted to put an initial on one end of the pocket.  I decided it would be super cute to put it inside a spool ... I used the Spell It With Moda letter as my inspiration and scaled it down... way down.  The letter finished at 1.5" wide x 2.5" tall.  I made the Mini Spool from Thimble Blossoms a little taller to accommodate that but otherwise followed Camille's directions.  I think it's really cute if I do say so myself! ;-)


My next end pocket is the cute little flower from Handmade - also a mini pattern by Camille. I fussy cut a bunch of flowers from this print as the center.  And can we talk about these measuring tape prints?!  I plan to add some borders to this one and to make it large enough.


Since I was traveling and wasn't sure what kind of iron and ironing board might be available at the beach house, I invested in a cute little travel iron and ironing mat that I got off of Amazon.  While small, this iron definitely did the job and got super hot.  I didn't use steam, but it was hot enough to press my seams nice and flat.  (Side note: after reading some reviews about these ironing mats/pads, I brought along a little tv tray table and used it as my ironing surface just in case ... and that way I didn't risk ruining the dining table at the house.)


I decided to piece some of the small Smitten blocks for both of my larger pockets.  I machine piece these and use the Marti Michell templates to cut and mark my fabrics. 


I used a paper grocery bag to make a template of the pocket size and then the MM templates to mark the layout to figure out how many blocks I would need to make.  And then I had a great time playing around with fabrics ...


Can all the blocks be my favorite? I don't think I can choose just one... ;-)

I think this bag is going to be totally dreamy with these colors and florals mixed up.  To make the pocket panel big enough, I added some partial unpieced hexagons (using the largest whole hexagon template in the set to cut them) along the top and sides.  Since the bottom of the hexagons on the second row will be cut off some, I kept all the most intricately pieced blocks along the top row where they could be seen.


I will be quilting up my pockets and other panel pieces this weekend ... I will post an update in a few days!

Happy Sewing! :-)

Sunday, June 5, 2016

Mini Mania : Hula Hoop

It's Mini Mania time!  :)

May got away from me, so we're running a little behind our schedule sharing this one, but I think it was worth the wait!  

May's mini is our 5th in the Mini Mania book by Abbey Lane Quilts and is a fun dresden block that alternates pointed and rounded blades. I decided on Chipper by Tula Pink and that fussy cuts were in order! 


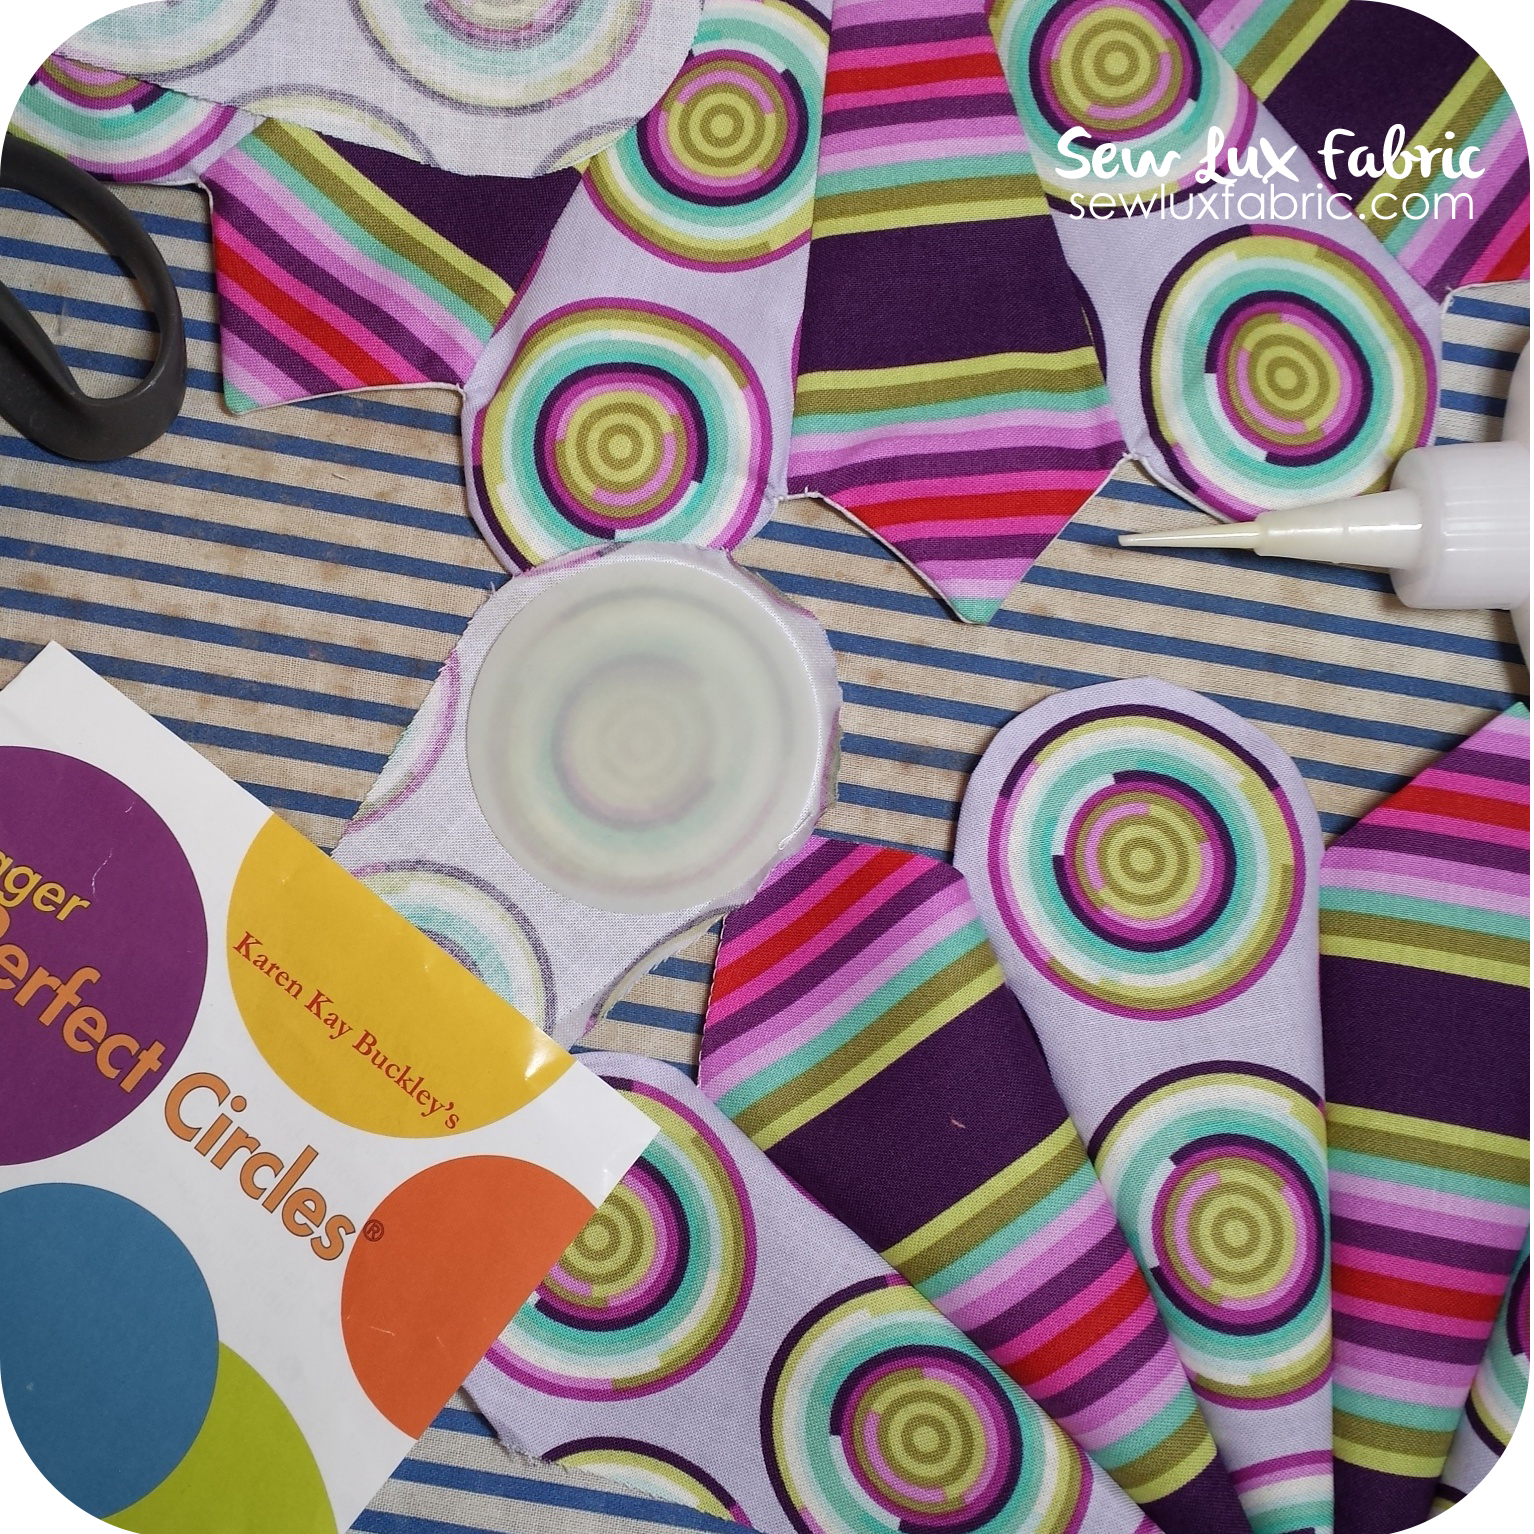
Admittedly, I had some issues with the suggested method of construction for the blades.  This one uses templates and has you sew it to a muslin and turn right sides out before attaching to the background.  As you can see in the photo below (top set of blades) that this came out really wonky for me in the corners between the blades.  I decided to start over and press the top of my blades under and glue baste before joining them.  For me, this came out better and I used my "Perfect Circles" by Karen Kay Buckley to help me with the curved blades. If you don't have Perfect Circles, check out this video by Sarah Fielke for how to make curved applique pieces.


Fussy cuts for the win!  I made these pretty easily, lining up my templates on the same part of the stripe (or dot) on the fabric.


I decided to quilt a grid in the background and used a ruler and 1" painter's tape to mark my lines. This is an easy method of marking and doesn't hurt the fabric. :)  I didn't quilt the dresden, but am considering going back to add some hand stitching with perle thread.


I used some light purple Aurifil 50 weight thread for my applique and quilting. I like the subtle effect of the pale purple on the black Crossweave background.  And can we talk about the binding stripe!? Love it!


We have kits for this one available (and we can make this in two other color ways - aqua and green - just let us know if you'd like)!


And our friend, Jennie at Clover & Violet, stitched up another version in Coral Queen of the Sea. A kit for her version is also available!

Until next time ... happy sewing! :-)

Sunday, April 24, 2016

Mini Mania : Hopscotch


We are continuing to stitch our way through the Mini Mania book along with Jennie at Clover & Violet. This month, we have a cute rectangular mini called Hopscotch with spinning stars.  This one measures 10 x 24 inches and is perfect for the wall or a table.  You could even make the blocks as three smaller minis too!


For my version, I used prints from Little Miss Sunshine by Lella Boutique for Moda with my favorite background, Moda's Essential Dots in White Black.  Love that Little Miss Sunshine has some great stripes, which are the perfect binding fabric too!


I quilted pebbles in the background area and did a swirl in the center of the modified churn dash blocks.  It's kind of hard to see the pebbles in this photo, but they make the stars seem to pop off the quilt, which is a fun effect.  I also fussy cut the center of all the friendship stars in the outer border with that cute little strawberry print.  :-)

This mini requires the use of a template.  I was a little too lazy to cut one out, but used my ruler to make a guide for cutting those pieces.  First, I measured what size rectangle I would need for the shape and cut the fabric to that size.


Then I used my ruler and some washi tape to make my "template."  You can see that I lined up the edge of my ruler with the angled cut.  Then I placed washi tape along the straight edge a the top of the rectangle. I lined up the edge of the tape with the top of the fabric and sliced off the bottom angle. Easy!  (Try on a practice block if you aren't sure!)


We have two different kits for this fun mini - Option 1 is curated by Jennie and then, of course, Option 2.  Find them both in the shop here while they last!

Happy Sewing! :)

Thursday, February 18, 2016

Pineapple Mini Quilt

I finally broke down and made a pineapple mini. I'd seen a few that were patchwork squares and they were totally adorable!  But then when I saw the Sew Kind of Wonderful girls turn their mini pumpkin pattern into a pineapple, I was sold.  I broke out my Mini Quick Curve Ruler I had picked up at market last fall and went for it.


I found that the Simply Colorful prints from V & Co were perfect for this ... all in similar shades with small scale interesting prints.  Scrappy made easy.  I like easy.  Of course, the background was a no-brainer ... my go-to Moda Essential Dots.


I used the Mini Pumpkins pattern available online here at Sew Kind of Wonderful for how to make the actual body of the pineapple.  The leaves are included as free directions here  (just click on the picture to access the file).

I added a small border (about 2" and then trimmed after quilting) to frame up my finished block.  A little echo quilting in the background, crosshatch on the fruit, and free motion in the leaves made this really fun!


A few folks on Instagram asked about a kit, so I have a similar kit of fabrics available here (shown above).

Happy sewing! :-)


Monday, February 15, 2016

Mini Mania QAL : Leap Frog

We're moving right along in the Mini Mania Book this month.  Jennie at Clover & Violet and I are sewing the Leap Frog Mini for this month.  We picked some similar colors this time, but I love how different these will look despite a similar color scheme.


 Jennie's kit features prints from Lil Red as well as fun aquas from Basic Mixologie and Simply Colorful II.  She is choosing to emphasize the center star with the pink print. 

My version of the kit keeps the background print as the center star, but uses the same print in all four corners around the center star.  Wouldn't this be such a fun block to make multiples of for a quilt?  At 16" square, its pretty quick to sew.

I couldn't help using my favorite Hello Darling print with some new Vintage Picnic (now in stock!) for my kit ... they play so nicely together! :-)

I'll share some tips as well as my finished mini this weekend!  In the meantime, you can see my progress on Instagram (@sewlux).

Happy Sewing!  :-)

Wednesday, February 3, 2016

Tutorial : Heart Mini Trio

Valentine's Day is quickly approaching and it is so nice to have a little something to show your favorite people you care.  This Heart Mini Trio comes together quick and easy thanks to Moda's precut mini charms!


You'll Need (kits while they last): 
  • 1 Mini Charm Pack (or thirty-five (35) 2.5" squares)
  • 1/4 yard binding
  • 1/4 yard backing
  • 10 x 20 cotton batting 
  • 3" x 4" cardstock 
  • 4" x 8" WonderUnder

Step One: 
Sort your fabric into four groups.  Using the First Crush Fabric by Sweetwater, I sorted as follows:
  • Eight red squares for the hearts 
  • Three sets of nine squares for the mini backgrounds 
Step Two: 
Next, sew together three nine-patches with your background squares.  Press the seams of each row in opposite directions so they will nest when you join them.


Then, sew the red squares together in a rectangle (two rows of four).  Press seams open. 

Step Three:  
Fold the 3" x 4" piece of cardstock in half (1.5" x 4") and use paper scissors to cut the shape of a heart.


Trace the cardstock heart onto paper side of the WonderUnder.  Cut out the hearts leaving a little room around your lines.  Then, following the manufacturer's directions, fuse the WonderUnder to the wrong side of your pieced hearts rectangle.


Cut out all three hearts.  And carefully peel the paper off.  Fuse to the nine patch units. 

Step Four: 
Using a coordinating thread, applique one heart to each of the three nine patch units.  (I used a zig zag stitch.  But you can use a blanket stitch or another decorative stitch.)


Step Five: 
Layer the nine patch, batting and backing.  Baste and quilt as desired.  Repeat to make three mini quilts. I chose to outline quilt the hearts and then stitch 1/4" along the sides of each seam to make a grid of quilting in the background. 

Step Six: 
Cut three 2.25" x WOF strips from the binding fabric (one strip for each mini).  Press in half lenthwise to created the binding strips.  Attach binding and finish by hand or machine as desired.  

If you do this by assembly line, you can make all three super quick!  You could also join them together to create a small runner or pillow.  

Hope you enjoyed this sweet little tutorial.  Kits for this are available in our shop while they last! 

Happy Sewing! :-) 


Sunday, January 10, 2016

Mini Mania Quilt Along

We're welcoming a new year with a new quilt along!

Back in October, we spotted this great little book of mini quilts by Abbey Lane Quilts.  And I loved them all on their booth wall and thought it would be fun to sew them up this year. 

For a little added fun, I asked Jennie over at Clover & Violet if she wanted to sew along with me and I was thrilled that she agreed!  So, here are the details ... 


The Mini Mania book has a total of eight mini quilts ranging in size from 12 x 16 to 21 x 21 inches. Many of them use templates, but they are nicely explained in the book.  We'll sew them in the order presented in the book - and they increase in difficulty and have different techniques.  So you'll learn some applique as well as curved piecing by the end.  

Jennie and I will each curate a kit for the minis, so there will be two options to choose from each month.  But, of course, this is also a great stash / scrap project!  And we welcome you to sew along from your stash (or with a kit).  Either way, you'll need a book for the pattern (sold separately from our kits). 

Kits will be available on the 10th of the month, from January through August 2016.  And Jennie and I will both share our finished minis on the 20th of the month along with how we decided to quilt them and any tips for piecing we think you'd want to know. 

The kits for the first mini quilt, Hot Potato, are now available


We hope you'll sew along with us!  Share your minis on Instagram with #minimaniaqal

Happy sewing! :-)


Thursday, December 11, 2014

Merry Mug Rug Blog Hop - Pleated Tree


Hey there!  When Jennifer of Ellison Lane asked me if I'd like to participate in her Merry Mug Rug Blog Hop I was happy to oblige!

I thought it would be fun to make a smaller version of my pleated tree block.


The original block is 8" x 10", but you can make this block pretty much any size and even a little wonky if you like!  I'm including some pictures from my original tutorial below - feel free to check out the complete tutorial here


For the smaller version, I pleated a 4" x 10" strip off a layer cake square.  Your pleated piece should look something like this ...


In my original tutorial, I used a solid white background.  If you are using a print, you'll need to cut two 6" squares.  Cutting each one on opposite diagonal angles to get triangles for the sides.


Sew the sides on one at a time and then add a trunk section along the bottom.

Trim to the size you want and add a border if you like.  I chose to add a scrappy-ish border of red prints from Miss Kate by Bonnie & Camille.


I used a red layer cake square for the backing and self-binding of my little mug rug.  It's quick and simple!  Check out this tutorial here that shows how I do this binding technique.

Thank you so much for stopping by today!  If you make a pleated tree project, I'd love to see it!  Link it up or tag me @sewlux on Instagram.

Happy Sewing!  :-)

Sunday, October 19, 2014

Machine Sewn Mini Pattern!

Hey there!

I am so excited to share that we have a brand new pattern available!  The Machine Sewn Mini is the a fast and easy-to-piece mini quilt.  


I also made a cute pouch with a block because the blocks were just so addictive to make! 

Download your PDF pattern today and start sewing!  Or get the pattern free with a mini quilt or pouch kit purchase!


Happy Sewing!  :-) 

Saturday, September 6, 2014

Mini Medallion Series - Border 3

Hey everyone!

I have been having so much fun sewing this Mini Medallion the last few months ... and maybe even more fun checking out all the versions you all have been making!

Here's the latest ...

You can see the brief tutorial and download the pattern over at Clover & Violet here.

Don't forget to tag me on Instagram - or leave a comment with a link so I can see what you're making!

Happy Sewing!  :-)

Monday, August 11, 2014

Sewvivor Nautical Challenge Entry

Welcome to my Sewvivor Challenge 1 Post!  I must admit that I was beyond excited to make the Top 16 and although there was some anxiety involved as I hemmed and hawed over the layout, I really enjoyed making my project for this challenge. 


First a little about my concept and inspiration ... 

Have you ever found yourself telling someone that you sew or quilt for your sanity? Some of you may even sport the popular "I quilt so I don't kill people" t-shirt!  We love spending time cutting our favorite fabrics and sewing them back together to create something new.  And we're involved in blogging and sharing our work on Instagram and other social media because we crave community in our craft. 

My challenge project was designed as both a representation of that sentiment (sewing for sanity) as well as a celebration of community. Community has meant so much to me as so many people graciously "threw me a line" during a particularly difficult season of life earlier this year.  

In February, my father passed away unexpectedly.  My world was rocked.  And it seemed like my own Titanic was sinking. And you know who was among the first people to show up?  Some of my real-life sewing friends.  They didn't politely ask or offer their help - they just showed up.  I will always be grateful. 

Since then, my personal "life preservers" have stepped in when I needed them most.  Some picked up my slack at work - insisting upon their assistance even when my pride insisted they didn't. Some remembered to ask how I was - knowing full well that I might not say "fine" and they were okay with that.  And some told me to "just keep sewing" when at first it seemed I could find no joy even at my machine.  

For me, this mini celebrates the community built on our common love of fabric and thread.  
I could not be more grateful for my own little community of life preservers - some quilty and some not. (You know who you are.) 

But as my dad once wrote, "Enough crap - on with the show!"  

Here's more about my project ... 


Once I honed in on my theme for this mini quilt, I started by making a bunch of mini Cheerio blocks (by Camille Roskelley featured in Love Patchwork and Quilting magazine Issue 8).  By changing the color way and setting these blocks on point, they made perfect life preserver rings!  

I used a variety of white and cream low volume prints and reds for the rings and used a pretty aqua print from Sphere by Zen Chic for all of the watery background.  

(horrible phone picture ... sorry!) 

Once I pieced all the blocks, I laid them out and sashed them together.  I used some strips to fill in the zig zag of space between the rows and used some half square triangles to set them and create a larger rectangle with each set of rings. 


Since my background fabric is directional, I took care to fussy cut and keep the lines in the print going horizontal whenever possible. I included a strip of aqua between to provide space for the flags to hang and added a 3" border prior to quilting.   


I did some free motion wavy lines throughout the entire background of the quilt, but chose to add in some spirals in the center of all the rings to help accentuate the circular shape.  


I chose to leave the rings unquilted so they would appear to sit above the quilted portion and "float in the water."


One of the things I really wanted to include from the very beginning when I first started sketching this concept was nautical flags spelling either "sew" or "quilt."  I ended up spelling "quilt" and made the flags by piecing 3.5" squares and adding a backing (like making a small pillow) to finish them off nicely. 


Before sewing the fronts to the backs, I stitched a two inch piece of twill tape to the top of each flag back to provide a little channel to string some rope through later. The 3" finished flags are strung across the quilt with some thin rope, which is knotted and tacked down at the sides of the quilt. 


These flags were super fun to piece (and applique!) and I love how they dangle above the water.  The finished project measures about 20" x 30" and was backed in a red print and bound with a red and white stripe.


I'm thrilled to have this celebratory mini hanging in my sewing room!


Thank you so much for stopping by!  I hope you'll take the time to vote for your favorite nautical project (hopefully mine! :-).  I'll be anxiously awaiting the results and working on an epic bag should I get to round two!

(Edited at 12:40 PM - the voting link is now available!  :-) 

Happy Sewing!  :-)