Hey there!
I've been obsessed with making Sew Together bags the past few months and have cranked out quite a few. One of my favorites was one where I mini-sized my Snow Tires pattern.
This past weekend, I was working on assembling a few more bags and went back to this fun and quick to piece pattern. After several comments on IG, I thought it would be fun to go ahead and make the mini-sized pattern to share.
So, I give you the Snow Tires Mini ....
This particular pattern is sized to 18" x 18", but you can easily make it longer or wider to fit your needs. The 18" x 18' size is perfect for pillows like the one shown here using Folk Art Holiday.
Paper patterns, PDF patterns, and kits for this particular pattern are available while supplies last and you can get one free this week (offer ends 11/30/14 - see above for details)!
Hope you all are having a great week!
Happy Sewing! :-)
Showing posts with label pillow. Show all posts
Monday, November 24, 2014
Tuesday, July 22, 2014
Tutorial : Twisted Ribbons Pillow
This tutorial is part of our Christmas in July series of tutorials.
I'm working with this fun bundle from Be Jolly by Deb Strain for Moda. I actually have two different projects from this bundle to share. First, I have a fun pillow for you today using the Bloc Loc HRT ruler and the reds and greens from our Be Jolly bundle. (Check out my other tutorial with the blues here.)
Project Requirements:
- You'll need four fat quarters and a half yard of background. I'm using prints from Be Jolly and a half yard of the Tiny Dottie White Red.
- You'll also need the "B" ruler from the Bloc Loc Half Rectangle Triangle (HRT) ruler.
- 20" square of batting and pillow front backing fabric
- Sewing machine and basic supplies
From two fat quarters (red and green), cut four strips 2.5" wide x 20" long. Subcut each strip into four 2.5" x 5" rectangles. You need 13 rectangles of each color.
From the background fabric, cut four strips 2.5" x WOF. Subcut each into eight 2.5" x 5" rectangles. You need 25 rectangles.
Cut each of the 2.5" x 5" rectangles in half along the diagonal. Cut them all the same and be sure its the same direction as your ruler!
You need 25 triangles of each color and 50 triangles of background.
Place two triangles right sides together and off set the points a little as shown in the photo. Sew a 1/4" seam. Chain stitch and get all those triangles sewn together!
Press each triangle carefully to the main print (away from the background). Since we got some bias going on, I like to finger press then use the iron.
Place your ruler on top of the pieced unit and slide it toward the seam until it locks on. Be sure that your completed size (2" x 3.5") is included in the trim lines. Trim the top and right sides.
Then slide the ruler up along the seam until the trimmed edges are lined up with the lines for the correct size (2" x 3.5"). Trim the left and bottom sides. Repeat to trim all 50 units.
Piece 10 columns of five blocks sewn end-to-end. Five with green on the ends and five with red on the ends. Press columns toward the bottom of the red & green triangles.
Piece the rows together. I ended up pressing seams open between the columns to reduce some of the bulk at the seams.
Cut two strips 3" x WOF from the background and use to add borders to the top. Baste and quilt as desired. Then trim to 18.5" square.
Use the remaining two fat quarters to piece the backing. (See more on how I piece backings for pillows in this tutorial here.)
Enjoy your new pillow! :-)
If you make Twisted Ribbons pillow, I'd love to see it! Tag me on Istagram (@sewlux) or link in the comments below!
Happy Sewing! :-)
Sunday, July 6, 2014
April Showers Mini Charm Pillow Pattern
If you're like me you love both quick and easy projects AND Bonnie & Camille fabrics! ;-) This project combines both of my favorites and works great for any collection or your scraps!
This pillow is so fast to make - quick piecing, add some borders, quilt it up and add a backing!
You'll need 1 mini charm pack and 3 fat quarters as well as batting for this 18" pillow project.
We also have some kits available in the shop while supplies last! Free pattern download available here.
Links to more pillow projects with tips on making backing and finishing here and here.
Please send me a link or tag me on Instagram (@sewlux) if you make one - I'd love to see it!
Happy sewing! :-)
Thursday, December 12, 2013
Snowflake Pillow Tutorial
I've had this idea for several weeks and am so glad I was able to get this done! It was super quick to whip up and I hope you'll have fun with it too. The best part is that everyone's will be a little different - just like how snowflakes are all unique!
If you are a Moda FQ Club subscriber with us, you received this kit free with your December bundle. Need a kit? We have a couple available here - while supplies last.
For this project, you will need the following:
- 1/2 yard Lightweight interfacing
- 1/2 yard grey Ombre Fabric (I used V & Co's ombre solids)
- 1 FQ Snowflake tonal print *
- 1/4 yard grey solid * (Bella Solids Graphite)
- 2 - F8 of white-on-white tonal prints (I used Muslin Mates)
* I decided to make a pillow with my kit and used the snowflake print for the pillow back. If you prefer to make a mini, you can use the snowflake print for the backing and then bind with the 1/4 yard solid grey. I didn't use the 1/4 yard solid as I did not add a binding to my pillow.
You will need one 20 x 20 piece for the pillow front backing.
Cut a few different size squares of interfacing and white tonal prints. Adhere interfacing to your white tonal prints - place the bumpy/rough side of the interfacing on the wrong side of your fabric and press it well.
Now, cut your snowflakes however you want to. If you have older kiddos that you trust with scissors, this is a good time to get them involved.
From your half yard of the ombre stripe, cut three 3.5" wide x WOF strips. Sub-cut each strip into twelve 3.5" squares. Mix 'em up.
Stitch the 3.5" squares into six rows of six squares. I just randomly pieced them back together, but feel free to be as deliberate as you like with your placement. :-) Once you've pieced all the rows, arrange them as you like and press each row in opposite directions so they will nest well at the seams when you join the rows.
Piece the rows of 6 squares together into a 6 x 6 block square as shown below.
Make a quilt sandwich with your pillow top, batting, and some backing (I just used some plain solid since it won't be shown). Then quilt as desired and trim to 18.5" x 18.5".
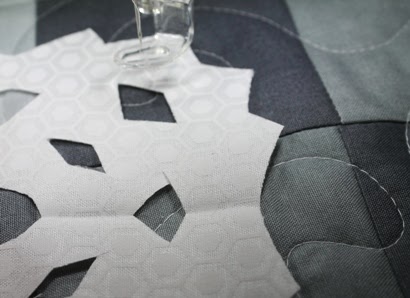
To attach my snowflakes, I just continued on with my free motion foot. You could also use a walking foot, but it would be a lot of turns and in a small area, I felt comfortable enough with this foot to go around the cut outs free motion style. :-) Stitch about 1/8" from the edges to secure the snowflakes.
It is kind of hard to see in this photo, but I went around the entire outside of the snowflake as well as around all the cut outs to secure it to the backing.
Continue until you have all the snowflakes arranged as you like.
I made the back similar to the way I made the one in my last pillow tutorial. I used some leftover ombre with the snowflake print FQ to piece the two flaps.
I really love how this pillow turned out. I think it would be fun to do a variation with a scrappy red background too!
If you make a snowflake pillow, I hope you'll share the link - I'd love to see it!
Happy Sewing! :-)
Monday, November 25, 2013
Modern Maple Leaf Pillow Tutorial
Thanksgiving is just a few days away and this weekend I whipped up a pretty maple leaf pillow to add to my fall decor in the living room. If you shopped with us during our Customer Appreciation weekend the earlier this month, you got a kit for this in your goody bag! :-)
Here's what you need for this 18" square pillow:
1 FQ backing (kits have one of an assortment of prints)
1 FQ Bella Snow (or other neutral for background)
4 F8 of Bella Solids (I am using Mustard, Clementine, Chocolate & Boysenberry)
20" square of batting & scrap for back of pillow front for quilting
Kits for this project are available here. :-)
First, I want to point out that this pillow is definitely inspired by the Modern Maples craze! I also made a basic maple leaf block tutorial some time ago here.
For each of the two smaller leaves, you need to cut the following:
- THREE 2.5" squares of leaf color
- TWO 3" squares of the leaf color
- ONE 1" x 5" strip of the leaf color
- TWO 3" squares of background
- TWO 2.5" squares of background
- ONE 3.5" x 6.5" rectangle of background
- ONE 3.5" x 9.5" rectangle of background
For each of the two larger leaves, you need to cut the following:
- THREE 3.5" squares of leaf color
- TWO 4" squares of the leaf color
- ONE 1.25" x 5" strip of the leaf color
- TWO 4" squares of background
- TWO 3.5" squares of background
First, cut one of the 2.5" background (or 3.5") and cut it in half on the diagonal. Sew the 1" x 4" strip (1.25" x 5") between the two background triangles. Press toward background.
Trim to 2.5" square (3.5" square).
Use the two 3" leaf color and the two 3" background squares (4" and 4") to make FOUR half square triangle units using your favorite method. (I usually cut them in half on the diagonal and sew them together. You can also draw a line down the diagonal and saw 1/4" on either side of the line then cut on the line.) Trim all four blocks to 2.5" (3.5").
Next, lay out your leaf block and sew together into three rows:
Top row: background + HST unit + HST unit
Middle row: HST + color + color
Bottom: HST + color + stem
* Small leaf block all squares in the 9-patch are 2.5" pre-sew. They are 3.5" pre-sew in the larger leaf block.
For the two smaller blocks, attach the 3.5" strips to two adjacent sides as shown to make it 9.5" square. (You may wish to layout our pillow to determine which sides to sew to if you want the leaves pointing in certain directions.)
Sew the leaf blocks together like this:
Baste and quilt as desired. I chose to create a bark/wood grain pattern with my quilting. And I really like how it turned out.
For the back, I cut my fat quarter in half lengthwise (two 9" x 21" strips) and then used some of my leftovers to create a pieced strip about 5" tall to add to one of the backing pieces so that the top and bottom of the pillow back would overlap by a few inches. (See more about how to make and attach the backing to a pillow at the end of this tutorial here.)
The back of the completed pillow. :-)
Hope you enjoyed this tutorial! This is a quick and easy project and would make a great hostess gift for Thanksgiving dinner!
Happy sewing! :-)
Thursday, November 14, 2013
Winter's Lane Patchwork Pillow
Hey there friends!
I promise I haven't forgotten about this blog. Life outside of Sew Lux has been a little busier than I'd like the past couple of weeks, but there is light at the end of the tunnel. :-)
I did want to stop in and share this awesome pillow tutorial that our friend Tessa at The Sewing Chick posted with one of our Winter's Lane bundles.
First, you really can't go wrong with the Winter's Lane collection. It's pretty much gorgeous. We do have some yardage and bundles left, but they probably won't last too much longer! (And its on sale!)
The pillow Tessa made uses appliqued letters and some simple patchwork.
Go check out her post here and say hello.
Happy Sewing! :-)
I promise I haven't forgotten about this blog. Life outside of Sew Lux has been a little busier than I'd like the past couple of weeks, but there is light at the end of the tunnel. :-)
I did want to stop in and share this awesome pillow tutorial that our friend Tessa at The Sewing Chick posted with one of our Winter's Lane bundles.
First, you really can't go wrong with the Winter's Lane collection. It's pretty much gorgeous. We do have some yardage and bundles left, but they probably won't last too much longer! (And its on sale!)
The pillow Tessa made uses appliqued letters and some simple patchwork.
Go check out her post here and say hello.
Happy Sewing! :-)
Monday, January 21, 2013
Sweet Chevrons Pillow Tutorial
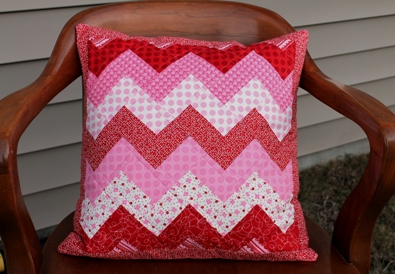
I am so excited to share this happy pillow project using the 2013 Be Mine Bundle. This is the first of two projects I will be making entirely from the bundle of 8 prints. Ready?
For this 18" pillow, you'll need:
- 8 coordinating FQ of red & pink prints (I used the 2013 Be Mine Bundle)
- 1 FQ of muslin or other fabric for backing
Note: Use a 1/4" seam throughout unless noted.
The first thing you need to do is decide what order you'd like your fabrics to be in the Chevron on the pillow. Label your prints as "A" "B" "C" "D" "E" "F" "G" and "H".
Cut two 2" x 18" strips from each of your red and pink FQs.
You'll sew the strips together along the long side. Sew strips in sets of two as follows:
AB, BC, CD, DE, EF, FG, GH, and HG.
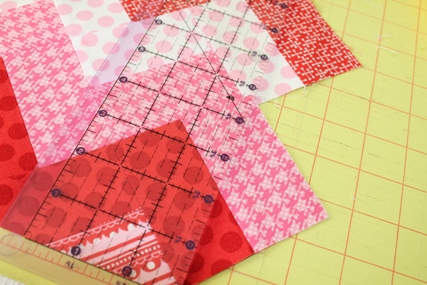
(Note: for this part, I am using different prints for illustration purposes only. The diagram below should help this make more sense if you are confused. The above photo is meant to illustrate AB and BC strips.)
Measure the width of your strips - mine were 3.5" wide.
Subcut the pieced strips into 3.5" squares. (Note: if your's measured something different, adjust your square size.) You should be able to get 5 squares from each strip set, although we'll only need 4 from each one.
Once you have sewn and subcut all your strips, you will then lay them out in a chevron pattern. You'll need to lay these out on point (diagonal/diamond) to make the pattern. Refer to the diagram below.
Ok, now its time to piece the blocks together. You'll be working in rows.
Sew the blocks together in diagonal rows.
Then sew the rows together, being sure to pin at the intersections. Lots of pins is good to get everything lined up. :-)
Keep sewing until you get all the rows joined.
Press everything really well before moving on. I pressed all my seams open as I went - but that is a personal choice. I sometimes press to the side and sometimes press open - just depends on what I am making. Here I went with pressing everything open to keep the project pretty flat.
Now, you'll trim this down - trim 1/4" away from the points along the sides.
Mine measured about 15.5 inches square after trimming.
From one of the FQs, cut four 2" x 18" strips to make borders.
Add borders - top and bottom and then the sides. (TIP: Keep the border strip on the bottom - this will slide through the machine easier since it will be nice and flat without the seams. I pressed toward the borders.)
Next, press your pieced pillow top well (again), layer with batting, and backing (I used a FQ of muslin). You could just use a layer of flannel and omit the batting and backing/muslin, if you prefer. Baste and quilt as desired.
I quilted diagonal lines along the block seams. And then free motioned some loops in the border (which, you can hardly see because the print is busy). Note - if you are new to free motioning, a busy print and coordinating thread hides any errors! ;-)
Press the quilted top and trim to 18" square.
Next, grab two more of the FQ pieces for the backing. For each piece, fold the selvage over, press, and stitch down.
Then trim them to size 13" from folded selvage edge by 18" wide.
Now, place your pillow front RIGHT SIDE UP on your table, and layer one of the backing rectangles on top so they are RIGHT SIDES TOGETHER. Selvage edge should be in the middle and raw edge along the outside edge of the pillow front.
Then, layer the second backing rectangle on top - the two pieces (selvage ends) will overlap in the middle.
Pin all the way around. Then sew all the way around the square. Used a 3/8" seam for this part.
Remove the pins, turn inside out and press and ENJOY!
The back should look like this ....
I hope you enjoyed this tutorial. I have one more project in the works with the leftovers from this project, so stay tuned! :-)
As always, I'd love to see your version if you make one - please send me a link or comment. If you have any questions about the tutorial, please ask in the comments or send an email.
Happy Sewing! :-)
Subscribe to:
Posts (Atom)