Showing posts with label chevrons. Show all posts

Monday, January 21, 2013

Sweet Chevrons Pillow Tutorial


I am so excited to share this happy pillow project using the 2013 Be Mine Bundle.  This is the first of two projects I will be making entirely from the bundle of 8 prints.  Ready?


For this 18" pillow, you'll need: 
- 8 coordinating FQ of red & pink prints (I used the 2013 Be Mine Bundle)
- 1 FQ of muslin or other fabric for backing

Note: Use a 1/4" seam throughout unless noted.

The first thing you need to do is decide what order you'd like your fabrics to be in the Chevron on the pillow.  Label your prints as "A" "B" "C" "D" "E" "F" "G" and "H".

Cut two 2" x 18" strips from each of your red and pink FQs.

You'll sew the strips together along the long side.  Sew strips in sets of two as follows:
AB, BC, CD, DE, EF, FG, GH, and HG.


(Note: for this part, I am using different prints for illustration purposes only. The diagram below should help this make more sense if you are confused.  The above photo is meant to illustrate AB and BC strips.) 


Measure the width of your strips - mine were 3.5" wide.


Subcut the pieced strips into 3.5" squares.  (Note: if your's measured something different, adjust your square size.)  You should be able to get 5 squares from each strip set, although we'll only need 4 from each one.


Once you have sewn and subcut all your strips, you will then lay them out in a chevron pattern.  You'll need to lay these out on point (diagonal/diamond) to make the pattern.  Refer to the diagram below.


Ok, now its time to piece the blocks together.  You'll be working in rows.

Sew the blocks together in diagonal rows.


Then sew the rows together, being sure to pin at the intersections.  Lots of pins is good to get everything lined up. :-)

Keep sewing until you get all the rows joined.

Press everything really well before moving on.  I pressed all my seams open as I went - but that is a personal choice.  I sometimes press to the side and sometimes press open - just depends on what I am making.  Here I went with pressing everything open to keep the project pretty flat.
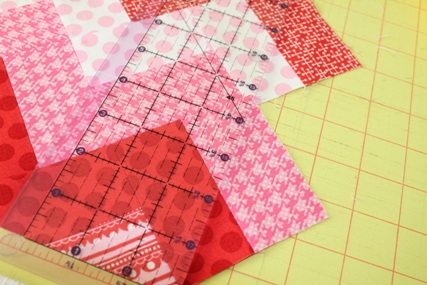

Now, you'll trim this down - trim 1/4" away from the points along the sides.


Mine measured about 15.5 inches square after trimming.


From one of the FQs, cut four 2" x 18" strips to make borders.


Add borders - top and bottom and then the sides.  (TIP:  Keep the border strip on the bottom - this will slide through the machine easier since it will be nice and flat without the seams.  I pressed toward the borders.)

Next, press your pieced pillow top well (again), layer with batting, and backing (I used a FQ of muslin).  You could just use a layer of flannel and omit the batting and backing/muslin, if you prefer.  Baste and quilt as desired.


I quilted diagonal lines along the block seams.  And then free motioned some loops in the border (which, you can hardly see because the print is busy).  Note - if you are new to free motioning, a busy print and coordinating thread hides any errors!  ;-)

Press the quilted top and trim to 18" square.

Next, grab two more of the FQ pieces for the backing.  For each piece, fold the selvage over, press, and stitch down.


Then trim them to size 13" from folded selvage edge by 18" wide.


Now, place your pillow front RIGHT SIDE UP on your table, and layer one of the backing rectangles on top so they are RIGHT SIDES TOGETHER.  Selvage edge should be in the middle and raw edge along the outside edge of the pillow front.


Then, layer the second backing rectangle on top - the two pieces (selvage ends) will overlap in the middle.
Pin all the way around.  Then sew all the way around the square.  Used a 3/8" seam for this part.

Remove the pins, turn inside out and press and ENJOY!
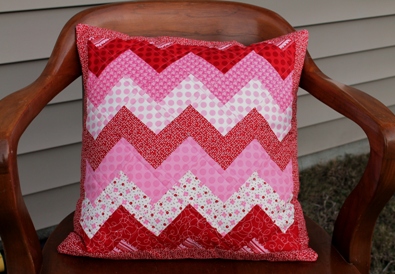

The back should look like this ....


I hope you enjoyed this tutorial.  I have one more project in the works with the leftovers from this project, so stay tuned! :-)

As always, I'd love to see your version if you make one - please send me a link or comment.  If you have any questions about the tutorial, please ask in the comments or send an email.

Happy Sewing!  :-)

Saturday, January 5, 2013

Zig Zagging Along

Hey y'all!  I've been having a little fun with the 2013 Be Mine Bundle this weekend.  :-)

I am in the middle of the first of several projects I hope to get out of this bundle ... first up a little chevron pillow. What do you think so far?


I just love these sugary sweet, dotty prints.  :)  We still have some bundles available here.

Happy Sewing! :-)

Monday, December 10, 2012

Design Challenge Tutorial : Holiday Herringbone Kitchen Mat

Hello!  My name is Jessica and I blog over at SewCraftyJess.  I am thrilled to be here guest posting at Sew Lux and have a fun holiday floor mat tutorial to help get your kitchen in the holiday spirit!

  DSC_0698  

When Chrissy asked if I'd like to take part in the design challenge guest blogger series, I immediately jumped at the chance, and when I found out I would be posting in December, I knew I wanted to work with these beautiful fun and festive Kate Spain Joy fat quarters. 

DSC_0672

Before we get started, I just want to let everyone know that we will be using just about every last usable inch of these 6 fat quarters, so trim sparingly, and measure twice, and cut once!  Just for fun, we'll also break a few quilty rules to stretch every last ounce of fabric but you know what they say, rules ARE meant to be broken.  So without further ado, lets get stitching!

Holiday Herringbone Kitchen Mat

You will need:

(6) coordinating fat quarters
(2) pieces cotton batting measuring 33" x 21"
Quilting Ruler at least 24" long with a 60 degree marking
Coordinating Thread

Cutting Instructions:

Press all (6) fat quarters, and stack on top of each other on your cutting mat, right sides up, making sure to line up the edges as best as possible.  We will be cutting all (6) layers at the same time to save on cutting time.

From all (6) fat quarters cut:
  • (1) strip measuring 1.5" x 22"
    • subcut into (3) strips measuring 1.5" x 7.25" - this should yield a total of (18) 1.5" x 7.25" strips
  • (1) strip measuring 2" x 22"
    • subcut into (3) strips measuring 2" x 7.25" - this should yield a total of (18) 2" x 7.25" strips
  • (1) strip measuring 2.5" x 22" 
    • subcut into (3) strips measuring 2.5" x 7.25" - this should yield a total of (18) 2.5" x 7.25" strips
  • (1) strip measuring 3" x 22" 
    • subcut into (1) strip measuring 3" x 7.25" - this should yield a total of (6) 3" x 7.25" strips
    • from remaining 3" x 15" strip, cut down to measure 2.5" x 15"
      • subcut 2.5" x 15" strip into (2) strips measuring 2.5" x 7.25" this should yield a total of (12) 2.5" x 7.25" strips
You should now have (6) remaining fat eighths measuring appx 9" x 22"

Select (1) remaining fat eighth and cut:
  • (1) strip measuring 1.5" x 22"
    • subcut into (3) strips measuring 1.5" x 7.25"
  • (3) strips measuring 2.5" x 22" - set aside for binding
Select (1) remaining fat eighth and cut:
  • (1) strip measuring 2" x 22" 
    • subcut into (3) strips measuring 2" x 7.25"
  • set aside remaining 7" x 22" for backing
Select (1) remaining fat eighth and cut:
  • (1) strip measuring 3" x 22"
    • subcut (1) strip measuring 3" x 7.25"
      • cut remaining 3" x 15" down to measure 2.5" x 15"- set aside for binding
  • (2) strips measuring 2.5" x 22" - set aside for binding
Set aside remaining (3) fat eighths of fabric for backing.

Whew!  Now that our cutting is done, lets get sewing.

Piecing Instructions:

use a scant 1/4" seam throughout

1.  Sort your various widths of 7.25" strips into 7 piles, with each pile consisting of:
  • (1) 3" x 7.25" strip
  • (4) 2.5" x 7.25" strips
  • (3) 2" x 7.25" strips
  • (3) 1.5" x 7.25" strips
DSC_0673

2.  Each stack will become one herringbone column in our mat.  Select one stack of fabrics to work with and set the remaining 6 stacks aside.  We now will angle one short edge of our fabric to help simplify the angled piecing process.  Using your quilting ruler, align the 60 degree mark with the bottom edge of your fabric as pictured below.  To save cutting time, I stacked like sizes in each fabric pile and cut all at once.

 DSC_0675

3.  Please note, as I am left handed, things may look backwards!  This is ok.  I aligned my ruler to cut the left short edge of the fabric at a 60 degree angle, if you are right handed it may be easier to cut the right short edge.  This is fine, as long as you are consistent with what edge you cut throughout the tutorial.

DSC_0677

4.  Once you have cut a 60 degree angle on one side of all strips in the first stack, we will piece together our strips.  Select two fabric strips, right sides together, and align the angled edges by over lapping the pointed edge 1/4" as pictured below.  Begin sewing where the arrow is pointing, and continue sewing as the dotted line shows.

DSC_0679

5.  Press seams open or to one side, which ever you prefer.  Your two fabrics should look like the picture below, with your angled edges lining up.

DSC_0680

6.  Repeat steps 4 and 5 until all (11) strips are pieced together. The result should look like this:

DSC_0681

7.  Align the long straight edge and trim to 4.75" wide.  Don't panic if your straight edge is a little wonky, we are working with bias seams here, so straighten as best you can.

DSC_0683

8.  Now we will trim our strip into a rectangular shape.  Trim one angled short edge to form a 90 degree angle as shown below.

DSC_0685

9.  Measure and trim to 18.5" wide, as pictured below.

DSC_0686

10.  Repeat steps 2-9 with (3) additional stacks of strips.

11.  With the remaining (3) stacks of fabric, we will now create the second half of the herringbone shape.  To do this, select one stack of fabric, and as in step 2, stack like sizes of strips, but place on cutting mat right side down.  Align the bottom long edge of your fabric strip with the 60 degree mark on your ruler, and trim to a 60 degree angle.  Repeat this process with the remaining (3) sizes of strips.

DSC_0687

12.  Piece together all (11) fabric strips in the pile in the same manner described in step 4.

DSC_0690

13.  Repeat steps 7-9 to result in a rectangle measuring 4.75" x 18.5"

14.  Repeat process described in steps 11-13 with remaining (2) fabric stacks.

15.  Arrange your herringbone columns, alternating the direction of the angle as shown below:

DSC_0693

16.  Sew together columns.  Resulting mat top should measure appx 30" x 18.5"

DSC_0695

17. To construct backing, sew together the (3) 9" x 22" fabric pieces, and (1) 7" x 22" fabric piece you previously set aside for backing, along the 22" edge.

DSC_0696

18.  To make the binding, we will break a quilting rule, and instead of sewing together your set aside binding fabric on a 90 degree angle, like usual, we are going to straight stitch the strips together using a 1/4" seam {{insert gasp, hopefully  the quilting gods are looking the other direction!}}  Again all in the name of stretching our fat quarters!

DSC_0697

19.  Create your quilt sandwich, first layering your backing fabric right side down, then both layers of batting (I like some cushion in my floor mats!) and then the quilt top right side up.  Be careful when aligning your quilt sandwich, as there isn't much room for error.

20.  Quilt and bind and desired, stand back and admire your work!

DSC_0704

Wednesday, August 22, 2012

WIP Wednesday: Chevrons

Hey y'all!  How's your week going?

Now that I have finished the FSU quilt and can "officially" make "whatever I want" (LOL) I've started lots of different things.  The first thing I made was a little chevron quilt and I thought I'd share a sneak of it...

I just need to hand stitch the binding down and it will be all set. :-)

This chevron quilt uses strips instead of half square triangles.  (I'm too lazy sometimes to want to match all the points and deal with the bias edges.)  And its only about 2 yards of fabric total for this one - all these are from my stash, actually.

Would any of y'all be interested in a tutorial for this one?

Don't forget to take a guess at my other WIP (comment on this post).  I'll choose a winner tonight and post tomorrow.

Happy Sewing!  :-)