Welcome to the August Design Challenge post!
This month, I have a fun and super quick project for you. All you need is one
fat quarter bundle (6 prints) and some batting (about 20 x 26").
These are the prints I am using for this project. You can pick up a
bundle here (on sale through 9/3/12).
I started with a sketch of the design. This was helpful and I have linked up a
cutting diagram here since you'll be getting the top, binding, and backing all from just the 6 fat quarters. :-)
Let's start with the hourglass blocks. With the two blue prints, you will cut a strip 6" x 22". Sub cut this strip to get two 6" blocks. The rest of the strip is scrap. Hold the larger pieces aside for the backing later.
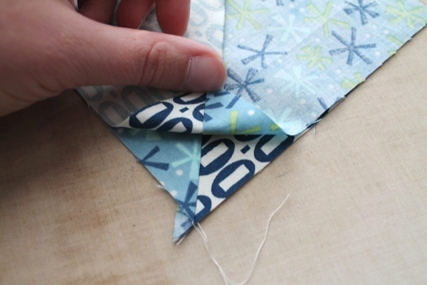
Place the two squares right sides together and cut along the diagonal. Use a 1/4 seam and stitch the triangles together. Press toward the star print.
Then place the two squares right sides together, opposite fabrics together. The seams should nest together nicely.
Pin in place draw a diagonal line in the opposite direction.
You will stitch 1/4" on both sides of the line. Then cut along the line.
Press open and repeat with the other two squares so you have four hourglass blocks.
Then place the block on your cutting mat - if you have diagonal lines, it will be helpful to use them.
You will trim 2.25" from the center of the block - so that you end up with 4.5" square blocks.
Cut the rest of your pieces. (Refer to
cutting diagram.)
There are two main blocks that you need to make ...
For the block on the left, piece the two squares and then the orange strip to the joined squares. For the block on the right, join the large square to the chevron strip. You need 4 of the blocks on the left and 5 of the blocks on the right. They will look like this...
At this point, blocks should measure 6.5" x 8.5". Join 3 blocks to create a row.
Then the three rows to finish the top.
Cute right?
(I love it! I am thinking about making a bigger one for me!)
Now, grab the remaining pieces of your FQs so we can cut strips for the backing. I used a little bit of all the prints - reserving ALL the orange for the binding.
Join all the strips together to create the backing. I pressed seams all in one direction, but you may also wish to press them open. The backing should measure approx 22" wide x 28" tall.
Layer the backing right side down, batting, and then the top right side up.
Use the seams of the rows on the front with a strip on the back to make sure your backing is straight. This way your stripes on the back won't be wonky! :)
Pin baste and quilt as desired.
Trim excess batting and backing.
For the binding, cut the remaining piece of your FQ into 2.5" x 22" strips. Join the strips together at the ends.
Then fold in half to creating the binding.
Attaching binding. (I forgot to take pictures of this process. But I have a
tutorial here.)
And you're all finished! Quilt measures 18" x 24" - perfect for a car seat or stroller.
The striped backing kind of makes it a two-for-one!
I hope you enjoyed my tutorial! If you have any questions, please ask in the comments or send me an email. And if you make one of these little quilts, please share the link or send a picture - I'd love to see it! :-)
Happy sewing! :-)