Showing posts with label Kits. Show all posts

Monday, February 15, 2016

Mini Mania QAL : Leap Frog

We're moving right along in the Mini Mania Book this month.  Jennie at Clover & Violet and I are sewing the Leap Frog Mini for this month.  We picked some similar colors this time, but I love how different these will look despite a similar color scheme.


 Jennie's kit features prints from Lil Red as well as fun aquas from Basic Mixologie and Simply Colorful II.  She is choosing to emphasize the center star with the pink print. 

My version of the kit keeps the background print as the center star, but uses the same print in all four corners around the center star.  Wouldn't this be such a fun block to make multiples of for a quilt?  At 16" square, its pretty quick to sew.

I couldn't help using my favorite Hello Darling print with some new Vintage Picnic (now in stock!) for my kit ... they play so nicely together! :-)

I'll share some tips as well as my finished mini this weekend!  In the meantime, you can see my progress on Instagram (@sewlux).

Happy Sewing!  :-)

Sunday, May 24, 2015

Hattie's Dresden Quilt by May Chappell

Several weeks ago, my friend Lee of maychappell.com texted me a picture of a new quilt she was making for Quilt Market.  I loved it instantly ... just a unique take on a dresden block!

When Lee came over for a sew day today I talked her into curating some kits for the quilt in a lap size.  (Of course, talking her into it didn't take much convincing!)

She helped us make two different kits ... one just like the original, using Tula Pink's True Colors with an Aqua solid background.


And one with a mix of fabrics from a variety of designers for a fun, scrappy look.


We have both kits available (each with 2 or 3 background options) as well as paper patterns now available in our shop.


See them all here and don't forget to check out all of Lee's new patterns from Quilt Market here.

Happy Sewing! :-)
Monday, February 17, 2014

All Sewn Up Kits

Hey friends!

I hope you are having a great Monday!  I was under the weather yesterday and didn't get to my Lazy Sunday post, but will do that later tonight.  Promise.

I did want to share that our super fun friend Lee, of May Chappell, has helped us put a brand new kit together for her All Sewn Up Pattern.


This is seriously the cutest travel sewing kit!  And in the new Sewing Box collection its perfect! :-)


We put together a bundle of the fat quarters she used to make her project for The Crafty Traveler series ...


and we have a notions kit as well.  You need vinyl and a few other things that can be a pain to track down, so we've bundled all of them together for you in one notions kit.

Stop by Lee's blog and see her version of the All Sewn Up travel sewing kit.

Happy Sewing! :-)
Thursday, January 23, 2014

Rose Cottage Quilt Kit

Hey y'all!

I am really excited to share a new quilt kit that we have in the shop.  When we first ordered the Rosey collection by Tanya Whelan, I thought of my friend, Tessa at The Sewing Chick.  I sent her and email and asked if she'd be willing to design a project with the prints we were getting and I was thrilled she said yes!

Check out this beautiful quilt!


You can see more about this quilt here on her blog. And we have kits available and we are offering a FREE copy of the pattern (an $8 value) with purchase of the kit.

Happy Sewing!  :-)


Wednesday, October 23, 2013

Holiday Hustle QAL Kit Sale!

Happy Wednesday!

It's hard to believe there's little more than a week left in October!  The holidays will be here before we know it!  That seems just crazy.


If you need some fun and easy projects for your handmade gifts list, check out the Holiday Hustle QAL. We have 7 great new kits in non-holiday prints as well as four holiday versions of this easy lap quilt. And ... they're on sale now through Sunday!  Everything you need for the top and binding of a lap quilt for less than $30!  Check them all out here.

Happy Sewing! :-)

Wednesday, July 3, 2013

Spool Mini Mug Rug

Hi friends!

Did a little sewing in between continuing to sort out my stash and attempting to get my sewing room back in some kind of order.  :)


I came up with this little spool mini, which is the prototype for the mini mug rug pattern & kit included in the Customer Appreciation Goodie Bag.  The kit's design is slightly different and you'll actually have enough fabric in the kit to make two of these (colors & prints may vary) - one to keep and one to share with a friend!  :-)

Happy Sewing!  :-)

Monday, January 14, 2013

Newness

Hi everyone!  We're kicking off a new week with a new special kit for a great project by Jenelle of Echinops & Aster.  Check out her beautiful project tutorial here and enter to win a FQ bundle and thread sampler!  (Enter to win on Jenelle's tutorial post.)


Bundles and thread samplers are on sale through Friday, 1/18/13.


Oh and did I tell you that 35 of the prettiest new bolts just arrived?!  We're coming off of a weekend in the 70's and with those temps, these spring-y fabrics from Kate Spain's new Honey, Honey collection are calling my name!

Almost done with the tutorial for this project ... coming later this week.  :-)

Happy Sewing!  :-)

Sunday, October 28, 2012

Weekend Sewing

Been doing a little sewing this weekend ... not too much since we traveled to a wedding out of town yesterday.  I have several friends expecting little ones soon, so I am on a mad dash to finish up some little quilts.


Fortunately, Jennie's Car Seat Quilt pattern is pretty quick to make.  Started a Bungle Jungle version ....


Finished the top today and then got all the pieces cut to a Vintage Modern version as well.  Hope to baste tomorrow.

What did you work on this weekend?

Happy Sewing!  :-)

Saturday, October 6, 2012

Customer Spotlight :: Wendy

Happy Saturday!

Today I wanted to share a project that one of our customers, Wendy of Caribousmom, recently completed. We love it when our customers email us with pictures of finished projects and we're excited to share Wendy's Garden Steps quilt with you.


Didn't it turn out just beautiful!?  You can read more about it from Wendy here.

Wendy used the Garden Steps Quilt Kit featuring Good Fortune by Kate Spain as well as the Garden Steps Perle thread kit to complete this Quilt Along project from Jennie & Clara at Clover & Violet.

Thanks so much for sharing your project with us, Wendy!

If you have a project you'd like to share with us, please email us!

Happy Sewing!  :-)

Tuesday, October 2, 2012

Candy Corn Bunting Tutorial

Hello, hello!  I am back tonight with a fast, fun and festive tutorial for you.  :-)


You will need a white solid, an orange tonal and a yellow tonal print as well as a black tonal print for this project.  A FQ each of the white, orange, and yellow and a 1/4 yard cut (9 x WOF) of the black.  Purchase a kit bundle here.


You will start by cutting the following from each print.  (For the candy corn pieces, you'll cut parallel to the long side of the fat quarter.)

  • Yellow Print: FIVE 2.5" x 21" strips 
  • Orange Print: THREE 3.5" x 21" strips 
  • White Print: TWO 2.5" x 21" strip
  • Black Print: TWO 2.5" x WOF strips

Starting with the yellow print, mark one strip with alternating diagonal lines.  One side of each rectangle should be 7" wide and the opposite side 5" wide.  Once you've marked the strip, stack all five strips and carefully cut your rectangles. You should get three angled rectangles from each strip.


Repeat the process with the orange strips  -- the long side of the rectangles should be 5" and the short side should be 2.5".  The white strips you will be cutting triangles as shown below with the bottom of the triangle being 3" wide.  (I cut mine 3.5 but 3 will line up better!)


Next, chain piece your rectangles together - starting with the orange and yellow.  Then adding the white.


Press seams open. You need 14 pieced triangles.


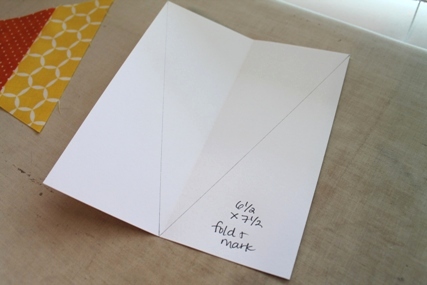
Next, cut a paper rectangle 6.5" x 7.5" and fold in half.  Draw lines to create a triangle for your pennant template.


Pin two pieced triangles right sides together, matching the seams as closely as possible.  Lay the paper template on top and trace the template onto the triangle.  (Line the template up with the top of the yellow strip.)


Next, you'll stitch 1/4" seam on the INSIDE of the template lines.


Trim along the line, grading the seam a little closer to the stitching on the white portion of the triangle.


Turn the triangles right sides out and carefully push out the point at the bottom.  Press.  (Tip: I like to use a bone folder tool to push out the corners and points since it isn't sharp.)


Carefully top stitch 1/8" from the edges along each side, pivoting at the point with your need down. Trim each triangle to the same size.  Mine were 6.75" tall.


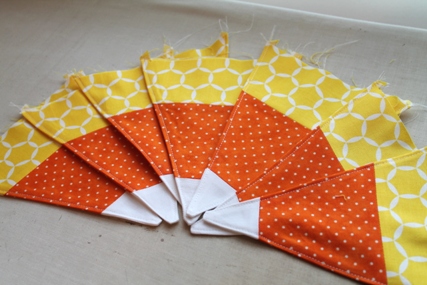
You should have 7 total candy corn flags.  Aren't they cute?!


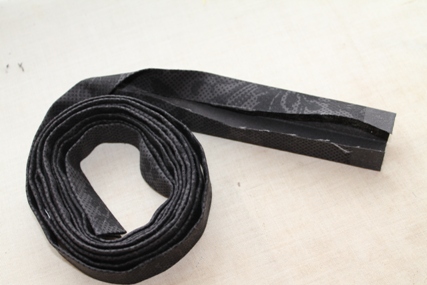
We're almost done ... let's finish it up.  Piece the two long black strips together end-to-end as you would binding.  The fold in half lengthwise, pressing as you go.  The press the sides into the center.


Find the middle of your black binding strip and place a flag in between the layers.  Pin in place.


Add three flags on each side of the center flag ... spacing them about 3 inches apart. Keep pinning to keep everything in place.


At the end of the binding strip, fold the edge in to tuck away the raw edges.

Start at one end of the binding strip and stitch across the short side, backstitching to secure the thread. Pivot at the corner and stitch along the edge - about 1/8" in.


Keep stitching the length of the bunting. Finish the end like you started at the opposite end of the bunting.


Press your bunting when you are finished and enjoy!


I might have squealed when I hung this.  


It was raining a lot here this weekend so I apologize that some of my photos are a little dark. If you have any questions, please email me or leave a comment. If you make a bunting, I'd love to see it - please link it up!

Happy Sewing!  :-)

Monday, October 1, 2012

Happy October!

Happy October, y'all!  We have some fun things planned this month ... more details on that later on ...
but here's a hint ... it's our two-year anniversary this month.  :-) 

This weekend I did some cute sewing ... 


... tutorial will be posted here on the blog tomorrow evening.  Who's excited?  
It's a quick and easy project that you can whip up in a hurry.


We've got some fabric treats for you on sale this week ... 


and the 2012 Boo Bundle (a Halloween-inspired bundle)!

See you tomorrow!

Happy Sewing!  :-)

Thursday, August 23, 2012

New Moda Bake Shop Kits

Hi again!

Just wanted to share that our friend Jennie at Clover & Violet has a new Moda Bake Shop Project that went live today.  Check out this cute Stroller Organizer she made!

(Photo courtesy of Clover & Violet)

See the free tutorial here and grab a kit from our shop here. We have both boy and girl kits available and they are currently on sale through 8/31/12.

Happy Sewing!  :-)

Monday, August 13, 2012

Introducing the GGP

Hey there friends!

I got out of dodge for a long weekend at the beach and am back to the real world today.  We did enjoy a nice stay oceanfront courtesy of some friends and it was so nice ... especially since teacher workdays start back up on Friday.  (gasp!)

Anywho, I am excited to share that our friend Jennifer of That Girl, That Quilt is kicking off a new quilt along - the Giant Granny Panties Quilt Along!  See the intro post here.

We're thrilled to work with Jennifer on this project by offering up kits for the project.  We have four different options and they are all currently on sale through Saturday, 8/18/12.

There's something for everyone, but quantities are limited.  I am having a hard time deciding myself!

Happy Sewing!  :-)

Wednesday, June 27, 2012

Patriotic Pillow Tutorial

Hey y'all!  A little later today than I hoped, but as promised .... a tutorial for my "Patriotic Pillow."  Ready?


For this project, you'll need 1 half yard of a border and backing fabric and then three fat quarters - a red, a blue and a white.  I am using some prints from Reunion by Sweetwater.  I have a limited number of kits available here if you are interested.  (We'll include a star template with the kits.  :-) 

First, draw a star about 5 inches tall.  Doesn't have to be perfect.  Make a template by cutting out your paper shape and tracing four times onto your white fabric. I use a FriXion pen because it irons right off!


Next, you'll need to cut into your fat quarters.  You need the following:


Ok ... let's whip this together.  I had originally planned to paper-piece this, but the ease of raw edge applique won out.  And I kind of like how it makes it a little more casual.  And faster to make!  

Take two white strips and pin to a red square as shown.


Stitch down the edge of each white strip - I used about a 1/8" seam. Repeat this process on the remaining four red squares.

Next, start piecing your rows.  Press toward the blue squares.  First make rows of three.


Then make a big nine patch block. Again, press toward the blue squares.


Alright ... now its time to applique your stars.  Using about a 1/8" seam, stitch along the edge of each star.  I made sure to put each star in the same orientation in each block, but you can angle them if you want to.


Don't worry about the fraying ... we'll manage that a little bit later.  And if your stars aren't perfect - its no biggie since we're going for the casual look with the raw edge. :-)  (I also ended up clipping my points a little later since they hung over.)

For the next step, grab your half yard piece for the borders and backing.  Cut as shown below.

I forgot to take pictures of adding the borders (sorry!), but you'll add a 2.5" wide strip along the top and bottom and then along the sides.  Press toward the borders.  (Hope that makes sense!) This completes the piecing of the front.

Then you'll layer, baste, and quilt the pillow front.


I chose to quilt a straight line down the middle of each white strip and then an outline of each star.  Then around the edge of the border about 1/2 inch from the star and stripe blocks.


After quilting, press and then trim to 18.5 inches square.  This ended up making my borders 1.75 inches wide on all sides.

Set your pillow front aside and work on the backing.  Take one of your 10 x 18.5 inch rectangles and add a  4 x 18.5" strip of the red (or whatever print you'd like) to one side.  This will make one panel overlap the other a little bit more.

Then on the WRONG side, trace a line 1/2" away from the edge and fold up to meet the line.  Press.  And then top stitch down.  (You could choose to fold this under again so no raw edge was exposed.)


It should look like this.


Now, take the other 10 x 18.5 inch rectangle and repeat along one long edge.


Backing pieces are all set.... Let's finish it up.

Lay the pillow front RIGHT SIDE UP.  Lay the wider backing (with the strip) piece RIGHT SIDE DOWN on top of the pillow front, aligning the edges.

(Please ignore my mess!!!)

Then lay the other backing piece on top.  Pin around all edges.


Then stitch around all sides using a walking foot if you have one.  (Tip: I like to lengthen my stitches when I am working through lots of layers with my walking foot.)  Once you have stitched around all sides, clip the corners.


Now turn it right side out. Gently push the corners out.

(Again with my mess!  Goodness gracious!)

And press. I also pulled those fraying threads a little and clipped them to rough it and clean it up a little.


Put a pillow in it and enjoy!  :-)


What do you think?  Hope you like this fast and fun patriotic pillow tutorial.  If you have any questions or something just doesn't make any sense, just ask!  And if you make one, I'd love to see it - please link it up!

Thanks for stopping through!

Happy sewing!  :-)