Showing posts with label kids. Show all posts

Monday, July 15, 2013

A Finish : Tifton Tiles Scoot Edition

Happy Monday!

I finally finished this long overdue quilt this weekend ... of course, it didn't take as long to finish as I thought it would.  In fact, I quilted it and bound it in one evening.  But I am glad to have it done and will be turning it over to its owner very soon and know it will be well-loved.  :-)

The pattern for this quilt is my "Tifton Tiles" quilt.  You can find the free tutorial for turning a stack of 9 FQs into a quick and easy to piece (and generously sized - approx 49" x 59") lap quilt here.  The original was a quilt that I whipped out for a Christmas present for my mother-in-law on a short time frame.


Like the original, I quilted this one with a meandering stitch all over.  This goes pretty fast and is easy to do.  :)

I did try something new on this one ... machine binding!  Ack!  I followed the tutorial from Rita at Red Pepper Quilts.  The tutorial is really good, but its definitely something I need to practice more.  I did cut my strips 2.5" wide and used a slightly wider seam allowance than 1/4", which I usually do.
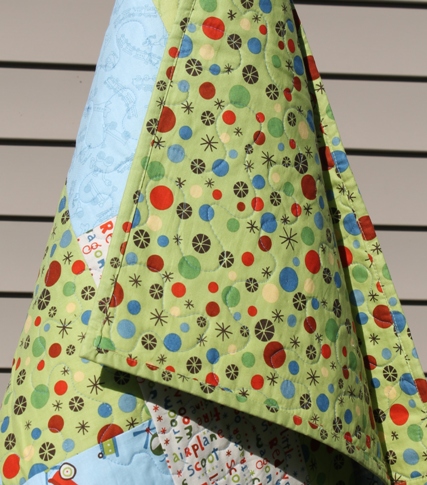

I will definitely try this again ... but I will use a LOT more pins.  I felt like I did a really good job of stitching in the ditch on the front - almost all my stitches were fairly unnoticeable.  But I definitely missed some spots (as seen on IG) that I had to go back and restitch.  It's not horrible, but its not perfect.  But about 90% was caught in the stitching the first time so I feel pretty good about that for about 225" of binding!  I think more pins might help or using some Clover clips between (or instead of) pins.  Going slow, lots of pins, using an increased stitch length and a walking foot are my best tips for you.  I might quilt up some scraps sometime to practice the corners. With all that said, there are some quilts I will likely still hand stitch the binding on, but if I get a little closer to perfect on this technique, I could definitely see myself becoming a convert.  :-)

In other news, I did take this quilt to my guild meeting yesterday and then wimped out of show-and-tell after several people shared much more intricately pieced and quilted projects.  Totally silly of me I am sure.  But after the one woman who appliqued a tree and all sorts of animals native to Australia all over the BACK of her quilt, I felt a little simple with my kid-friendly, utilitarian quilt.  After thinking about that more today, I feel even sillier.  This quilt will be no less loved (and likely more used) than those "better" quilts.  I'm promising myself not to wimp out in the future.  :-)

Happy Sewing!  :-)

Quilt Stats: 
Pattern: Tifton Tiles by me (Chrissy Lux) (free pattern tutorial here)
Fabric: Scoot by Deena Rutter for Riley Blake
Size: 49" x 59"

Tuesday, September 4, 2012

Free Pattern: Lil Monster Pencil Case

School's back, y'all!  And Halloween is just around the corner.  Are you ready?

Photo from unitednotions.com

I saw this super cute (and FREE) pattern designed by Holly Hickman at Moda's website and thought I'd share it with you. A couple of seams and a little applique and you're off!

I think they'd make great party favors too.  :-)

Download the PDF pattern here.

Happy Sewing!  :-)

Tuesday, January 17, 2012

Get Organized: Kids Arts & Crafts Hanging Pockets

This guest post is part of the Get Organized Series!
 

Hi Sweet Friends!  I'm Amy Gibson of Stitchery Dickory Dock (and most recently the host of the Craftsy Block Of The Month), and I'm so excited to be guest posting today as part of the Sew Lux "Get Organized" series!!! Goodness knows I need all the organization I can muster!

My organizational dilemma arose after Christmas, when arts and craft supplies seemed to be on the top of Santa's list in our house.  My two little girls just loooove them some craft projects, and boy did we get a ton this year.  From modeling clay and suncatcher kits, to finger paints and pipe cleaners, it's all good fun, but there was no way I was going to fit all of our new projects into the small art bin I'd been storing on a shelf in the pantry (we live in a 1930s home that's big on charm and small on space).

Say hello to my hanging door organizer!!!  With a yard of laminated fabric, a wooden dowel, and some string, I stitched up this custom pocket organizer for all of our artsy goodies.


Isn't it fun?!?  The pockets are not only functional, but also a fun way to showcase a favorite print.

Here are a few tips & ideas-

1.  Laminated fabric doesn't fray on the edges, like regular woven fabric, so don't feel obligated to turn all of the edges under!  I chose only to turn under the tops of the pockets (where they'd get the most wear), but the other 3 sides were left raw.  Plus, no pressing!  SO quick!

2.  Lay out your items onto your main piece first, to get an idea of what should go where, and what sizes you need to make the pockets.


3.  Instead of pins, try using masking tape to hold the pockets in place while stitching.  Worked like a dream for me!


4.  If your presser foot "sticks" to the laminated fabric, try putting a piece of masking tape on the bottom side of the foot to help it glide over the fabric more smoothly.

5.  Think about stitching on elastic loops for holding odd shaped items like scissors or paint jars.


6.  Get creative!  Hanging pocket organizers are perfect for toys, books, shoes, sewing supplies, makeup, jewelry, office supplies...  Totally customizable, and wipable!


Well, that just about wraps up my project!  I hope you're inspired to make a hanging organizer of your own, or to experiment with laminated fabric (or both!).  Thanks so much for stopping by!!

Amy :)