Wednesday, October 31, 2012

Design Challenge Tutorial: Mod Angles Cushion

Hi! I'm Debbie from A Quilter's Table, and I was really pleased when Chrissy asked me to join the Sew Lux Design Challenge Series! This month's fat-quarter bundle consists of several prints from Kate Spain's Serenade, one from Basic Grey's Hello Luscious (the green print), and a really lovely cross weave by Moda.


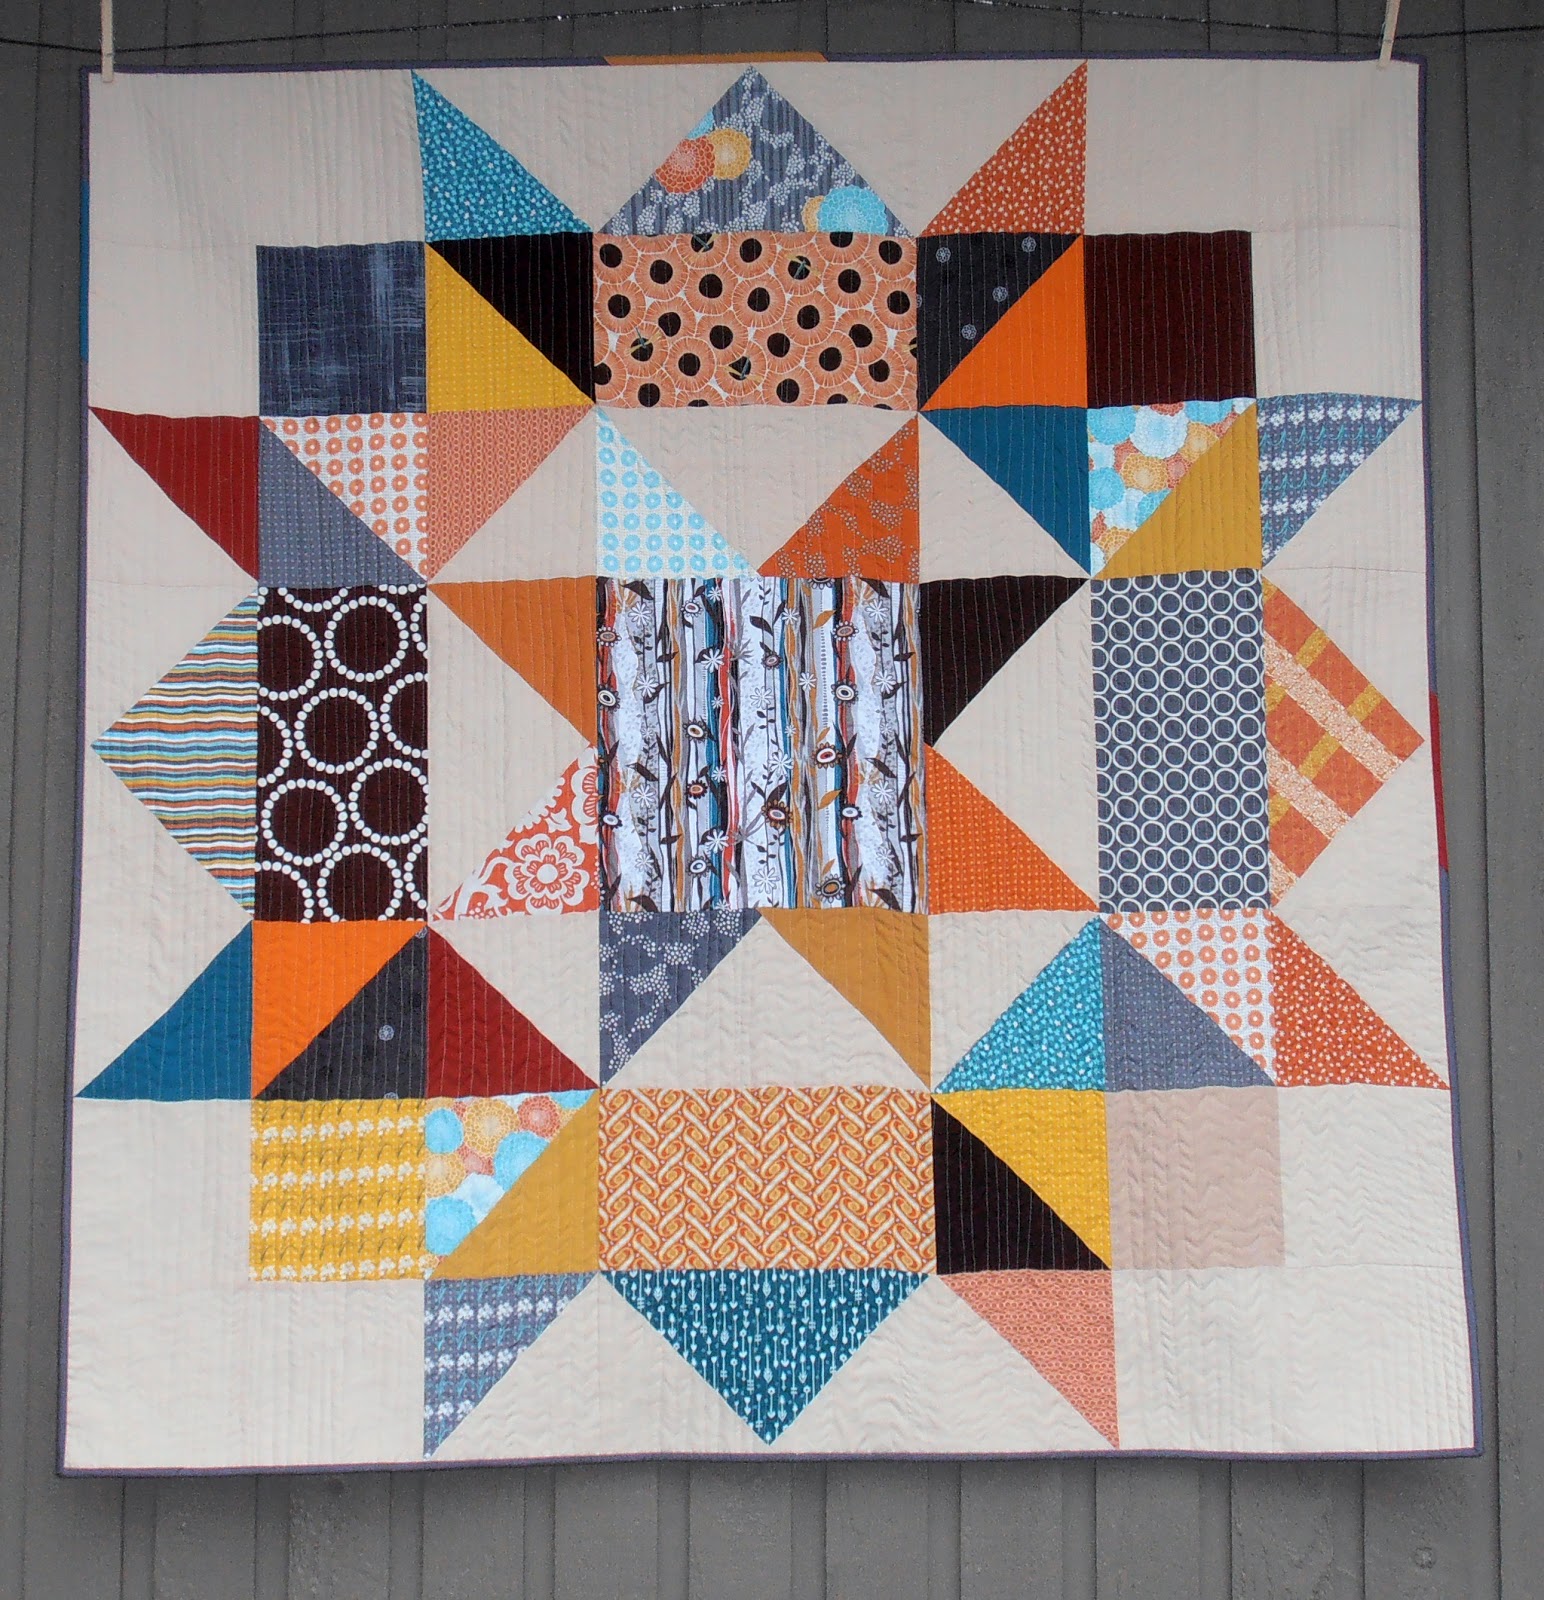
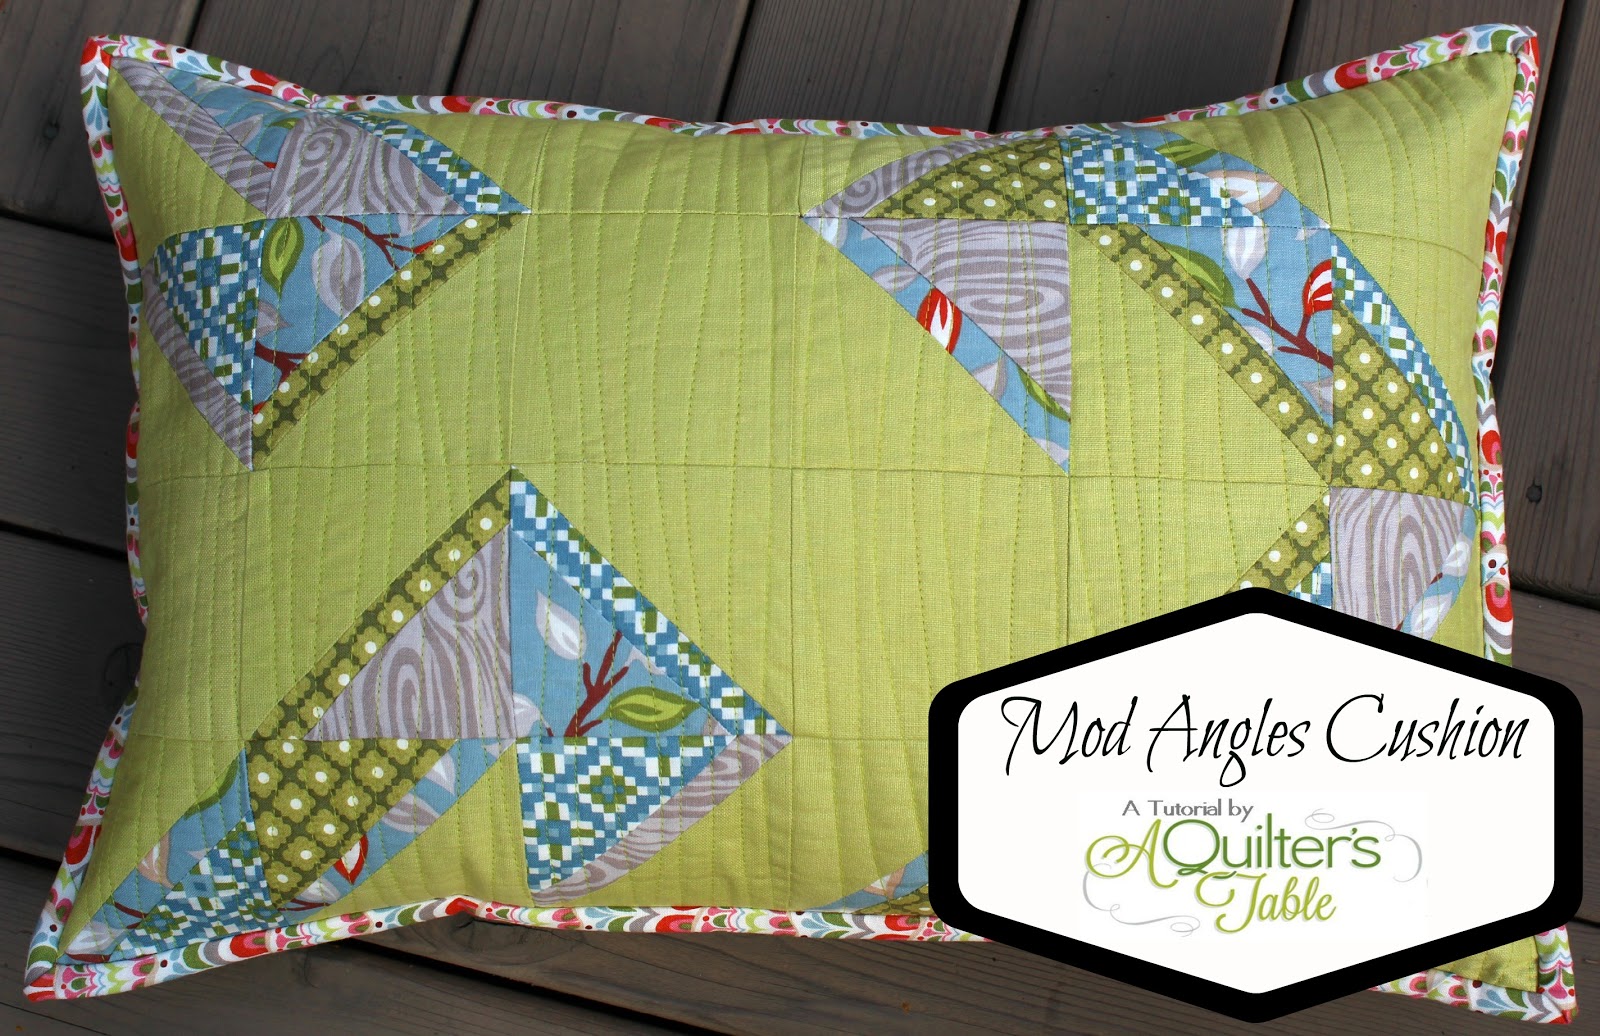
The tutorial I have to share with you is for a 12" x 18" cushion, inspired by my mini quilt, Spiraled. It uses some pretty special half-square triangles, and is quilted with organic straight-line quilting. I love the look of the binding finish, which also just happens to be one of my favorite steps in the quilting process. So let's get started on our Mod Angles Cushion!

Supplies Needed:

  • 6 fat quarters of coordinating fabric
  • 1 zipper, 16" -18”
  • 1 piece of batting, approximately 14" x 20”
  • Coordinating thread
  • 12” x 18” cushion insert

Cutting Instructions:

  • 1 - 12 1/2” x 18 1/2” rectangle for main backing fabric
  • 1 - 4” x 18 1/2” rectangle for accent backing fabric


  • Cut 4 - 2 1/4” x 21” pieces for binding, trimming at a 45-degree angle at each end. (not shown)
  • 6 - 3 1/2” squares from background fabric
  • 9 - 4” squares from background fabric
  • 9 - 4” squares from your prints
  • 18 - 3” squares from your prints for block contrasting strips


Block Construction and Cushion Front:
(Inspired by Double Flip HSTs Tutorial by don’t call me betsy.)

  • Draw diagonal line on back of 4” background squares and 3” contrasting squares. 


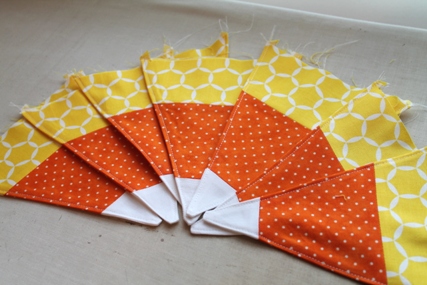
  • Layer 4” background squares on top of 4” print squares, right sides together. Sew 1/4” on either side of diagonal line. Cut on line to make 2 half-square triangles (HSTs). Press seams open.


  • On each HST, line up a 3” contrasting square on top of print corner. This time, sew ON the diagonal line of each 3” square. Trim off corner, leaving 1/4” seam allowance, and discard trimmed corner or save for another use. Press seam open.


  • Lining up diagonal line of ruler, trim HST to 3 1/2” square. Repeat to make 18 HSTs.


  • Arrange HSTs per photo, or as you wish for another cushion cover front design. Piece blocks together to create cushion cover.


  • Lay cushion cover, wrong-side down, on top of batting. Baste, either with pins or spray baste. Quilt as desired. Trim to 12 1/2” x 18 1/2”.


Cushion Back and Zipper Installation:
(Lapped Zipper technique from Erin Harris of house on hill road.)

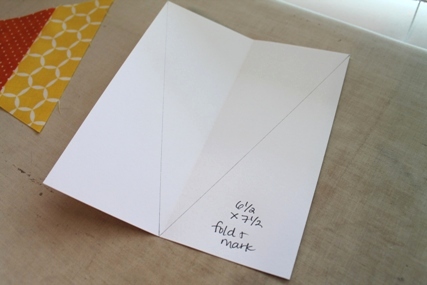
  • Place two backing pieces right sides together along one long edge. Mark a stitching line 1 1/2” in from the long edge. Center zipper down along line and mark where actual zipper begins and ends.
  • Pin fabric together, and beginning at one end of marked line, stitch with regular stitch length until you come to the first zipper mark. Back-stitch a few stitches to secure and stitch back to first zipper line. Now change stitch length to a basting stitch and sew until you reach the second zipper mark. Change your stitch length back to a regular stitch, back-stitch a few stitches, and then stitch to end of fabric. Press the seam open.


  • Fold and press fabric pieces as shown below. Mark line 1/4” away from seam towards the short edge.

  • Fold the short edge back along the line towards right side of fabric and press.


  • Line up fold along zipper teeth as pictured, centering zipper and pinning into place. Using a zipper foot, stitch along length of fold, about 1/8” from zipper teeth.


  • Flip entire piece over, so right side of main fabric is up and zipper is wrong-side up, as shown.
  • Still using zipper foot, stitch second side of zipper down.


  • Draw a line 3/4” from sewn seam, towards the main fabric piece. Stitch along this line to create lapped edge. With seam ripper, remove basting stitches to expose zipper.


Final construction:

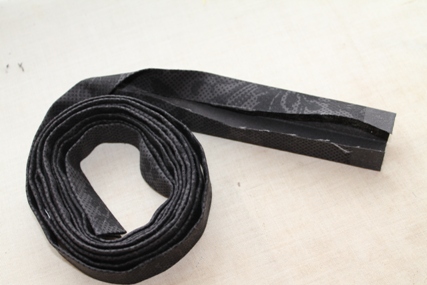
  • Make binding by sewing ends of binding strips together. Press seams open. Fold and press length of binding in half, wrong-sides together.
  • Layer quilted cushion front on top of finished back, wrong sides together. If the back is slightly larger than the front, trim it to match. Machine stitch binding around outside edge on front, raw edges matching.


  • Turn folded edge of binding to back, and hand-stitch along stitching line, to secure. Your cushion cover is now complete!


  • Insert cushion form and admire your good work!


I really enjoyed making this cushion for you, and I hope you enjoy making it too! Please share yours in my flickr group, Quilting with A Quilter's Table. I'd love to see it! And if you have any questions, feel free to email me. Thanks again!

Sunday, October 28, 2012

Weekend Sewing

Been doing a little sewing this weekend ... not too much since we traveled to a wedding out of town yesterday.  I have several friends expecting little ones soon, so I am on a mad dash to finish up some little quilts.


Fortunately, Jennie's Car Seat Quilt pattern is pretty quick to make.  Started a Bungle Jungle version ....


Finished the top today and then got all the pieces cut to a Vintage Modern version as well.  Hope to baste tomorrow.

What did you work on this weekend?

Happy Sewing!  :-)

Saturday, October 27, 2012

Design Challenge : October's Featured Blogger


We're excited to bring you another project in our Design Challenge Series, in which we ask a blogger to come up with a tutorial using 6 FQs.  Check out the previous posts here 

This month, we're welcoming Debbie of A Quilter's Table.  I've "known" Debbie for quite sometime through a charity bee called do.Good Stitches. Here's a little more about her ...


Hello! My name is Debbie and I blog at A Quilter’s Table. I live in a Seattle suburb, but love to visit the city! I’ve been quilting for over 20 years, encouraged by a friend to take a beginning quilting class so we could sew while we visited and watched our kids play. For years, I made pretty traditional, hand-quilted quilts (that was all I knew!).  A couple of years ago, I was introduced to ‘modern quilting’ and have enjoyed exploring new techniques and patterns, as well as began to do machine-quilting. Friends and family have often commented that my ‘style’ has totally changed!

What was your first quilting project?
My very first quilting project was a sampler quilt, sewn and quilted entirely by hand. In making it, I learned the basics of quilting that I depend on and continue to use in my work today.

What is your most favorite quilt block of all time?
I think it has to be Swoon. I love trying new blocks, but with Swoon, I was compelled to make it again and again, creating different sized blocks and a variety of sizes of quilts.

Read more about Debbie's Swoon Quilt here.
Photo courtesy of Debbie at A Quilter's Table.

What is your favorite color combination?
I tend to lean towards the cool colors, though I love working with orange, and more than not, adding gray to my projects.
Read more about Debbie's Scrappy Swoon block here.
Photo courtesy of Debbie at A Quilter's Table.


Where do you find inspiration for your sewing/quilting projects?
Inspiration is found in so many places! I find it in projects that I see others make, fabrics themselves, palettes in nature, the furnishings at Starbucks. It’s all around, and sometimes it just seems to appear. I really enjoy taking a block or pattern or technique, and doing something unexpected with it, making it my own.

Read more about Debbie's X and + Quilt here.
Photo courtesy of Debbie at A Quilter's Table.


Thanks so much for joining us this month, Debbie!  We're so thrilled to have you and to share your project with our readers.  :-)   We can't wait to see what you have planned for this beautiful bundle


Debbie's tutorial is coming soon to our blog and her bundle is now available (and on sale through 11/2/12) here!

Happy Sewing!  :-)


Wednesday, October 24, 2012

Customer Spotlight : Robyn of Oh So Cheeky Boutique

Hi again!  We love seeing what you're making with the fabric we mail out and I was so excited to see how Robyn at Oh So Cheeky Boutique was making with Essential Dots Orange.

Photo courtesy of Robyn at Oh So Cheeky Boutique.

Isn't this little Halloween shirt just too cute?!  Of course, anything with polka dots is sure to be a hit with me!  Check out Robyn's creations here.

Thanks, Robyn, for letting us share your project here on our blog!

If you have a project you'd like to share with us, please email us!

Happy Sewing!  :-)

Tuesday, October 23, 2012

Marmalade ...

Hey there friends!  How's your week going so far?

So excited to tell you that our Marmalade bolts have shipped and will be here on Friday afternoon!


  I just love this line and I bet you will too!  We're happy to have them available for you!  :-)


I can't wait to make this Flower Girl quilt.  Have any of you already made this pattern?

Lots of things are coming to the blog this week .... including a Design Challenge and a few other fun things.  Stay tuned!

Happy Sewing!  :-)

Saturday, October 20, 2012

TGITW!

Thank goodness its the weekend, y'all!  :-)  
Whew ... this past week was crazy.  My husband was recovering from some (minor) surgery and Linda was on vacation ... of course, all this coincided with the Anniversary Sale at the shop (ends today)!  I told Linda she owed me a trip to the Cheesecake Factory for packing all the orders by myself this week.  :-)

Anyway, I did get some sewing in last weekend just in time for the end of this quarter in the 3 x 6 Bee.  I was in the Pinwheel Hive and I decided to make up my own block for this.  I will do a block tutorial soon, but here they are ...

I am sorry the lighting was so horrible - it rained a lot last weekend.  :-/


I love the new Good Morning Honeycomb bundle and used several colors from it in my bee blocks.

That's all for now ... going to blow the dust off my machine today.  What are you working on this weekend?

Happy Sewing!  :-)

Friday, October 12, 2012

Anniversary Sale


October marks our 2nd anniversary in the fabric shop business!  Let me just say that it has been an amazing ride so far.  I will admit that it's challenging at times and we've learned A LOT about so many things.  But we love it!  We used to say "did we get any orders today?" and now we say "how many orders did we get today?"  :-)  We really do enjoy wrapping up the pretty cottons you can't wait to stitch with and sending them your way and getting to know you all in the process.

To celebrate our anniversary, we're having a little sale ... we've set up our shop to automatically deduct 15% from any order of $25 or more now through 10/20/12 - no code needed.  And if you have a Sew Lux Bucks coupon code you can use that as well!

Thanks for a wonderful ride so far!

Happy Sewing!  :-)


EPP Mug Rug

So last month I finished up a Scrappy Mug Rug swap ... I was just going through some pictures and realized that I never posted the a.maz.ing mug rug I received ...


Robyn, at Coffee & Cotton, made this awesome mug rug for me.  I love the English Paper Pieced star on this.  It's really super fun.  I admire the people who have the time (and patience) to make all those beautiful EPP blocks.  One day, I tell myself, one day.  :-)


Look at the detail on the quilting.  Goodness!  It's really so lovely.

Robyn makes some amazing things ... check out her blog here.  :-)

Happy Sewing!

Wednesday, October 10, 2012

Introducing Curated Collections

Happy Wednesday, y'all!  :-)  I hope your week is going great so far...

Today, I am really excited to share about a new series we have going on at Sew Lux Fabric.  Over the next few months, we'll be working with a couple of our blogging friends to bring you "Curated Collections" FQ Bundles.

Our "curators" have selected 8 prints to build a special, limited edition bundle. These limited-edition bundles will be introduced at the beginning of the month and will be featured at a special price until the 15th of the month.  Bundles will be available while supplies last or until the end of the month, whichever comes first!  :-)


We're excited to introduce two bundles to you this month - learn more about them, including the curator's inspiration, here.

Happy Sewing!  :-)

Tuesday, October 9, 2012

New Precuts

Hi there friends!

Just a quick post tonight to share about some new precuts that just arrived in the shop ... 


Flirt by Sandy Gervais in charm packs, jelly rolls, and layer cakes


And Kissing Booth by Basic Grey in charm packs


We also have the Crossweave in Natural in stock.  
(Our friend Jennie likes to use it in her photos - read more about it here.)

That's all for now ... I have an exciting new series of bundles I will be introducing tomorrow - see you then!

Happy Sewing!  :-)

Saturday, October 6, 2012

Customer Spotlight :: Wendy

Happy Saturday!

Today I wanted to share a project that one of our customers, Wendy of Caribousmom, recently completed. We love it when our customers email us with pictures of finished projects and we're excited to share Wendy's Garden Steps quilt with you.


Didn't it turn out just beautiful!?  You can read more about it from Wendy here.

Wendy used the Garden Steps Quilt Kit featuring Good Fortune by Kate Spain as well as the Garden Steps Perle thread kit to complete this Quilt Along project from Jennie & Clara at Clover & Violet.

Thanks so much for sharing your project with us, Wendy!

If you have a project you'd like to share with us, please email us!

Happy Sewing!  :-)

Wednesday, October 3, 2012

Butterflies

Hey there!  I wanted to share a little more of my weekend sewing from last weekend with you all ...

For our September do Good. Stitches FAITH group, we all made a rainbow assortment of these cute little wonky butterfly blocks.  They measure 6" finished and they are so fun and quick to make.


I cut all the pieces and then chain pieced them so fast.


I really can't wait to see how this quilt comes together.  Our quilt from this month will be donated to Restore Innocence and I am use it will be a blessing to a young lady somewhere.  I love that the butterfly is a symbol of a new creation as well.  So fitting.

You can see the tutorial we used for these here.  Rita from Red Pepper Quilts also has made some beautiful butterflies.  I adore this quilt she made.

Thanks for stopping through today!

Happy Sewing!  :-)

Tuesday, October 2, 2012

Candy Corn Bunting Tutorial

Hello, hello!  I am back tonight with a fast, fun and festive tutorial for you.  :-)


You will need a white solid, an orange tonal and a yellow tonal print as well as a black tonal print for this project.  A FQ each of the white, orange, and yellow and a 1/4 yard cut (9 x WOF) of the black.  Purchase a kit bundle here.


You will start by cutting the following from each print.  (For the candy corn pieces, you'll cut parallel to the long side of the fat quarter.)

  • Yellow Print: FIVE 2.5" x 21" strips 
  • Orange Print: THREE 3.5" x 21" strips 
  • White Print: TWO 2.5" x 21" strip
  • Black Print: TWO 2.5" x WOF strips

Starting with the yellow print, mark one strip with alternating diagonal lines.  One side of each rectangle should be 7" wide and the opposite side 5" wide.  Once you've marked the strip, stack all five strips and carefully cut your rectangles. You should get three angled rectangles from each strip.


Repeat the process with the orange strips  -- the long side of the rectangles should be 5" and the short side should be 2.5".  The white strips you will be cutting triangles as shown below with the bottom of the triangle being 3" wide.  (I cut mine 3.5 but 3 will line up better!)


Next, chain piece your rectangles together - starting with the orange and yellow.  Then adding the white.


Press seams open. You need 14 pieced triangles.


Next, cut a paper rectangle 6.5" x 7.5" and fold in half.  Draw lines to create a triangle for your pennant template.


Pin two pieced triangles right sides together, matching the seams as closely as possible.  Lay the paper template on top and trace the template onto the triangle.  (Line the template up with the top of the yellow strip.)


Next, you'll stitch 1/4" seam on the INSIDE of the template lines.


Trim along the line, grading the seam a little closer to the stitching on the white portion of the triangle.


Turn the triangles right sides out and carefully push out the point at the bottom.  Press.  (Tip: I like to use a bone folder tool to push out the corners and points since it isn't sharp.)


Carefully top stitch 1/8" from the edges along each side, pivoting at the point with your need down. Trim each triangle to the same size.  Mine were 6.75" tall.


You should have 7 total candy corn flags.  Aren't they cute?!


We're almost done ... let's finish it up.  Piece the two long black strips together end-to-end as you would binding.  The fold in half lengthwise, pressing as you go.  The press the sides into the center.


Find the middle of your black binding strip and place a flag in between the layers.  Pin in place.


Add three flags on each side of the center flag ... spacing them about 3 inches apart. Keep pinning to keep everything in place.


At the end of the binding strip, fold the edge in to tuck away the raw edges.

Start at one end of the binding strip and stitch across the short side, backstitching to secure the thread. Pivot at the corner and stitch along the edge - about 1/8" in.


Keep stitching the length of the bunting. Finish the end like you started at the opposite end of the bunting.


Press your bunting when you are finished and enjoy!


I might have squealed when I hung this.  


It was raining a lot here this weekend so I apologize that some of my photos are a little dark. If you have any questions, please email me or leave a comment. If you make a bunting, I'd love to see it - please link it up!

Happy Sewing!  :-)