

I've had this idea for several weeks and am so glad I was able to get this done! It was super quick to whip up and I hope you'll have fun with it too. The best part is that everyone's will be a little different - just like how snowflakes are all unique!
If you are a Moda FQ Club subscriber with us, you received this kit free with your December bundle. Need a kit? We have a couple available here - while supplies last.
For this project, you will need the following:
- 1/2 yard Lightweight interfacing
- 1/2 yard grey Ombre Fabric (I used V & Co's ombre solids)
- 1 FQ Snowflake tonal print *
- 1/4 yard grey solid * (Bella Solids Graphite)
- 2 - F8 of white-on-white tonal prints (I used Muslin Mates)
* I decided to make a pillow with my kit and used the snowflake print for the pillow back. If you prefer to make a mini, you can use the snowflake print for the backing and then bind with the 1/4 yard solid grey. I didn't use the 1/4 yard solid as I did not add a binding to my pillow.
You will need one 20 x 20 piece for the pillow front backing.

Cut a few different size squares of interfacing and white tonal prints. Adhere interfacing to your white tonal prints - place the bumpy/rough side of the interfacing on the wrong side of your fabric and press it well.

Now, cut your snowflakes however you want to. If you have older kiddos that you trust with scissors, this is a good time to get them involved.

From your half yard of the ombre stripe, cut three 3.5" wide x WOF strips. Sub-cut each strip into twelve 3.5" squares. Mix 'em up.

Stitch the 3.5" squares into six rows of six squares. I just randomly pieced them back together, but feel free to be as deliberate as you like with your placement. :-) Once you've pieced all the rows, arrange them as you like and press each row in opposite directions so they will nest well at the seams when you join the rows.

Piece the rows of 6 squares together into a 6 x 6 block square as shown below.

Make a quilt sandwich with your pillow top, batting, and some backing (I just used some plain solid since it won't be shown). Then quilt as desired and trim to 18.5" x 18.5".

To attach my snowflakes, I just continued on with my free motion foot. You could also use a walking foot, but it would be a lot of turns and in a small area, I felt comfortable enough with this foot to go around the cut outs free motion style. :-) Stitch about 1/8" from the edges to secure the snowflakes.
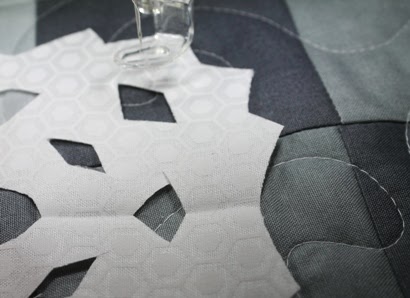
It is kind of hard to see in this photo, but I went around the entire outside of the snowflake as well as around all the cut outs to secure it to the backing.

Continue until you have all the snowflakes arranged as you like.

I made the back similar to the way I made the one in my last pillow tutorial. I used some leftover ombre with the snowflake print FQ to piece the two flaps.

I really love how this pillow turned out. I think it would be fun to do a variation with a scrappy red background too!
If you make a snowflake pillow, I hope you'll share the link - I'd love to see it!
Happy Sewing! :-)
Darling pillow!
ReplyDeleteThis is so fun!
ReplyDeleteGorgeous cushion! I've been hosting a Cushion for Christmas blog hop the past two weeks and the linky is now open! Feel free to share! x
ReplyDelete