
I am excited to share a fun new mini quilt tutorial with you today. Consider this tutorial as a teaser for our big Christmas in July Tutorial Series next week!
This mini comes together in practically no time with simple piecing and a little bit of fabric. We have a limited number of kits available in our shop. Basically, we'll make a center and add three borders.
Supplies Needed:
1 Solstice Mini Charm Pack
1 Fat Eighth blue/grey print
1/4 yard Red Print for outer border and binding
1 FQ backing
Small piece (5") square of lightweight fusible interfacing
Batting (approx 18 x 18")
Basic Sewing Supplies (thread, machine, ruler, scissors, etc)
TIP: Read the tutorial and then layout your squares as you like... Then sew!
Step 1: Make the Wreath Center
Make a four patch of white/cream squares.

Cut one green 2.5" square into four 1.25" squares.

Place one square in each outer corner of the cream four patch right sides together and sew along the diagonal. Trim seam allowance to 1/4" and press away from the center. Set aside the completed center piece.

Step 2: Make the Wreath Border
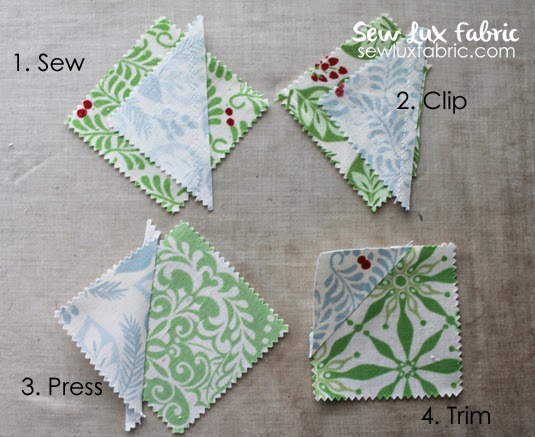
Cut 2 blue/grey squares in half on the diagonal to make four triangles.

Place each half on a green square as shown in the photo below - with the straight sides of the triangles about 1/2" from the edges of the green squares.

Sew 1/4" seam along the diagonal edge. Trim excess and press toward the blue/grey. Trim to 2.5" square. These will be the wreath corners.
Next, sew four pairs of green squares together.

Sew a pair of green squares to the left and right sides of the wreath center. Then sew a wreath corner to each side of the remaining two pairs of green squares to make two sets of 4 squares. (Reference photo below.) Sew the these two rows to the remaining sides of the wreath center to complete the wreath border.

Step 3: Make the Background Border
From the blue/grey background fat eighth, cut two 2.5" strips. From one strip, subcut to get four 2.5" squares. From the other strip, subcut to get four 2.5" x 4.5" rectangles.

From remaining blue/grey mini charm squares, sew together four pairs of two squares.

Add one background square to each side of two pairs of mini charm squares.
Add one 2.5" x 4.5" rectangle to each side of the remaining two pairs of mini charms.

Sew the two shorter strips (square + pair + square) to opposite sides of the wreath. Press away from wreath. Sew the two longer strips (rectangle + pair + rectangle) to the remaining to sides of the wreath to complete the background border. Press away from the wreath.
Step 4: Make the Outer Border
Sew four sets of 3 red squares together.
From the red 1/4 yard border fabric, cut one 2.5" strip. Subcut to get the following: FOUR 2.5" x 3.5" rectangles and FOUR 2.5" x 5.5" rectangles.

Add one 2.5" x 3.5" rectangle to each side of two sets of mini charm squares.
Add one 2.5" x 5.5" rectangle to each side of the remaining two sets of mini charm squares.
Attach this border as you did the previous one - add the two shorter strips first, then the longer ones.
Step 5: Put a Bow on It
Draw a bow shape and trace it onto the back of a scrap of interfacing. Fuse the interfacing to the wrong side of red fabric. Cut out the bow and zig zag stitch around the edge to attach to the pieced top.

I added tails first, then the bow. (Kits include a template.) The top of the bow is one piece, but I stitched the center to look like a knot.

Step 6: Quilt the Mini
Press the top well and layer with batting and the backing fat quarter. Baste and quilt as desired.

Trim to 16.5" x 16.5" square.
From the border/binding print, cut two 2.5"-wide strips and join together at two short ends to make one long binding strip. Press binding in half lengthwise, wrong sides together. Attach and finish as desired. See more on binding here.
You're finished! Enjoy our new mini! :-)

Hope you enjoyed this tutorial! If you make one, tag me on Instragram (@sewlux and #isewwithsewlux) or link your post in the comments!
Happy Sewing! :-)
I love it!! So cute!
ReplyDeleteThis is wonderful! Thank you!
ReplyDeleteVery cute!
ReplyDeleteSuper cute. Thanks for the tutorial.
ReplyDeleteWhat ad adorable block!! Thanks for the delightful tutorial!
ReplyDeleteSusie
Such a gorgeous block.Thanks!!
ReplyDeleteThis is so cute Chrissy!! I adore the fabrics, might have to get some!!!
ReplyDeleteIt looks great, I'm pinning this!
ReplyDeleteThat is really cute. Thanks for sharing this
ReplyDeleteThis is great! I've been making mini's this year to practice my FMQ and look forward to making this one now. Thank you!
ReplyDelete~Brandy
pamperedpettit.blogspot.com
I don't have mini charm pack but it looks nice. I might just chop something from my stash :-)
ReplyDelete