Saturday, February 14, 2015

Flash Sale - Ends Sunday 2/15

With so many new bolts arriving this past week and next, we're out of space!  So, we're having a quick weekend sale to make a little room for all the new lovelies!


Save 15% on everything in the Sale Section with coupon code FLASH15 now through Sunday, 2/15/15.

Tuesday, February 10, 2015

Daysail by Bonnie & Camille

Hey all you B&C fans out there!  I am ridiculously excited to announce that our Daysail yardage has shipped and will arrive on our doorstep on Friday! 


Since they are en route, we've added yardage, bundles, and single FQs to the shop.  We'll cut orders with Daysail over the weekend to ship out the beginning of next week.  If you preordered a bundle, these will be cut and shipped first. :)

This collection has some great prints in it ... including stripes, dots, sail boats, florals, and not to be missed text prints!


I loved making my Nova Tote for the Sewvivor contest with a layer cake that I was lucky enough to get a little early!

Happy Sewing!  :-)

Friday, February 6, 2015

Smitten Quilt Along : Large Block One

Hey everyone!  I hope you are ready to sew some hexagons together!

For more details on the Smitten Quilt Along, visit this post here for dates and supplies, etc.  If you haven't purchased templates, go ahead and make your's using the pattern and template plastic or other material of your choice.  (Be sure to add the seam allowance if making your own templates.)


This month, we're tackling the Large Block One.  This is probably where you will want to fussy cut your favorites!  I consider this the showpiece block for this quilt. There are a lot of pieces in this one, so it may be worth it to cut and piece several at a time after you get the first one under your belt!  :-)

Grab your pattern, templates and marking pen and select your favorite prints!  Following the pattern, cut out all the correct pieces needed for the block.  Update:  Pattern Error -  Someone commented that there is an error in the cutting directions for this block.  You need to cut piece "D" instead of "B" based on the printed templates in the pattern.  Since I used acrylic templates, I just followed the pattern diagrams and did not notice the misprint initially. 

(Cutting TIP:  If you are using the Marti Michell templates and don't need to fussy cut, follow the directions included with the templates for cutting from strips to make quick work of your cutting.)

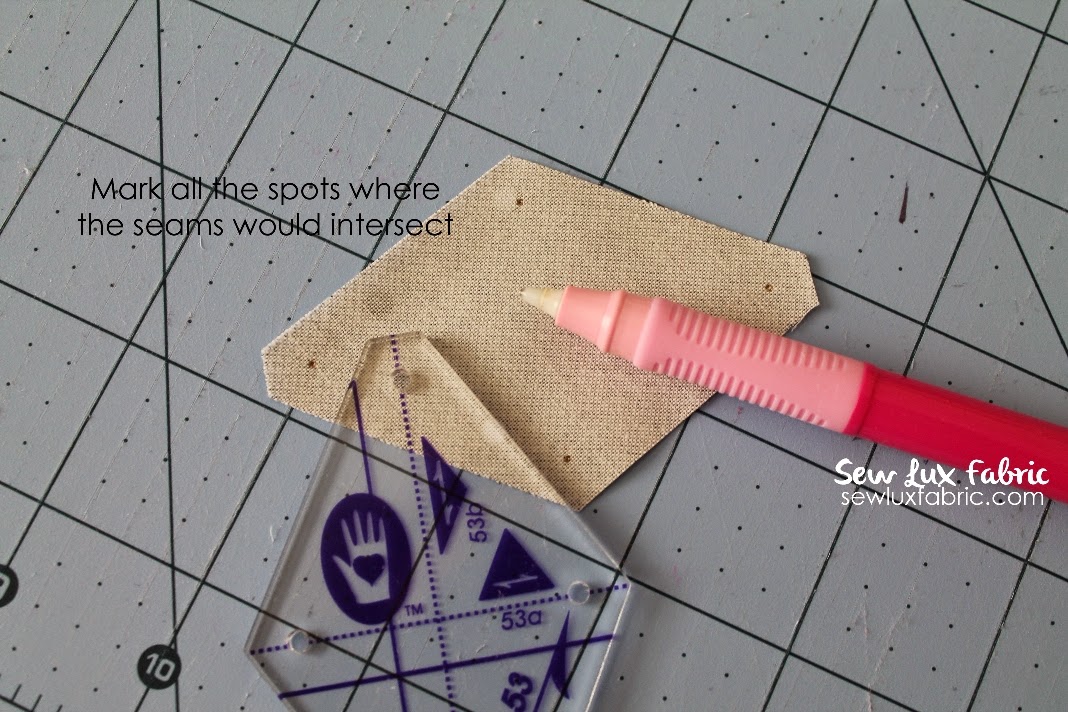
Mark the wrong side of your fabric pieces with dots where the 1/4" seams would meet.  (The acrylic templates have holes, making this super easy!) Alternatively, you could use your ruler and pen to draw lines along the seam allowances to mark your start and stop points.

We'll use these dots as our start and stop points for sewing. Sew a 1/4" seam and always backstitch to secure, but don't sew past the dots, unless we are sewing to the edge.  (You'd sew to the edge when the seam is not part of a Y-seam intersection... this will hopefully make more sense in pictures below.)


Here's how I machine-pieced mine together...


I worked in segments to build the border around the main center hexagon.  To try and sew more efficiently, I prepped and then sewed all the same seams for each of the six segments at the same time.

I'll refer to the blue diamond as the center and the yellow and pink pieces as the sides.  Pin or glue baste and then join the top and bottom side pieces by sewing from the inner dot all the way to the outer edge.  Complete this on both sides, remembering to start sewing at your dot (1/4") from the edge where the side pieces will join the center diamond.


Next join the side piece to the center diamond.  Pin or glue baste to keep things in place.
To glue baste, draw a thin line of glue about 1/8" from the edge.  This should be inside your seam allowance. Be careful not to glue all way into where the Y-seam will be.  Lay the fabrics right sides together and carefully press to heat set the glue.  Then go ahead and glue or pin down the next seam.


You'll need to shift the fabrics a little as you line up the pieces. It should look like this ...


Head over to your machine and sew the pieces together.  Start at the joint in the Y-seam and begin at your start dot, being sure to move the other pieces out of the way.  Sew all the way to the edge.


Complete each seam to join the center and outside pieces.


Next, join the left side diamonds in the same manner to get a completed segment.  Make six segments.


Next, we'll join the segments of the border to the center hexagon. I chose to join two sets of three segments. You'll start at the dot on the inside of the segment border and sew to the outer edge.


Then join the segments to the center hexagon. Pin or glue base in place.  If glue basting, be careful not to glue all the way into the Y-seam, as we will need to shift the fabric around to sew the seam. Sew all seams from dot-to-dot (not all the way to the edge!).


Sew both sides on and then join the border by sewing the final two seams. You'll sew from the dot (inside of the border) all the way to the edge of the border.


Carefully press your block and admire your work!  :-)


Now plan and sew four more ... you need 5 completed Large Block Ones.

I hope these photos were helpful to you...  I can't wait to make a few more myself and to see your's too! Don't forget to use #smittenquilt and #smittenquiltqal on Instagram. :-)

If you have questions, leave a comment, email me or tag me on IG!

Happy Sewing!  :)

P.S. Learn more about glue basting from my friend Cristy here.

Monday, February 2, 2015

Gene Pool Quilt : Rowing Right Along

At the end of the year, I started the Gene Pool quilt by Jen Kingwell.  I started with a few scrap bags from Fig Tree collections and quickly realized I was short on fabric to make this big enough.  (I had to downsize the pattern slightly based on the width of strips I was starting with ...)

I put out a call to my IG friends and several offered to help by sending fabric to help me finish so this was on hold for a bit while I waited on some fabric to wing its way around the world. (Quilters really are some of the best people I think.)

Anyway, I've been plugging away at this a little bit each weekend and so far I love how its turning out!  Here's where I am at the moment ...


I still have several rows to finish and have found that assembling these in pairs of rows has worked out great for me. (I have a few pinned on top of each other in the middle in this photo.)  I think I am about 2/3 of the way finished with this one.  :-)


This pattern is really pretty easy and is really fun to play with your layout of prints and colors.  It's really a great jelly roll-friendly pattern!

I'll keep you posted on this one as I go.

Happy Sewing!  :-)


Friday, January 30, 2015

New Cotton + Steel : Mochi & Playful

Happy Friday everyone!

We're so excited to finally have Mochi by Rashida Coleman-Hale for Cotton + Steel in the shop!


The collection is full of fun prints in gorgeous colors!

We also have some Playful by Melody Miller as well ... including the highly sought after Viewfinders print!

Happy Sewing!  :-)

Tuesday, January 27, 2015

The Smitten Quilt Along : All the Details

When I went to Fall Quilt Market back in October, one of the quilts that I was most excited about was the Smitten Quilt by Lucy Kingwell for Jen Kingwell Designs.  Lucy is Jen's daughter and the talent for beautifully hand-pieced and quilted scrappy quilts run in the family!


The Smitten quilt is 48" x 61" but you can make it larger if you want my adding additional blocks. 
The quilt looks really complicated, but like any big project, you should "eat the elephant one bite at a time" so to speak. :)  Ultimately, it is made up of a lot of pieced hexagons all hooked together.


I played around with the pattern and templates the other day and shared on IG.  I pretty much loved the opportunity to fussy cut some things and this is a great scrap buster project.  And so I decided to host a quilt along ... want to sew with me?

Materials Needed: 
  • The Smitten Pattern - Lucy Kingwell 
  • 4-4.5 yards total for blocks
  • 1/2 yard for setting triangles (down the sides of the quilt)
  • 5/8 yard binding 
  • 3-5/8 backing fabric
  • Template plastic OR Marti Michell Set H acrylic templates 
  • Marking pen 
  • Pens or Glue Tips for glue basting
You can find patterns, acrylic templates, and pens here in our shop. (Note - if these sell out quickly, we'll update them to "presale" so you can go ahead and order and we'll ship when they come in as we have additional templates on order.) 

This quilt can be pieced by hand or machine.  I'll be piecing by machine. :-) 

A Word about Templates: 

There are drawings in the pattern that you can trace onto template plastic to make your own cutting templates for the pieces we will need.  If you make your own, don't forget to add the 1/4" seam allowance. 

Personally, I am using the Marti Michell templates for a number of reasons.  First, they are already made and include the seam allowance!  Second, I really can't say enough about the directions and diagrams included with these templates.  Rotary cutting from strips, other quilt patterns, sewing hexagons tips, and more.  A really great resource.  Thirdly, there are lines on the templates showing the middle so it makes it easy to center motifs if you are fussy cutting.  And finally, the predrilled holes make marking your start and stop points so fast, accurate, and easy ... and when combined with the clipped corners, lining everything up is a breeze.  

Don't Fear the Y Seams: 

This quilt uses Y-seams for construction of the blocks.  This doesn't have to be scary!  It's a little tedious, but if you cut and mark your pieces well and can sew an accurate 1/4" seam to connect the dots then you are good to go!  (Here's a tutorial I did piecing hexagons by machine.)  You can totally do it!  :) 

Quilt Along Schedule: 

We'll kick this awesome project off in February and sew together for about 8 months ... finishing before the holiday sewing madness! :)
In February, we'll tackle Large Hexagon One which is probably the most tedious to piece.  BUT it does give us opportunities to fussy cut and will likely be some of the blocks you build the rest of the quilt on ... so we'll knock them out first!  If you need to make some in February and some later in the quilt along its totally fine!  :)

Also, in months where we'll make large and small hexagons, we're essentially making the same block in two sizes, so I've grouped them together. 

Help Along the Way: 

On the 6th of the month (hexagons have six sides, so hopefully that is easy to remember!), I will post here on my blog some tips for piecing that month's blocks.  I won't be sharing the pattern or cutting measurements.  But I will share some step by step photos for getting the blocks together. I'll also share my progress here and on Instagram and hope you will too!  Use #smittenqal and #smittenquiltqal !

Who's ready?!

Hugs & Kisses Mini Quilt

I had a really fun day sharing on the Moda Bake Shop Instagram account and closed my Tuesday Takeover with a picture of this fun mini...


A few people were interested in the tutorial, which you can find here.

Happy Sewing!  :-)