Monday, July 21, 2014

Christmas in July Project Link Up

Our Christmas in July Series is in full swing!

We're all about getting a head start on all that holiday sewing!  My goal is to not be sewing a binding on Christmas morning this year!  :-)

We'd love for you to link up your completed projects for a chance to win some fun prizes, including a gift certificate to Sew Lux and some May Chappell patterns! Learn more about the prizes here.

Here are the rules for entering the linky contest:

  • Your completed project should be from one of the tutorials from our series this week.  We'll have 9 different projects over the course of the week, so there's sure to be something for everyone!  (You can use one of our fun bundles or your own stash.)
  • One entry per person (Make more than one thing?  Write them up in one post for the linky entry.)
  • Have fun sewing!
Link Up Closes 8/4/14.

Happy Sewing! :-)


Sunday, July 20, 2014

Sewvivor - Sew Lux

Have you seen the buzz about the Sewvivor competition hosted by Rachel at Family Ever After?  I've been back and forth about entering and finally decided to go for it!  And regardless of whether I make it into the competition, I will definitely be following (and sewing) along!

So, what's "Sewvivor?"  Well, its kind of like the reality show, only the challenges aren't standing on a pole over a mud hole for whoever can last the longest ... its all quilting related!  Truth be told, I used to watch the show religiously in college and even helped my roommate make her contestant entry video!

This year, its all about the quilting and there are four different challenges with some twists and turns here and there and it sounds like so much fun.  I've even been sketching up some ideas for what I might make to stay alive!

But first, here's my entry ...

I had two different options for what I feel like are my favorite quilting projects.  But in the end, my first Amy Butler Weekender Bag won out.

The pattern sat in my sewing room for several years ... all that interfacing and the horror stories were a little scary!  But seeing some friends make them at retreats, I figured "hey, I can do this."  I knew that I wanted to quilt the panels, but QAYG seemed like it would take forever and I really wanted to piece them.  And then Camille started introducing the mini quilt patterns.


If you know me, you know I love pink, aqua and a good black & white low volume (especially dots), so the fabric choices were easy.  I pieced a mini Swoon and then a mini Spool ...


And then a little economy block (since that was also all the rage on IG at the time)...


And did a little subway tile pattern for the back pocket.

All the panels and pockets were quilted and I have to admit that I carried this around the house from room to room after finishing it just so I could keep looking at it!

Making a bag like this was challenging and I learned a lot.  The piping, the zipper, the importance of the jeans needle.  Lots of new techniques to practice in this one.  And I loved it ... except for sewing on that second side!  I've even made a second one since!

Fortunately, I was able to take some glamour shots in Hawaii a few weeks after finishing.  (Tough, right?!)

So there you have it ... my entry for Sewvivor!

Thanks for stopping by and good luck to everyone!

Happy Sewing!  :-)


Shop News - Cotton + Steel and New Precuts!


Hey there!  Hope you've all had a great weekend!  I've been sewing up a storm for our Christmas in July series and am looking forward to sharing some great projects with you this week!


A few quick updates if you haven't heard yet ... 


Cotton + Steel Basics are here - yardage and bundles!


And a fresh bunch of new precuts just showed up, including some great collections we saw (and loved!) at Market! 


And save 10% on all Christmas yardage, bundles and kits this week! 

See you tomorrow for the start of the Christmas in July tutorials! 

Happy Sewing! :-) 

Wednesday, July 16, 2014

New Bloc Loc Favorites

Hey y'all!

You know I love the Bloc Loc rulers and when we went to market we saw a few new rulers that we had to have - the Half Rectangle Triangle and the Cogwheel Ruler.

Basically, I totally fell in love with this quilt that was hanging in the booth ...


I am trying to get my hands on the pattern for it.  BUT, I did get to play around with the Cogwheel ruler last weekend and came up with this ...


Super fun and fast to make using strips.  I watched the YouTube video and the directions are also included in this 2-ruler set.

I am planning a few block tutorials for after our Christmas in July series next week. :-) The possibilities are endless!!!

Happy Sewing! :-)

Monday, July 14, 2014

Tutorial : Mini Charm Wreath Tutorial

Hey there!

I am excited to share a fun new mini quilt tutorial with you today.  Consider this tutorial as a teaser for our big Christmas in July Tutorial Series next week!

This mini comes together in practically no time with simple piecing and a little bit of fabric.  We have a limited number of kits available in our shop.  Basically, we'll make a center and add three borders.

Supplies Needed: 
1 Solstice Mini Charm Pack
1 Fat Eighth blue/grey print
1/4 yard Red Print for outer border and binding
1 FQ backing
Small piece (5") square of lightweight fusible interfacing
Batting (approx 18 x 18")
Basic Sewing Supplies (thread, machine, ruler, scissors, etc)

TIP:  Read the tutorial and then layout your squares as you like...  Then sew!

Step 1: Make the Wreath Center
Make a four patch of white/cream squares.


Cut one green 2.5" square into four 1.25" squares.


Place one square in each outer corner of the cream four patch right sides together and sew along the diagonal.  Trim seam allowance to 1/4" and press away from the center.  Set aside the completed center piece.


Step 2: Make the Wreath Border

Cut 2 blue/grey squares in half on the diagonal to make four triangles.


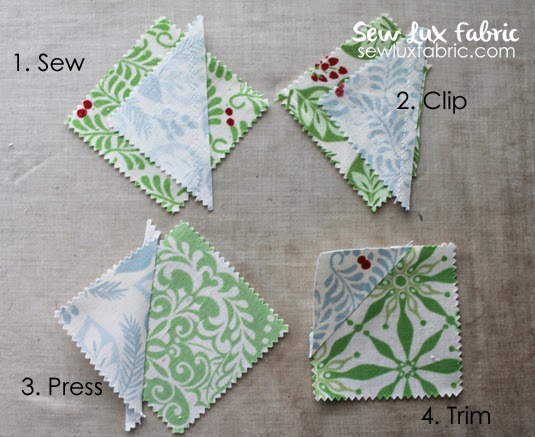
Place each half on a green square as shown in the photo below - with the straight sides of the triangles about 1/2" from the edges of the green squares.


Sew 1/4" seam along the diagonal edge. Trim excess and press toward the blue/grey.  Trim to 2.5" square. These will be the wreath corners.


Next, sew four pairs of green squares together.


Sew a pair of green squares to the left and right sides of the wreath center.  Then sew a wreath corner to each side of the remaining two pairs of green squares to make two sets of 4 squares. (Reference photo below.)  Sew the these two rows to the remaining sides of the wreath center to complete the wreath border.


Step 3: Make the Background Border 

From the blue/grey background fat eighth, cut  two 2.5" strips.  From one strip, subcut to get four 2.5" squares.  From the other strip, subcut to get four 2.5" x 4.5" rectangles.


From remaining blue/grey mini charm squares, sew together four pairs of two squares.


Add one background square to each side of two pairs of mini charm squares.
Add one 2.5" x 4.5" rectangle to each side of the remaining two pairs of mini charms.


Sew the two shorter strips (square + pair + square) to opposite sides of the wreath.  Press away from wreath.  Sew the two longer strips (rectangle + pair + rectangle) to the remaining to sides of the wreath to complete the background border.  Press away from the wreath.

Step 4: Make the Outer Border

Sew four sets of 3 red squares together.

From the red 1/4 yard border fabric, cut one 2.5" strip.  Subcut to get the following:  FOUR 2.5" x 3.5" rectangles and FOUR 2.5" x 5.5" rectangles.


Add one 2.5" x 3.5" rectangle to each side of two sets of mini charm squares.
Add one 2.5" x 5.5" rectangle to each side of the remaining two sets of mini charm squares.

Attach this border as you did the previous one - add the two shorter strips first, then the longer ones.

Step 5:  Put a Bow on It

Draw a bow shape and trace it onto the back of a scrap of interfacing.  Fuse the interfacing to the wrong side of red fabric. Cut out the bow and zig zag stitch around the edge to attach to the pieced top.


I added tails first, then the bow.  (Kits include a template.)  The top of the bow is one piece, but I stitched the center to look like a knot.


Step 6:  Quilt the Mini 

Press the top well and layer with batting and the backing fat quarter.  Baste and quilt as desired.


Trim to 16.5" x 16.5" square.

From the border/binding print, cut two 2.5"-wide strips and join together at two short ends to make one long binding strip.  Press binding in half lengthwise, wrong sides together.  Attach and finish as desired.  See more on binding here.

You're finished!  Enjoy our new mini! :-)


Hope you enjoyed this tutorial!  If you make one, tag me on Instragram (@sewlux and #isewwithsewlux) or link your post in the comments!

Happy Sewing! :-)

Sunday, July 13, 2014

Sewing Stuff Together

I've become an Insta-sewer as opposed to a blogger.  I'm sorry about that - Instagram is just so easy! 

Anyway, I wanted to share a recent finish with you all ... the Sew Together Bag by Sew Demented!


This is actually my 2nd attempt at this bag and I already have two more in the works with plans for another two.  They are addicting and you have so many options with fabric placement to make them different.


Admittedly, there are some steps to this bag that scare some folks... zippers mainly.  I would classify this as appropriate for a confident beginner.  With that said, there aren't a lot of step-by-step pictures so you do have to read carefully.


Since I was making this second one for my friend, Sarah at Stitching and Bacon, I took it up a notch and pieced the outside in a mini sparkle punch pattern.  I totally love it. 


She is into cat fabric ... so I fussy cut the tabs just for her.


For the inside, I used some metallic birds, some cats, and some of a favorite text print and Carolyn Friedlander Botanics fabrics. 


I really love it.  Did I mention that?  

My next one uses Bliss by Bonnie & Camille ... I offered to make our Moda Rep a bag and she handed me like 10 fat quarters of Bliss ... and then said I could keep the scraps.  (I think I got the better end of that deal!)  I'll share that later this week... 

See you tomorrow with a brand new holiday mini tutorial!  

Happy Sewing!  :-) 

Monday, July 7, 2014

Christmas in July Series

Happy Monday!

We're thrilled to announce our Christmas in July Series today! We had a great time with this last year and we have some great things planned for this year's series as well!

While the holidays arrive at the same time each and every year, it never fails that they seem to sneak up on so many of us.  Our goal with this series is to help you get a jump on your holiday sewing by sharing tutorials as well as providing an opportunity to link up your projects and win some great prizes !  Like last year, we've enlisted the help of some friends who will be working with one of six different Christmas in July bundles and preparing a fun holiday tutorial for the series.


With bundles from designers like Kate Spain, Basic Grey, Gina Martin and more there's something for everyone!   And this week you can save 10% on all of our featured Christmas in July Bundles with coupon code NICELIST.  Offer ends 7/13/14.

Here's our Schedule of Events for the Series: 

  • July 7th - Series Announcement & Bundle Sale 
  • July 14th - Solstice Wreath Mini Tutorial (See that cute wreath in our series button image? We'll show you how to make it here on the Sew Lux Blog!)
  • July 21st - Sewing with Winter Wonderland - Lee of May Chappell
  • July 22nd - Sewing with Be Jolly - Chrissy of Sew Lux
  • July 23rd - Sewing the Folk Art Holiday - Sarah of Stitching & Bacon AND Megan of Quilt Story
  • July 24th - Sewing with 25th & Pine - Tessa of The Sewing Chick AND Tracey of traceyjay quilts
  • July 25th - Sewing with Solstice - Christen of Love by Hand AND Stephanie of Quarter Incher
  • July 21-August 4th - Linky open to link up your projects
  • August 5th - Winner Announced
Sew with Us! 
To encourage you all to also get a start on your holiday sewing, we're offering up some prizes!  All you have to do is make a project using one of the tutorials from the series and link it up by August 4th!  You can use a bundle or fabric from your stash - it only has to use one of our 9 tutorials from this series! 

Prizes
There will be two winners chosen at random and announced on August 5th. International friends are welcome to participate - your prize will be included with your shipment upon redeeming your gift certificate.
  • Grand Prize: $50 gift certificate to Sew Lux Fabric, a set of 6 You're Sew Nice cards, and an assortment of three patterns by May Chappell 
  • 1st Prize: $25 gift certificate to Sew Lux Fabric, a set of 6 You're Sew Nice cards, and a pattern by May Chappell
Who's excited?!

Happy Sewing! :-)